Tuesday, December 29, 2009

Selecting and Copying Graphic Images


You use the Select Image tool, located at the bottom of the Selection toolbar menu on the Basic toolbar, to select individual graphic images for copying. When you choose the Select Image tool, the mouse pointer becomes a crosshair that you use to draw a bounding box around the graphic. After you’ve enclosed the entire graphic (and you don’t have to worry if your marquee is a little larger than the image borders), you can copy the graphic to a new document open in another program either by copying it to the Clipboard (Edit➪ Copy) or by dragging it to a new document window. Note that if your PDF document is tagged, you can simply click an image with the Select Image tool to select a graphic object.
Keep in mind that when you copy images to the Clipboard, Acrobat uses the graphics resolution of your monitor and that set for the Clipboard by your computer’s operating system, rather than the resolution of the images as saved in the PDF document (which could well be a lot higher than either of the two). Also, be aware that all images you copy into the Clipboard are automatically converted onto the Clipboard as pixels, even if they are saved as vector (or line) graphics in the PDF file.

Copying PDF tables into word processors and spreadsheets

The Select Table tool makes it a joy to copy tables from PDF files into wordprocessed documents or spreadsheets.
Microsoft Word automatically recognizes and preserves the table structure by creating a new Word table. Even more importantly, Word has maintained the number formatting as well (indicated by the dollar signs, commas, percent signs, and parentheses for the negative values).
You see that Excel also has no problem recognizing and correctly interpreting the layout and formatting of the table data. It immediately inserted the incoming table data into the correct worksheet cells, while maintaining the correct cell formatting. (By the way, in case you aren’t yet an Excel user, if you see #### symbols in the new worksheet, these symbols merely indicate that the column isn’t wide enough to display the values in that cell — these are not error indicators and are easily disposed of by widening the column.)
Acrobat 6 offers an even easier way to get selected table data into a spreadsheet program. (This method assumes that you already have a CSV-compliant spreadsheet program like Microsoft Excel installed on your computer.) Select a table in a PDF document with the Select Table tool, right-click to open the context menu, and choose Open Table in Spreadsheet. Your CSV-compliant spreadsheet program (and all of them are these days) opens a document with your table data imported into the spreadsheet. You can then edit and save your table data in that program’s document format.

Saving a table or formatted text in a new file


Unlike when you select text with the Select Text tool, after you highlight a table or blocks of text with the Select Table tool, you can not only copy it to the Clipboard but also save the selection into a new file format. To do this, you right-click (Control+click on the Mac) the text or table selection and then click Save Selected Table As on the context menu to open the Acrobat Save As dialog box, where you specify the folder, filename, and type of file format in which to save the selection.
Select the Rich Text Format when you want to open the table or formatted text in a word processor such as Microsoft Word. Stay with the Comma Separated Values (*.csv) default file format when you’re saving a table of data and you want to be able to import that data into a spreadsheet program (such as Microsoft Excel) or a database program (such as FileMaker Pro).

Tuesday, November 24, 2009

Selecting tables and formatted text


The second text tool on the Basic toolbar is called the Select Table tool, and as its name implies, you use this tool when you want to copy text set in a table or to copy text along with its formatting (including font, font size, text color, alignment, line spacing, and indents when saving in an RTF — Rich Text Format — file format). To use the Select Table tool, you use its cross-hair mouse pointer to draw a bounding box around a table or lines of text that you want to select. As soon as you release the mouse button, Acrobat encloses the selected text or table in a heavy blue outline. The Select Table tool can make table selections based on a PDF document’s underlying document structure tags. To find out if you’re working with a tagged PDF document, right-click the page with the Select Table tool to see if the Select Table Uses Document Tags command is activated (the PDF file is tagged) or grayed-out (the PDF file in untagged) on the context menu. Acrobat automatically selects this command when you open a tagged PDF document. If you’re working with a tagged PDF document, you can simply click with the Select Table tool to select a table or lines of text formatted as a table.
When Acrobat identifies a text selection as a table, it maintains the structure of the table by preserving the layout of the data in rows and columns of cells. If you then save the table data in the RTF file format for use in a word-processed document, the table maintains this layout in the new document. If you save the table data in the CSV (Comma Separated Values) text file format, which is the default format selected by Acrobat, the program maintains the table structure by separating the data items with commas and hard returns. This creates what is often called a comma delimited text file that most database and spreadsheet programs can convert easily into their own native file formats.

Selecting columns of text

The Select Text tool enables you to select complete columns of text without having to worry about selecting text in any adjacent columns on the page that you don’t want to include. Use this tool when you need to copy all or part of columns on a single page of a PDF document that uses newspaper columns.
To select a column of text with the Select Text tool, you simply drag the Ibeam pointer from the top-left corner of a column of text in a diagonal direction toward the bottom-right corner of the column of text and release the mouse button.
In this figure, I have used the Select Text tool to select all the text in the righthand column. The selected text is now available for copying to the Clipboard or dragging to a document in another program window. If you’re working with a lot of text in a PDF document, you can configure the Hand tool in Acrobat 6 to automatically function as the Select Text tool when you hover it over text in a PDF document. Choose Edit➪Preferences or press Ctrl+K (Ô+K on Mac) to open the Preferences dialog box. Click General in the list box on the left to display the General Preferences options, and then select the Enable Text Selection for the Hand tool check box. You can enter values (measured in picas) in the Text Selection Margin Size and Column Selection Margin Size text boxes to specify how much white space around text or columns to allow before the Hand tool transforms into the Text Selection tool and vice versa.

Using drag-and-drop to copy text

Instead of copying and pasting to and from the Clipboard, you can just drag the selected text from the PDF file open in an Acrobat window to a new document open in another program window. Figure how this method works.
PDF document open in the Acrobat program window on the right, I dragged the Select Text tool through the lines with the title and the first paragraph of text to select it. Then I dragged this text selection to the new document window open in Microsoft Word on the left by positioning the arrowhead mouse pointer (with the outline of the text selection) at the very beginning of the blank document.

Tuesday, October 27, 2009

Extracting Blocks of Text from PDF

Before you can copy sections of text in a PDF document to the Clipboard or another open document, you need to select the text in the PDF document. To select text in a PDF document, you use two of the three different tools found on the Selection toolbar, which is attached to the Basic toolbar:
  • Select Text tool (V): Use this tool to select lines or columns of text by dragging through them.
  • Select Table tool (Shift+V): Use this tool to select a table or block of text with its formatting by drawing a bounding box around the table or text block.
You can also use the TouchUp Text tool (press T to select this tool) to select a block of text defined by its underlying document structure tags, such as whole headings or whole paragraphs. True to its name, this tool should be used only when you need to extract small amounts of text from a PDF document. Like the text selection tools on the Basic toolbar, text selected with the TouchUp Text tool can be copied, deleted, edited, and placed in other program documents . When you use the Select Text tool to select lines or columns of text in a PDF document, you can then copy the selected text to the Clipboard by choosing Edit➪Copy or by pressing Ctrl+C (Ô+C on the Mac). After you’ve copied the text to the Clipboard, you can switch to a document open in another program and then paste the copied text into the file by using that program’s Edit➪Paste command or by pressing Ctrl+V (Ô+V on the Mac).

Encrypting PDF Files

The last and most secure type of security that you can add to your PDF documents employs the Certificate Security system that you use to digitally sign documents, along with the list of Trusted Certificates in your user Digital ID file. When you encrypt a PDF document with Certificate Security, no one has access to the document other than those you specifically designate as recipients, and you can designate as recipients only those persons who are already on your Trusted Certificates list.
The steps for encrypting a PDF document with Certificate Security are as follows:
  1. Choose Document➪Security➪Encrypt for Certain Identities Using Certificates. The Restrict Opening and Editing to Certain Identities dialog box opens.
  2. In the Identity Directories list box, click the name of the person you want to add to the Recipients list box below, and then click the Add to Recipient List button.
  3. Click the name of the newly added recipient to highlight it in the Recipients list box.
  4. Click the Set Recipient Permissions button. By default, Acrobat grants the recipient full access to the PDF document whose user permissions include general editing, commenting and form field authoring privileges, the ability to print the document at any print resolution, and full copying and extraction privileges.
  5. To restrict the recipient’s user permissions in some way, click the Restrict Printing and Editing of the Document and Its Security Settings button.
  6. Limit the permissions by deselecting the Enable Text Access for Screen Reader Devices for the Visually Impaired check box and/or the Enable Copying of Text, Images and Other Content check box and/or by selecting new options in the Changes Allowed and Printing Allowed drop-down lists before you click OK.
  7. Repeat Steps 3 through 6 (as they apply) to add your other recipients from the Identity Directories list box and set their user permissions in the Recipients list box.
  8. After you’ve added all the recipients and set their user permissions, click the OK button. If the Certificate Security - Alert box appears, telling you that settings will not be applied until you save your PDF document, click OK. You can also opt to not show this dialog box in the future by selecting the Do Not Show This Message Again check box before you click OK.
  9. Choose File➪Save to save the Certificate Security encryption settings for the current document. Alternatively, choose File➪Save As and edit the filename and/or folder location of the encrypted document before clicking the Save button. After you save your PDF file encrypted with Certificate Security, you can distribute copies to all the people you added to the Recipients list. When someone on the list tries to open the encrypted file, Acrobat displays the Select My Digital ID File dialog box, where the user selects his or her user Digital ID and enters his or her user password. When the user clicks the OK button to close the Select My Digital ID file dialog box, Acrobat checks the user’s public key against the certificate information (specifically the MD5 and SHA-1 fingerprints) in the encrypted file.
When Acrobat finds they match, it then opens the PDF document. The user then has access to the opened document according to user permissions that you set. To check these permissions, the user can right-click (Control+click on the Mac) the Document Encrypted key that now appears on the Document pane Status bar (a locked padlock on the left of the Status bar), select Document Security on the context menu, and then click the Security Settings button in the Document Properties dialog box.
If someone not on the Recipients list attempts to open a PDF document that’s encrypted with Certificate Security, upon logging in, he or she will receive the Certificate Security - Alert dialog box with the message You do not have access rights to this encrypted document. When the user clicks OK to clear this dialog box, the document will fail to open.

Comparing signed PDF documents


Each time a person digitally signs a PDF document that already has one signature, Acrobat saves the changes and signature of each subsequent signatory in a special appended version of the file. You can then compare the various versions to note what changes, if any, each signatory made.
Acrobat notes when a PDF document that you’ve sent out for subsequent signatures comes back to you with changes by adding a Document Was Modified item to the Signatures palette. You can then display the details of the modifications by clicking the Expand button (with the plus sign on Windows and the triangle pointing to the right on the Mac). Note that the detailed change items shown in the expanded list are purely informational and do not perform as bookmarks.
To have Acrobat do a side-by-side comparison of the versions to let you visually compare the changes, select View Signed Version on the Signatures palette Options pop-up menu. Acrobat then displays the original version of the PDF file and the most current version in a Document pane. To compare the files side by side, choose Window➪Tile➪Vertically. You can then scroll through the pages, visually noting the differences. When you’re finished checking the changes, close the original version on the left by clicking its document window’s Close button and maximize the latest version on the right by clicking its document window’s Maximize button. If you would prefer, you can have Acrobat do a page-by-page comparison and locate all the changes between the latest signed version and the original. To do this, select Compare Signed Version to Current Document on the Signatures palette Options pop-up menu. Acrobat then performs a page-by-page comparison and creates a second PDF document containing only the pages that have changed. These changed pages are displayed side by side. When you have finished comparing these pages, you can close this newly created document by pressing Ctrl+W (Ô+W). You can then save it in its own PDF file by clicking the Yes button in the alert dialog box that asks you if you want to save the changes before closing. If you have no further need for this comparison PDF file, you can click the No button to abandon the comparison document and just return to the most up-to-date signed version of the PDF document.

Saturday, September 26, 2009

Adding certificates to your Trusted Certificates list


The way that you add the certificates that you receive to your Trusted Certificates list depends upon how you receive them. If you receive an e-mail message with a certificate attached, you can launch Acrobat, validate the certificate, and add the certificate to your Trusted Certificates list all by simply opening the certificate file attached to the message in your e-mail program (in most programs, you open an attachment by double-clicking the file attachment icon).
When Acrobat launches, it displays the Data Exchange File - Import Contact dialog box. To add the certificate to your list, click the Set Contact Trust button to open the Import Contact Settings dialog box. The Trust Signatures Created with this Certificate check box is selected by default. Click the Import button to import the certificate data and create a Digital ID certificate that will appear in your Trusted Identities list. If you have access to someone’s Self-Sign Security certificate file on your computer system, you can add it to your Trusted Certificates list by clicking the Import from File button in the Trusted Certificates portion of your User Settings dialog box. To do this, follow these steps:
  1. Choose Advanced➪Manage Digital IDs➪Trusted Identities to open the Manage Trusted Identities dialog box.
  2. Click the Add Contacts button to open the Select Contacts to Add dialog box, and then click the Browse for Certificates button.
  3. Locate the certificate exchange file you want to import in the LocateCertificate File dialog box, and then click the Open button. The selected certificate data file appears in the upper list box of the Select Contacts to Add dialog box.
  4. Click the Add to Contacts List button to display the certificate exchange file in the Contacts to Add list box below; then click OK.
  5. Click OK to close the alert dialog box and return to your Manage Trusted Identities dialog box, where you see the name of the person you just added to your Trusted Identities list.
  6. Click the Close button to close the Manage Trusted Identities dialog box.

Exchanging certificates with associates

You can simplify the process of validating signatures in the PDF files you review by having all the review team members exchange copies of their Self-Sign Security certificates. Acrobat makes this easy by adding an export function to the Manage Trusted Identities dialog box. To open this dialog box, choose Advanced➪Manage Digital IDs➪Trusted Identities. Select your Digital ID from the list box in the Manage Trusted Identities dialog box and click the Export button to open the Data Exchange File - Export Options dialog box. Two radio buttons appear in the Export options section. The first is the E-mail the Data to Someone radio button that you can select to send a copy of your certificate to team members in a new e-mail message. The second is the Save the Data to File radio button that you can use to make a copy of the certificate file that others can import into their Trusted Certificates list. (For example, you can use this option if you and your coworkers are on the same network and share access to certain folders.)
When you select the Save the Data to a File radio button, Acrobat opens an Export Data As dialog box, where you can designate the drive and folder on which the copy of your certificate is saved (saved in a special Acrobat Self-Sign key file format that uses a .fdf file extension) when you click the Save button. When you select the E-mail the Data to Someone radio button, Acrobat opens the Compose E-mail dialog box, To send the e-mail, fill in the recipient’s e-mail address in the To text box, make any necessary changes in the default text provided in the message window, and click the E-mail button. Acrobat transfers the information into your e-mail client in order to send your certificate data to someone else.

Validating PDF digital signatures

Whenever you add your own signature to a PDF document, Acrobat automatically uses your user Digital ID information to verify your signature as valid (indicated by the green check mark and the text Signature Valid underneath it). When you receive a document that has been signed by other people, their signatures will not automatically be recognized as valid when you open the PDF file.
You can then validate their signatures. As part of this process, you need to get in contact with the signatory and verify that one or both of the two socalled fingerprint numbers stored in the public key attached to the signature in your PDF document match the fingerprint numbers in the signatory’s public key stored as part of his or her certificate attributes on his or her hard drive. (The two fingerprints are made up of a combination of letters and numbers that make your software serial number look short; the first is called the MD5 Fingerprint, and the second is called the SHA-1 Fingerprint.) To validate a signature in a PDF document that you have open, follow these steps:
  1. Open the Signatures palette and select the name of the unknown signatory you want to validate (indicated by a blue question mark before the name), and then select Validate Signature on the Signature palette Options pop-up menu.
  2. If the unknown signatory has not been added to your list of trusted certificates, Acrobat next displays the Signature Validation Status dialog box.
  3. Click the Signature Properties button. The Signature Properties dialog box appears.
  4. Use the contact information (if listed) to get a hold of the signatory (preferably by telephone) to verify the MD5 and/or the SHA-1 Fingerprint numbers listed at the bottom of the Certificate Attributes dialog box. Click the Show Certificate button to view these numbers. To find these numbers to read off to you, the signatory must choose Advanced➪Manage Digital IDs➪My Digital ID, select their Digital ID in the Manage My Digital IDs dialog box, and click the Settings button to open the Set Digital ID Usage dialog box. The signatory then clicks the Show Certificate Details button to open the Certificate Attributes dialog box and view their MD5 and SHA-1 Fingerprint numbers.
  5. If the fingerprint numbers on your screen match the numbers given to you over the phone, click the Trust Identity button. The Certificate Security-Alert dialog box opens, telling you that Trusting Certificates directly from a document is unwise.
  6. Click OK to close the Alert box and open the Import Contact Settings dialog box.
  7. Click the Import button and then click OK in the Import Complete dialog box to add the person to your list of trusted certificates and to validate the selected signature in the PDF document.

You can quickly validate individual signatures for the people you’ve added to your Trusted Certificates list by simply double-clicking their signature fields. Acrobat will quickly search your list and, upon finding the person’s certificate, display a Signature Validation Status alert dialog box, informing you that the signature is valid. You can also use this technique on your own signatures in the event that they show up as unknown signatures when you reopen the PDF document, even when your Digital ID file is open. To update all the signatures in your PDF at one time, simply choose Document➪Digital Signatures➪ Validate All Signatures in Document, or select the Validate All Signatures in Document option on the Signatures palette Options pop-up menu.

Monday, August 24, 2009

Signing a PDF document using a predefined signature field

You can also digitally sign a PDF document by using a signature form field that’s already been added to it. To sign a document in a predefined signature form field, you follow these steps:
  1. Open your Digital ID file by choosing Advanced➪Manage Digital IDs➪My Digital ID Files➪Select My Digital ID File. The Select My Digital ID File dialog box opens.
  2. Select the filename of your user Digital ID in the Digital ID File dropdown list, enter your password in User Password text box, and click the OK button.
  3. If the Signatures palette isn’t open and selected in the Navigation pane, choose View➪Navigation Tabs➪Signatures.
  4. Click the name of the signature field you want to sign in the Signatures palette to highlight it, and then select Sign Signature Field on the Signatures palette Options pop-up menu to open the Apply Signature to Document dialog box.
  5. Enter your user Digital ID password in the Confirm Password text box if necessary, and then modify the settings in the other options (Reason for Signing, Location, Your Contact Information, and Signature Appearance) as desired. Refer to Steps 5 through 10 in preceding post, “Adding a visible or invisible signature to a PDF document,” for details.
  6. Click the Sign and Save button to save your changes and signature in the selected signature field in its current location with the same filename.
Alternatively, click the Sign and Save As button to open the Save As dialog box, where you can modify the file’s location and/or save it under a new filename.
As with the other methods of digitally signing a PDF document, after Acrobat finishes saving the signed document, the program displays an alert dialog box, informing that you have successfully signed it. As soon as you click the OK button to close the alert dialog box, you can see your signature in the signature form field. Figure shows you a PDF document after I signed a signature form field beneath the book title and byline.

Adding a visible or invisible signature to a PDF document

When signing a document, you can sign it invisibly so that no signature form field appears in the PDF document, or you can sign it so that all your signature information appears (as designated in the Configure Signature Appearance dialog box), including any graphic that you’ve selected.
To sign a document, take these steps:
  1. Open your Digital ID file by choosing Advanced➪Manage Digital IDs➪My Digital ID Files➪Select My Digital ID File.The Select My Digital ID File dialog box opens.
  2. Select the filename of your user Digital ID in the Digital ID File dropdown list, enter your password in User Password text box, and click the OK button.
  3. Choose Document➪Digital Signatures➪Sign this Document or, if the Sign Task button is open on the Tasks toolbar, click it and choose Sign This Document on the pop-up menu. If the Alert - Document Is Not Certified dialog box appears, you are given the opportunity to add a Certifying Signature to the document, which will be invalidated if unauthorized changes are made. To specify this added security feature, click the Certify Document button and follow the prompts; otherwise, click the Continue Signing button to open the Sign Document dialog box.
  4. Select the Create a New Invisible Signature radio button, and then click Next to open the Apply Signature to Document dialog box. Alternatively, if you wish to sign the PDF document with a visible signature, select the Create a New Signature Field to Sign radio button, click Next, and then draw a signature field in the PDF document by dragging the mouse in the area you want to sign.
  5. If you want to add the reason for signing the document, your location, or contact information to the signature information (that can be viewed in the Signatures palette), click the Show Options button to expand the Apply Signature to Document dialog box.
  6. To include the reason for signing the document as part of the signature information, select the reason from the Reason for Signing Document drop-down list (such as I Am Approving This Document or I Am the Author of This Document). Note that you can edit the reason you select by clicking the insertion point in the text and then inserting or deleting text as needed.
  7. If you wish to save your location as part of the digital signature information, click in the Location text box and enter your current location (as in Chicago or Corporate Headquarters).
  8. If you wish to include contact information, such as your telephone number, so that coworkers can contact you if they need your certificate in order to verify your digital signature, click in the Your Contact Information text box and enter that information there.
  9. If you’re using a visible signature, by default, Acrobat selects Standard Text as the Signature Appearance. To preview how this signature field will appear in the document, click the Preview button. If you wish to select a new appearance for your signature field, select its name in the Signature Appearance drop-down list. To create a new signature appearance, click the New button. To edit the appearance you selected in the drop-down list, click the Edit button, which replaces the Preview button when you select an appearance you created.
  10. Click the Sign and Save button to save your changes and signature in the document in its current location with the same filename. Alternatively, click the Sign and Save As button to open the Save As dialog box, where you can modify the file’s location and/or save it under a new filename. After you click the Sign and Save button in the Apply Signature to Document dialog box (to save the file with the same name) or the Save button in the Save As dialog box (to save the file in a new location or with a new filename), Acrobat saves the PDF document with your signature and then displays a Certificate Security - Alert dialog box, informing you that you have successfully signed the document.
After you click OK to close this dialog box, you can verify that you’ve signed the document (if you used an invisible signature) by opening the Signatures palette by clicking the Signatures tab on the Navigation pane (if the palette isn’t already displayed in the Navigation pane). To display the detailed information you added to your signature (including the reason, location, and contact information), click the Expand button (the plus sign on Windows and the triangle pointing right on the Mac) to expand the signature information. If you used a visible signature to sign the document, after you click OK to close the alert dialog box, you can see your signature right on the document page. Note that the Signatures palette shown in this figure displays a list of the detailed signature information that also appears (much smaller) in the signature field to the right of the facsimile of my handwritten signature. You can always review the signatory information for a particular signature in its Signature Properties dialog box. You can open this dialog box for a visible signature by right-clicking (Control+clicking on the Mac) the signature field and then clicking Properties on the context menu. You can also open this dialog box (for an invisible or visible signature) by selecting the signatory’s name in the Signatures palette and then selecting Properties at the bottom of the Options pop-up menu.

Signing a PDF document


After you’ve set up your Digital ID, you’re ready to use it to digitally sign off on PDF documents. In digitally signing a PDF document, you add a special signature form field to the document that contains the mark and signing information that you want displayed. The first time a document is signed by you or one of your coworkers, Acrobat saves the PDF file with the signature in a special append-only form. Every time someone digitally signs the document after that, Acrobat saves a new version of the file to which his or her editing changes and signature are appended.
Keep in mind that when you’re viewing a PDF document with multiple signatures, you’re looking at the latest version of the document with all changes since the first time it was signed. If you want, you can view the original version of the signed document side by side with the most current version by selecting the signatory in the Signatures palette and then selecting View Signed Version in the Options pop-up menu. You can also compare the changes between the original signed version and the current document (by selecting Compare Signed Version to Current Version on the same Signatures palette Options pop-up menu).
If you ever decide that you should manually save a PDF document that’s been digitally signed, don’t use the File➪Save command to do it. Use instead the File➪Save As command to save a copy of the PDF document under a new filename. If you use File➪Save to save a signed PDF document, you automatically invalidate all the signatures in it.

Monday, July 27, 2009

Palm handheld users take note!


If you have a Palm handheld connected to your computer, you can use the Palm ™ Organizer button (no longer grayed-out when Acrobat detects graphic files on the device) in the Configure Signature Appearance dialog box to select a version of your handwritten signature as the graphic to be used in your digital signature in Acrobat. You can create this picture of your handwritten signature by writing with your stylus on the Palm screen and then saving the handwriting as a graphics file on your device. When you click the Palm Organizer button, you can then select the graphics file with your handwritten signature in the Palm Organizer dropdown list, which appears to the immediate right of the button.

Adding a graphic to your signature in a signature appearance

Although they’re called digital signatures, they don’t look anything like signatures you’re used to seeing on documents, unless you add a picture of your handwritten signature. If you have an image of your handwritten signature or a particular picture that you’d like to use as your identifying mark, and the image is saved as a PDF file, you can add it by creating a signature appearance as outlined in the following steps:
  1. Choose Edit➪Preferences or press Ctrl+K (Ô+K on the Mac) to open the Preferences dialog box in Acrobat. Click Digital Signatures in the list box on the left side of the Preferences dialog box to display the Digital Signatures options.
  2. Click the New button. The Configure Signature Appearance dialog box appears.
  3. Click the Title text box and enter a descriptive name for the new signature appearance you’re creating.
  4. Select the Imported Graphic radio button.
  5. Click the PDF File button. The Select Picture dialog box opens.
  6. Click the Browse button to display the Open dialog box, where you open the folder and click the icon of the PDF file that contains the graphic of your handwritten signature, and then click the Select button to close the Open dialog box and return to the Select Picture dialog box.
  7. Check that you’ve selected the correct image in the Sample area in the Select Picture dialog box, and then click the OK button. The Select Picture dialog box closes, and you return to the Configure Signature Appearance dialog box.
  8. Check the preview of your digital signature in the Preview area. To remove various pieces of information from the signature display, deselect their check boxes in the Configure Text area of the dialog box. Keep your eye on the Preview area as you remove individual items.
  9. When you have the digital signature looking the way you want it to appear in the PDF document, click the OK button to close the Configure Signature Appearance dialog box, and then click the Close button in the Digital ID File Settings dialog box.

Changing your password settings


You can change the password you assigned to your Digital ID, or you can change your password timeout settings (that is, how often you’re prompted for a password when working with a PDF document that you’ve signed). Note that changing your password has no noticeable effect on your digital signature.
To change your password, follow these steps:
  1. Click the Change Password button in the Digital ID File Settings dialog box for your Digital ID.
  2. Click in the Old Password text box and enter your current password.
  3. Click in the New Password text box and enter the new password you want to set.
  4. Click in the Confirm Password text box and reenter the new password.
  5. Click the OK button. An alert dialog box appears, telling you that your password has been successfully changed.

By default, Acrobat prompts you for your password each time you digitally sign a PDF document. If you don’t ever want to be prompted for your password when signing off on a bunch of PDF files, or you want the program to prompt again only after a certain time period has elapsed, you can change these password options as follows:
  1. Click Password Settings button in the Digital ID File Settings dialog box for your Digital ID.
  2. To not be prompted for your password when signing, deselect the Require Password to Access When Signing check box.
  3. To select a time period before being prompted for your password, select the After radio button (the default is Always), and then choose a timeout setting on the After drop-down list. The settings on this list include a fair number of timeout intervals between 30 seconds and 24 hours.
  4. Enter your password in the Enter Password (Needed to Apply the Change) text box.
  5. Click OK. An alert dialog box appears, telling you that your password timeout has been successfully changed.
If you change the password and password time period settings for your Digital ID, don’t forget to replace all backed-up versions of your Digital ID (the .apd file) with the new version that contains your updated password settings. Should you forget to do this and ever have to rely upon a backup of your Digital ID, you’ll have to be able to reproduce your old password in order to log in and sign documents with it.

Sunday, June 21, 2009

Making a backup of your Digital ID

You should always make a backup copy of each Digital ID that you create so that if the original file saved in the Acrobat folder (Acrobat 6.0 on the Mac) ever becomes corrupted, you can use the backup to both sign documents and verify other people’s signatures. To make a backup of your Digital ID, click the Export button in the Digital ID File Settings dialog box for your Digital ID. Then in the Data Exchange File - Export Options dialog box, select the Save the Data to a File radio button in the Export Options area. Click the Next button to open the Export Data As dialog box, select the folder in the Save In drop-down list (preferably on another hard drive, if you have more than one drive on your system or are connected to a network), and click the Save button. Acrobat then displays Certificate Security - Alert dialog box, indicating in which folder you’ve successfully backed up your Digital ID file.

Modifying the user settings in a profile

You can modify the user settings in your Digital ID at any time. You might, for instance, want to associate a graphic with your digital signature (especially one that is actually a picture of your handwritten signature). You also might need to change the password for a profile or want to back up the profile file or change the password timeout options.
Before you can change any settings for your profile, you need to take these steps:
  1. 1. Open your Digital ID file by choosing Manage Digital IDs➪My Digital ID Files➪Select My Digital ID File. The Select My Digital ID File dialog box opens.
  2. Select the filename of your user Digital ID in the Digital ID File dropdown list, enter your password in User Password text box, and click the OK button. Acrobat automatically opens your Digital ID file.
  3. Choose Manage Digital IDs➪My Digital ID Files➪My Digital ID File Settings to open your Digital ID File Settings dialog box.

Setting up your digital ID profile

The first step to be able to use Certificate Security for digitally signing PDF documents is to set up your Digital ID. Your Digital ID contains your password, along with basic information about your role. You can set up multiple profiles for yourself if you digitally sign documents in different roles.
To create a new user profile, follow these steps:
  1. Choose Advanced➪Manage Digital IDs➪My Digital ID Files➪Select My Digital ID File. The Select My Digital ID dialog box opens.
  2. Click the New Digital ID File button. The Create Self-Signed Digital ID dialog box appears, as shown in Figure.
  3. Edit the Name, Organization Unit, Organization Name, E-mail Address, and Country/Region text boxes, if necessary (only the Name text box must be filled in), in the Digital ID Details section of the dialog box. Note the profile name that appears in the Name text box is the name that appears in the Signatures palette in Acrobat 6 and is used in the naming of the Self-Signed Digital ID filename. If you select the Enable Unicode Support check box, Acrobat displays additional text boxes for entering Unicode values for extended characters next to the ASCII versions you just entered.
  4. Select an RSA algorithm (either 1024-bit or 2048-bit) in the Key Algorithm drop-down list, and then select a purpose for your Digital ID in the Use Digital ID For drop-down list. Note that 2048-bit offers more security, but 1024-bit is more compatible with current encryption technologies. Your choices are Digital Signatures, Data Encryption, or the default Digital Signatures and Data Encryption.
  5. Click in the Enter a Password text box and enter a password of six characters or more.
  6. Press Tab to jump to the Confirm Password text box and then reenter the password.
  7. Click the Create button to open the New Self-Sign Digital ID File dialog box. By default, Acrobat names the new profile file by combining the profile name with the .pfx file extension in the Security folder within the Acrobat 6.0 folder in Windows, and the Acrobat 6.0 folder on the Macintosh. If you wish, edit the filename before clicking the Save button to save the new profile and close the Create Self-Signed Digital ID dialog box.

Sunday, May 24, 2009

Signing Off Digital Style


The Certificate Security option in the Security Method drop-down list in the Document Properties dialog box enables you to digitally sign a PDF document or to verify that a digital signature in a PDF document is valid. Certificate Security is what is known in the trade as a signature handler that uses a private/ public key (also known as PPK) system. In this system, each digital signature is associated with a profile that contains both a private key and a public key.
The private key in your profile is a password-protected number that enables you to digitally sign a PDF document. The public key, which is embedded within your digital signature, enables others who review the document in Acrobat to verify that your signature is valid. Because others must have access to your public key in order to verify your signature, Acrobat puts your public key in what’s called a certificate that is shared. The Certificate Security uses what is known as a direct trust system for sharing certificates, because it doesn’t use a third-party agent (like VeriSign) to do this.

Checking a document’s security settings


You can check the security settings in effect for any PDF document you open in Acrobat 6 or Adobe Reader 6 (of course, you can tell immediately if the file requires a user password because you must supply this password before you can open the document in Acrobat or Adobe Reader). To check the security settings in effect, you choose Document➪Security➪Display Restrictions and Security.
When you select this command in Acrobat, the program opens a Document Properties dialog box with the security settings showing, where you can both review and change the settings. When you select this command in Adobe Reader (choose File➪Document Properties and click Security in the list box to display the security settings), the program simply lists all the settings in effect. The security settings in the Document Properties dialog box contain the Security Method drop-down list that shows you the type of security in effect.
This list can contain one of these three options:
  • No Security: The document uses no protection at all.
  • Password Security: The document uses a user password and/or master password and possibly restricts the type of edits.
  • Certificate Security: The document is encrypted so that only trusted associates with digital certification can open and change it.
Beneath the Security Method drop-down list, you find a Document Restrictions Summary area that lists all the security options in effect. To the right of the Security Method drop-down list, you find the Change Settings button that enables you to change the security settings when either the Password Security or the Certificate Security option is selected in the Security Method drop-down list.

Protecting PDF Files


You can password-protect the opening and editing of PDF documents at the time you first distill them (as part of their Security Settings) or at anytime thereafter in Acrobat 6. When you set the security settings, you can choose between two different levels of encryption:
  • 40-bit RC4: Used for PDF files created when you set the encryption level to 40-bit RC4 (Acrobat 3.x, 4.x)
  • 128-bit RC4: Used when you set the encryption level to 128-bit RC4 (Acrobat 5.x, 6.0)
40-bit RC4 encryption offers a lower level of file security but is compatible with Acrobat 3 and Acrobat 4. 128-bit RC4 offers a higher level of security (it’s a lot harder to hack into) but is compatible only with Acrobat 5 and Acrobat 6. If you’ll be sharing secured PDF documents with coworkers who haven’t yet upgraded to Acrobat 5 or 6, you’ll have to content yourself with the less secure, 40-bit RC4 encryption. However, if you’re dealing with highly sensitive, “for-your-eyes-only” material, you may want to upgrade everybody to Acrobat 6 as soon as possible, so that you can start taking advantage of the
more secure 128-bit RC4 encryption.

Saturday, April 25, 2009

How to edit batch sequences?

You can run, edit, or create new batch sequences from the Batch Sequences dialog box (shown in Figure) that you open by choosing Advanced➪ Batch Processing. To run a batch sequence from this dialog box, click its name in the list box and then click the Run Sequence button. To edit an existing batch sequence, click the name of the sequence in the list box and then click the Edit Sequence button to open the Batch Edit Sequence dialog box. From this dialog box, you can change the sequence of commands executed when you run the sequence with the Select Commands button, change which files are processed by the sequence from the Run Commands On drop-down list, and change where processed files are located in the Select Output Location drop-down list. For details on using these options, refer to the series of steps on creating a new batch sequence in the following post (the steps for using these controls are identical for editing and creating batch sequences).

Batch Processing to the Rescue

For the final editing topic, I want to introduce you to Acrobat’s batch-processing capabilities. Batch processing (or batch sequencing as Acrobat refers to it) automates the editing process by enabling you to perform one or more actions on a group of PDF documents all at the same time. When you first install Acrobat 6, it comes with a number of predefined batch sequences. You can then edit these sequences or create your own to fit the work you need done by Acrobat. The key to successful batch processing is setting up an input folder in which you’ve moved all the PDF documents that need processing with a particular batch sequence and, if you’re going to run a sequence that makes changes to the PDF documents, setting up another output folder to hold all the processed files (which you specify as part of the batch sequence).

How to Merge PDF layers?

When you merge PDF layers, you consolidate one or more layers into another single layer. The layer properties of this target layer specified by the author of the original document prior to conversion to PDF are applied to the merged layers. Like flattening layers, merging layers cannot be undone. For this reason, you should always work with a copy of the original PDF saved under a different name, unless you’re absolutely confident about your merging and flattening desires. To merge one or more document layers into another, follow these steps:
  1. Click the Layers tab on the Navigation pane to display the Layers palette.
  2. Choose Merge Layers on the Options pop-up menu at the top of the Layers palette. The Merge Layers dialog box appears, as shown in Figure.
  3. In the Layers To Be Merged list box on the left, select the layers you want to merge. To make multiple selections, Ctrl+click (Ô+click on Mac) each layer name, and then click the Add button to move the selected layers to the middle list box. You can remove layers from the middle list box by selecting a layer name and clicking the Remove button.
  4. Click the Add All button to select all layers for merging and move them into the middle list box or click the Remove All button to delete all the layers selected for merging in the middle list box.
  5. In the Target Layer to Merge Into list box, select the single layer you wish to merge the selected layers into.
  6. Click OK to close the Merge Layers dialog box, and then click Yes to close the Warning dialog box and merge your selected PDF layers.
After you’ve merged PDF layers and display the Layers palette in the Navigation pane, you’ll notice that the target layer still appears in the Layers palette list, but the merged layers do not. To view the target layer by itself, click all the Show/Hide Layer buttons (the eye icon) attached to all layers but your target layer. When the target layer is the only layer showing, notice that it displays all the elements of the merged layers in addition to its own. To restore the layer view to its original state, choose Reset to Initial Visibility on the Layers palette Options menu.
When you’ve flattened or merged the PDF layers in a document, you do have one chance to undo the supposedly undoable. If your first response to flattening or merging layers in your PDF file is “oops!” choose File➪Close or press Ctrl+W (Ô+W on Mac) and when the alert dialog box asks you if you want to save changes to the PDF before closing, click the No button. The next time you open the PDF document, it appears in its last saved state.

Saturday, March 28, 2009

Flattening PDF layers

When you flatten PDF layers, you remove any layers that aren’t visible and consolidate the rest into one layer. You might use this technique if you want to freeze a drawing or project at a certain stage of development in order to archive a non-editable version. To do so, follow these steps:
  1. Choose File➪Save As to open the Save As dialog box.
  2. Locate a folder destination in the Save In drop-down list and enter a new name for your flattened PDF document in the File Name text box. It is very important that you change the name of this file because flattening the layers in a PDF document cannot be undone.
  3. When you’ve saved the PDF file under a new name, click the Layers tab on the Navigation pane and choose Flatten Layers on the Options menu at the top of the Layers palette. A Warning dialog box appears, stating This operation cannot be undone. Would you like to proceed?
  4. Click Yes to close the Warning dialog box and flatten the document layers. The proof of your flattening action is exhibited in the Layers palette, which is now completely empty.

Editing Document Layers in a PDF File

Now that Acrobat 6 supports document layers created in programs such as AutoCAD, Microsoft Visio, and Microsoft Project, you may one day find yourself staring at a PDF document with the new Layers palette overflowing with layers, just like the one shown in Figure. Fortunately, Acrobat makes it a breeze to select, move, edit, delete, and even merge and flatten document layers. Note that you can view document layers in either the Standard or Professional versions of Acrobat 6. If you want to edit document layers, you must have Acrobat 6 Professional version.

The good news is that Acrobat treats visible text and graphic objects on document layers in exactly the same way as regular objects in PDF documents. This means that even though a portion or even a whole object may reside on different document layers, Acrobat views the object as a single item for selection and editing. Because of this seamless view of document layers, you can apply the same tools and editing techniques to document layer objects that have been described in previous sections of this chapter. For example, you can use the TouchUp Object tool to select, move, or edit a layer object. Figure shows the selection of all the visible chair components in the drawing using TouchUp Object tool, even though some of the furniture is drawn on different layers.
You might occasionally encounter a locked layer in a PDF document. You’ll know because a padlock icon appears next to a layers name in the Layers palette in the Navigation pane. These layers were locked by the author of the original AutoCAD, Visio, or Project document and are visible for informational purposes only. You can edit the Layer name in these cases by right-clicking the layer in the Layers palette and choosing Properties on the context menu. In the Layer Properties dialog box, enter a new name in the Layer Name text box and click OK.

Checking the flow of a new article

This Hand pointer with the arrow pointing down from a crossbar enables the reader to start reading the article at any place he or she chooses. You can use it to check the flow of your article. However, because you’re currently at the end of the new article you’ve just defined, you need to go back to the place where you defined the first article box before you click it, so that you can check the flow of the entire article from start to finish. Before you click this pointer and start checking the flow of the article, you may want to adjust the default fit-visible zoom magnification setting that’s currently in effect in Acrobat, because all articles in a PDF document apply the default fit visible zoom magnification setting to any article that you’re reading. To change this setting, press Ctrl+K (Ô+K on the Mac) to open the Preferences dialog box, click Page Display in the list box on the left, and enter an appropriate percentage value in the Max Fit Visible Zoom text box at the bottom of the dialog box (this starts out at a whopping 800%) before clicking OK. To check the flow of the article, click the Hand pointer with the arrow pointing down from a crossbar somewhere in the text of the first article box, and then continue to click the Hand pointer (which loses the crossbar while retaining the downward-pointing arrow) to view in succession each portion of every article box in the article. Acrobat lets you know when you’ve reached the end of the article (the last visible portion of the last article box) by adding a crossbar at the bottom of the downward-pointing arrow on the Hand pointer. When you click this Hand pointer, Acrobat returns you to the top of the article, and the page resumes the magnification setting currently in effect in the Document window (as shown in the Magnification text box on the Zoom toolbar).

Wednesday, February 25, 2009

Defining articles

To add articles to a PDF document you’re editing, you divide a section of text into blocks by enclosing them in a series of boxes (invisible to the user when he or she reads the article) that control the sequence in which the text blocks are displayed in the Document pane. This sequence of boxes creates a navigation path through the text formally known as an article thread. You use the Article tool on the Editing toolbar in Acrobat 6 to draw the succession of boxes that create the article thread and define its order.
To define a new article in a PDF document, follow these steps:
  1. Open the PDF document to which you want to add an article.
  2. If the Navigation pane is open, press F6 to close it.
  3. If the page view is not in Fit Page and Continuous page mode, click the Fit Page button on the Zoom toolbar and the Continuous button on the status bar of the Document pane.
  4. Click the Article tool button (the one with a serpentine arrow icon) on the Advanced Editing toolbar, and then drag the cross-hair pointer to draw a bounding box that encloses the first block of text in the article (including all the text up to any excluded element, such as a figure you don’t want included or the end of the column).
  5. After you have the first text block outlined in the bounding box, release the mouse button to add the first article box. This article box is labeled 1-1 at the top with sizing handles around the perimeter and a continuation tab (with a plus sign) at the bottom (see Figure 1). Note that the mouse pointer changes from a cross-hair to the Article pointer (with a serpentine arrow).
  6. Scroll the page as required to position the Article pointer in the upper-left corner of the next block of text to be added to the article, and then drag the pointer to draw a bounding box around its text. Release the mouse button. The second article box, which is labeled 1-2, is created (see Figure 2).
  7. Repeat Steps 4 through 6, adding as many article boxes as are required to define the reading path of the article.
  8. To end the article, click the Hand tool (H) or press the Enter key (Return on the Mac). The Article Properties dialog box opens.
  9. Replace Untitled in the Title text box with a descriptive name for the article. This name is displayed in the Articles palette that enables users to select the articles they want to read —
  10. If you want, add a brief description of the contents of the new article in the Subject text box, the name of the author in the Author text box, and key terms, separated by commas, that describe the contents in the Keywords text box (terms that you can use in searching the PDF document).
  11. Click OK to close the Article Properties dialog box. If you pressed the Enter key (Return on the Mac) to end the article, click the Hand tool or press H to select the Hand pointer, which hides all the article boxes in the article. Note that as soon as you select the Hand tool after defining a new article, Acrobat adds an arrow pointing down from a crossbar to the back of the Hand icon (which looks like a tattoo to me). This form of the Hand icon appears whenever a user positions the Hand pointer over an article that you’ve defined in a PDF document.

Adding Articles to a PDF Document

Although Acrobat’s editing features do not enable you to physically restructure the layout of the text in a PDF document in any way, its Articles feature does enable you to restructure the online reading experience. As an essential part of the Accessibility features included in Acrobat 6, articles are designed to make the reading of long, disjointed sections of text, especially those set in newspaper columns that span pages, a smooth experience in Acrobat 6 or Adobe Reader 6.
Articles accomplish this by breaking up sections of text into discrete blocks that are displayed in sequence as you click the Hand pointer, requiring no scrolling and no resetting of the page view. This eliminates the need for you to interrupt your reading experience with any type of scrolling or any other kind of page manipulation in order to get to the following section of text, a common experience in normal online reading where when you reach the end of one column, you must reset the page by scrolling back up (and often over) to continue reading at the top of the next column.

Adding Watermarks and Backgrounds to PDF Documents

Acrobat 6 now supports document layers created in AutoCAD or Microsoft Visio. One of the benefits of this new functionality is the ability to add watermarks and background images to a PDF document. Just remember that you can’t edit watermarks and background layers in Acrobat 6 as you can with AutoCAD or Visio layers.
A watermark in the non-digital world is a faint image impressed on paper during manufacture that appears when the paper is held up to the light, such as the company logo you see on fine manuscript paper. They are also used as a security measure, such as the word “Sample” across a photo that makes it difficult to reproduce, or the authenticating images you find on traveler’s checks and the like. In Acrobat 6, watermarks are placed in a layer on top of the displayed page. Background images are the color, texture, or pattern placed in a layer behind the displayed page. Note that an image must be converted to PDF in order for it to be used as a watermark or background in Acrobat 6. To add a watermark or background image to a PDF document, follow these steps:
  1. Choose Document>Add Watermark & Background. The Add Watermark & Background dialog box appears, as shown in Figure.
  2. Choose the desired page element in the Type area by clicking either the Add a Background (Appears Behind the Page) or the Add a Watermark (Appears on Top of the Page) radio button. Note that the settings in this dialog box are the same for both watermarks and backgrounds.
  3. Select one or both viewing options in the Type area. To display the watermark/background when viewing the PDF document on your computer screen, select the Show When Displaying On Screen check box. To display the watermark/background when the PDF document is printed, select the Show When Printing check box.
  4. Click the Browse button in the Source Page area to locate the PDF document you want to use for your background or watermark. If the source PDF is a multi-page document, use the Page Number text box to identify which page you want to select as your source.
  5. Click the All Pages radio button in the Page Range area to have the watermark/background appear on all the pages in your document. If you want to be choosier, click the Specify Page Range radio button and then enter a range of pages in the From and To text boxes.
  6. From the Vertical Alignment drop-down list in the Position and Appearance area, choose Top, Center, Bottom, or Fit to specify the vertical placement of your watermark/background on the page. Note that all changes made in the Position and Appearance are displayed in the Preview window on the right side of the Add Watermark & Background dialog box.
  7. From the Horizontal Alignment drop-down list in the Position and Appearance area, choose Left, Center, Right, or Fit to specify the horizontal placement of your watermark/background on the page.
  8. Click the Rotation spinner button to rotate the watermark/background on the page; use the Opacity slider button or enter a percentage value in the text box to increase or decrease the opacity of the watermark/background. The preview window really helps with these two options.
  9. When you’re finished tweaking your watermark/background, click OK to close the Add Watermark & Background dialog box and view your changes in the current PDF document. You can remove or restore deleted watermarks and backgrounds by choosing Edit>Undo Background or Undo Add Watermark to remove a watermark/ background. Choose Edit>Redo Add Background or Add Watermark to restore a deleted watermark/background.

Tuesday, January 27, 2009

Adding Headers and Footers to a PDF Document

Acrobat 6 provides a new feature that enables you to add header and footer information (such as document title, date, time, or page numbers) to the top and bottom margins in a PDF document. This feature is especially useful when editing PDF documents that weren’t created using PDFMaker 6.0, which has the ability to convert header and footer information from the original document. To add a header or footer to your PDF document, follow these steps:

  1. Choose Document>Add Headers & Footers. The Add Headers & Footers dialog box opens, as shown in Figure.
  2. Click the Header or Footer tab, depending on which element you want to add to your PDF document. The procedure is the same for either option.
  3. Click in one of the three alignment boxes (on the left, center, or right at the top of the dialog box) to specify where the header/footer information is displayed in the PDF document. Note that these boxes correspond to the Align buttons and can be selected via these buttons as well.
  4. Choose a font and font size in the appropriate drop-down list.
  5. Choose a date style in the Style drop-down list in the Insert Date section of the dialog box and click the Insert button to insert the date in a header/footer.
  6. Choose a page number style in the Style drop-down list in the Insert Page Number section of the dialog box and click the Insert button to insert page numbers in a header/footer.
  7. Enter text in the Text box in the Insert Custom Text section of the dialog box and click the Insert button to insert your own text in a header/footer.
  8. Select from the options in the Page Options area of the Add Headers & Footers dialog box as follows:
  • Page Range: Select Apply to All Pages or Apply to Page Range in the drop-down list to specify on which pages the header/footer appears. If you select Apply to Page Range, specify the page range in the From and To text boxes below.
  • Alternation: Choose either Even Pages Only or Odd Pages Only in the drop-down list to specify the display of the header/footer on even or odd pages or choose Do Not Alternate to bypass this feature.
  • Margins: Specify white space around the header/footer either by clicking the spinner buttons or by entering values in the text boxes in the Margins area.
  1. When you’re finished setting up a header/footer, click the Preview button to preview your header/footer and then click OK to return to the Add Headers & Footers dialog box.
  2. Click OK to insert your new header or footer.

Headers and footers can be edited in a number of ways by selecting their Date, Page Number, or Custom Text elements in the alignment boxes in which they appear and then using the Remove and Insert buttons. For example, to change the position of a header/footer element, select the Date, Page Number, or Custom text element in the alignment box that it appears in, and then click the appropriate Align button to change its position. To delete a selected element, click the Remove button. After deleting an unwanted header/footer element, you can then create new ones by specifying Date, Page Number, or Custom Text parameters and using the Insert and Align buttons to position them in the header/footer.
You can Undo and Redo headers and footers created in a single session, meaning any you’ve created before clicking OK to close the Add Headers & Footers dialog box, by choosing Edit>Undo Headers/Footers or Edit>Redo Headers/Footers. If you created headers or footers at different times, you can repeat these commands to Undo or Redo headers/footers from previous Task sessions.

Renumbering the thumbnail pages

You can use Acrobat’s Page Numbering feature to renumber the pages in the Pages palette to match the page numbers shown on the pages of the document in the Document window. You need to do this, for example, when you’re dealing with a PDF document that contains front matter that uses a different numbering scheme (usually lowercase Roman numerals as in i, ii, iii, and so on) from the body of the text (usually numbered with Arabic numerals as in 1, 2, 3, and so on).
Because Acrobat automatically numbers pages in the Pages palette and in the Page Number area on the status bar of the Document pane in Arabic numerals, starting at page 1, the page numbers displayed in the Pages palette and on the status bar do not match those shown in the document pages themselves when they use different numbering styles. This can make it harder to find your place in the document when doing review and making touchup edits. For that reason, you should renumber the pages in the PDF document so that the page numbers in the document agree with those displayed in the Pages palette and on the status bar.
Keep in mind that renumbering the pages in the Pages palette has absolutely no effect on the page numbers shown on the pages in the Document pane, as these actually represent the page numbers added to header or footer of the document before it was converted to PDF. To renumber the pages of a PDF document, you need to manually edit them in Acrobat or open the source document with the original program, updating the page numbering, and then redistill the file.
To renumber the thumbnails in the Pages palette to match those shown on the pages of the PDF document, take these steps:
  1. Select Number Pages on the Options menu at the top of the Pages palette. The Page Numbering dialog box opens, as shown in Figure.
  2. Choose how you want to renumber the pages. To renumber all the pages in the document, click the All radio button. To renumber only the pages that you’ve selected in the Pages palette, leave the Selected radio button chosen. To renumber a specific range of pages, select the From radio button and then enter the first page number in the From text box and the last page number in the To text box. To change the numbering style for the specified range, leave the Begin New Section radio button selected. To continue numbering when a range of pages is specified, click the Extend Numbering Used in Preceding Section to Selected Pages radio button.
  3. When you’re beginning a new numbering section, select the numbering style on the Style drop-down list, specify any prefix to be used in the number (for example, 2- when you want the numbers to appear as 2-1, 2-2, 2-3, and so on) in the Prefix text box, and enter the beginning number in the Start text box if the section numbering begins at a number higher than 1.
  4. Click OK to renumber the pages as specified.

Sunday, January 11, 2009

Inserting and deleting PDF pages

Instead of replacing pages, you may just find that you need to insert a new page or group of pages in the PDF document. When inserting new pages, you can choose between similar methods as when replacing pages. You can insert all the pages from an unopened PDF file using the Insert Pages command, or you can use the side-by-side, drag-and-drop method to insert one or more individual pages. The big difference between these two insertion methods is that in the dialog box method, you must insert all the pages from the incoming PDF file. In the drag-and-drop method, you can insert a single page or a limited group of pages.
Follow these steps to insert all the pages in a single PDF file:
  1. Open the document in which you want to insert the new pages; make sure that all your changes are saved. If you’re not sure if the changes have been saved, choose File>Save.
  2. Choose Insert Pages on the Options menu at the top of the Pages palette. The Select File to Insert dialog box opens.
  3. Open the folder and select the file icon of the PDF document with the pages you want to insert, and then click the Select button. The Insert Pages dialog box opens.
  4. In the Page area, click one of the following radio buttons:
  • First: Inserts the pages at the beginning of the PDF document, either before or after the first page.
  • Last: Inserts the pages at the end of the file, either before or after the last page.
  • Page: Inserts the pages either before or after the page number designated in the associated text box. By default, Acrobat inserts the pages after the page you specify in the Page portion of the Insert Pages dialog box. To have the pages inserted in front instead, select Before on the Location drop-down list. Click the OK button to have Acrobat insert the pages from the selected file.
To use the drag-and-drop method for inserting one or more pages in a document, you use the same setup as described in the preceding section, “Replacing pages from other PDF files.” Place the two documents in Fit Width view side by side with both their Pages palettes displayed. Then select the thumbnail of the page or pages to be inserted and drag them to Pages palette of the document in which copies are to be placed. The only difference between this method and replacing pages with drag-anddrop is that you position the mouse pointer in between the thumbnails at the place where you want the newly inserted pages to appear (and never on a thumbnail’s page number). You can tell you’ve hit the right spot because an insertion bar (like the one shown in Figure) appears in the Pages palette to let you know where the copies of the incoming pages are about to be inserted. You also notice that a plus sign appears at the arrowhead pointer, indicating that copies of the pages will be inserted as soon as you release the mouse button.

To replace PDF pages by dragging and dropping them

Be aware that you can’t use the Undo command to undo a replacement that’s gone wrong. If you mess up, choose File>Revert to reopen the original PDF document with all of its pages intact (and send me a thank-you for reminding you to save the document in Step 1).
To replace pages by dragging and dropping them in place, follow these steps:
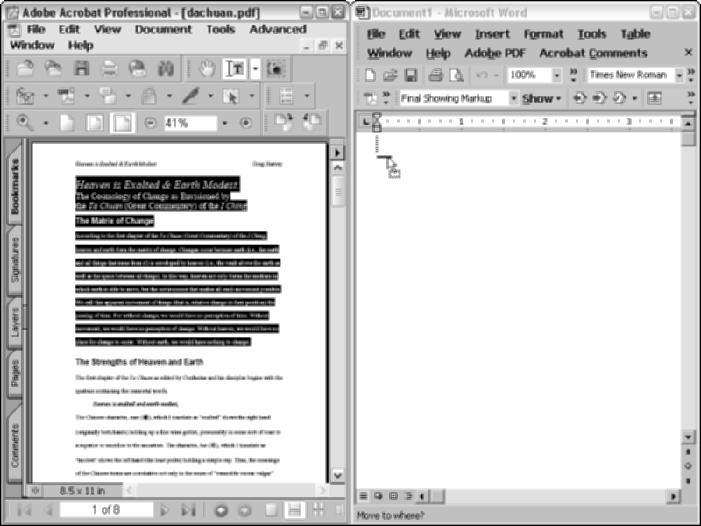
  1. Open both PDF documents: the one with the pages to be replaced and the one with the replacement pages. In both documents, click the Fit Width button on the Zoom toolbar and click the Pages tab if the Pages palette is not displayed in the Navigation pane.
  2. Choose Window>Tile>Vertically or press Ctrl+Shift+L (Ô+Shift+L on the Mac).
  3. In the window with the page or pages to be replaced, scroll the Navigation pane so that the thumbnail of the first page to be replaced is visible.
  4. In the window with the replacement page or pages, select the thumbnails of the replacement page or pages (starting with the first replacement page). Shift+click or drag a bounding box around the thumbnails to select a series of pages.
  5. Drag the arrowhead mouse pointer from the Pages palette with the selected replacement thumbnail(s) to the Pages palette with the pages to be replaced.
  6. Position the mouse pointer over the number at the bottom of the first thumbnail to be replaced and then release the mouse button.
You can tell when you’ve reached the right spot because the number and the page thumbnail become highlighted, along with any subsequent pages in the palette that are to be replaced. As soon as you release the mouse button, Acrobat makes whatever page replacements are necessary to bring in all the pages you selected before dragging. As with the first method, if you discover that you replaced the wrong pages, choose the File>Revert command to put the pages back where they were. Replacing and adding PDF pages through Acrobat can result in a not-soobvious problem involving files that have font subsets.
When you insert or replace pages containing those fonts, Acrobat automatically includes all the font subsets in the resulting file. If you do a lot of inserting and replacing, you can end up with a lot of redundant font subsets that can’t be removed from the file. Mild to severe bloat can happen, depending on how may subsets are involved.
To cure this problem, choose Advanced>PDF Optimizer. On the PDF Optimizer dialog box that appears, click the Fonts tab, use the Move buttons to unembed any redundant font subset, and then click OK to optimize your PDF file.

Replacing pages from other PDF files

Every now and then in editing a PDF document, you come across a situation where you need to replace just certain pages in the file. Keep in mind when you’re replacing an original page with an updated version that only the text and graphics on the original page are replaced by those on the updated page. All interactive elements associated with the original page remain and carry over to the updated page (this could potentially cause problems if the links carried over from the original page no longer match up with buttons or linked text in the updated version).
As with cropping pages, Acrobat offers you two different ways to replace a page or pages in a PDF document. In the first method, you open just the document, select the page or pages to be replaced, and then use the Replace Pages command to specify the PDF document (which doesn’t have to be open) and the page or pages in it to replace the selected pages. In the second method, you use a variation of drag-and-drop, where you drag a thumbnail of the replacement page from its Pages palette onto the page it’s replacing in its Pages palette (of course, to do this, you must have both documents open, tiled side by side, with both of their Pages palettes selected). Use the first method when you’re sure (without looking) which pages in what PDF document to use as the replacements for the currently selected pages. Use the second method when you want to have a visual check as you make the replacements in your PDF document. The steps for using the first method with the Replace Pages command are as follows:
  1. Open the document that has the page or pages that need replacing in Acrobat 6; make sure that all changes are saved in the file. If you’re not sure if the changes have been saved, choose File➪Save.
  2. Open the Pages palette in the Navigation pane and select the thumbnail( s) of the page or pages that need replacing (Shift+click to select multiple pages).
  3. Select Replace Pages on the Options menu at the top of the Pages palette. The Select File with New Pages dialog box opens.
  4. Open the folder and select the file icon of the PDF document that contains the replacement pages, and then click the Select button. The Replace Pages dialog box opens.
  5. Check the page numbers that appear in the Replace Pages and To text boxes in the Original section of the dialog box to make sure that they represent the one(s) you mean to replace.
  6. Enter the page number of the first page of the replacement range in the With Pages text box. Acrobat replaces the same number of pages from the replacement PDF as are designated in the Replace Pages range.
  7. Click the OK button.
The Acrobat alert dialog box appears, asking you to confirm the replacements.
Click the Yes button to make the replacements.

How to use the PDF Crop tool?

To use the Crop tool to do the cropping, follow these steps:
  1. Click the Actual Size button on the Viewing toolbar and, if necessary, the Single Page button on the status bar of the Document pane.
  2. Click the Crop tool on the Advanced Editing toolbar.
  3. Use the cross-hair mouse pointer to draw a bounding box that marks out the approximate cropping margins and then release the mouse button. Acrobat responds by placing sizing handles at the four corners of the bounding box.
  4. If necessary, use the double-arrow mouse pointer on the edges or corners of the cropping bounding box to adjust the crop margins.
  5. Double-click the arrowhead pointer somewhere within the bounding box. The Crop Pages dialog box (refer to Figure) opens.
  6. If necessary, adjust the values in the Top, Left, Right, and Bottom text boxes in the Crop Margins section of the dialog box.
  7. If you want to crop more than just the current page in the document, specify the page range in the Page Range section of the Crop Pages dialog box.
  8. Click OK to crop the page(s) to the specified crop margins.

Cropping pages in PDF

On occasion, you may find that you need to crop one or more pages whose overall page dimensions conflict with the others in the PDF document. Acrobat offers two methods for doing this: You can crop pages in the Crop Pages dialog box, where you must specify the values of the crop margins, or with the Crop tool on the Editing toolbar, where you draw the crop marks right on the page.
To open the Crop Pages dialog box, select the Crop Pages command on the Pages palette Options pop-up menu or choose Document>Pages>Crop on the menu bar. When you do this, Acrobat displays the Crop Pages dialog box, as shown in Figure.
You can then select from the following options in the Crop Pages dialog box to resize the desired page or pages:
  • Page Display: Specify different types of clipping paths for the cropping operation in this drop-down list: Crop Box (defines display and printing by the Crop tool), Bleed Box (defines, for professional printing, where a bleed area is included to allow for paper trimming or folding), Trim Box (defines the finished dimension of the page after cropping), or Art Box (defines page contents that include white space). Note that each page display option is defined by a different color box in the page preview of the Crop Pages dialog box. Selecting the Show All Boxes check box displays all defined display options in preview. Deselecting this check box displays each display option individually when selected in the Page Display drop-down list.
  • Crop Margins: Specify how much to cut off the page from the top, left, right, and bottom margins by typing a number in the associated text boxes or by using the toggle buttons. Select the Remove White Margins check box to have Acrobat figure out the crop margins by removing all the white space around the text and graphics on the specified pages. Click the Set to Zero button to restore all margin values to zero. Click the Revert to Selection button to use the dimensions of the previously used cropping rectangle. Select a measuring unit (Inches is the default) in the Set Values drop-down list.
  • Page Range: Determine which pages you want to crop. Select the All radio button to crop all pages, the Selection radio button to crop only the page(s) selected in the Pages palette or the Pages radio to crop the range you specify in the From and To text boxes. _ Crop: Limit what type of pages are cropped in the selected range by choosing Even and Odd Pages, Odd Pages Only, or Even Pages Only.