Sunday, December 28, 2008

Rotating pages in PDF

Sometimes, you end up dealing with a PDF document that contains one or more sections whose pages need to be reoriented (perhaps switched from portrait to landscape mode) to better suit their text and graphics. To rotate pages in a PDF document, you select the Rotate Pages command on the Pages palette Options pop-up menu or choose Document>Pages>Rotate on the menu bar. (Don’t confuse this command with the Rotate View command found on the View menu, which rotates all the pages in the current PDF document for viewing.) When you choose Rotate Pages, Acrobat displays the Rotate Pages dialog box, as shown in Figure. You can select from the following options in the Rotate Pages dialog box to change the orientation of the desired page or pages:
  • Direction: Choose to rotate the image Clockwise 90 degrees, Counterclockwise 90 degrees, or 180 degrees.
  • Page Range: Determine which pages to rotate: Select the All radio button to rotate all pages, the Selection radio button to rotate only the page(s) selected in the Pages palette, or the Pages radio button to rotate the range you specify in the From and To text boxes.
  • Rotate: Limit what type of pages in the designated page range to rotate with these two drop-down lists. You can choose Even and Odd Pages, Even Pages Only, or Odd Pages Only from the top drop-down list. From the bottom drop-down list, you can select Pages of Any Orientation, Landscape Pages, or Portrait Pages.

Page-Editing Practices


Acrobat makes it easy for you to perform a number of routine page edits on one or more pages of a PDF document. Possible page edits can include rotating and cropping the pages, replacing pages from another PDF document, inserting a new page, deleting pages, and reordering the pages in the document, as well as assigning page numbers. You find all the commands to make these types of page edits on the Options pop-up menu at the top of the Pages palette in the Navigation pane.
When you’re using the Pages palette to navigate or edit pages, you can display more thumbnails of the pages in this palette by selecting the Reduce Page Thumbnails option at the bottom of the Pages palette Options pop-up menu. You can also increase the number of thumbnails visible by dragging the border between the Navigation and Document panes with the doubleheaded arrow to the right to make the pane wider.

Editing graphic images from the context menu

When a graphic is selected, you can also edit it using the options available on its context menu. To open a graphic’s context menu, right-click (Control+click on the Mac) the image with the TouchUp Object tool. These context menu options include many of the same options as the context menu for selected text . The following items on the context menu for selected graphics differ from the context menu for selected text:
  • Delete: Removes the selected image and places it in the Recycle Bin (Trash on the Mac).
  • Delete Clip: Removes any objects that are clipping the selected image (that is, cutting off part of the image in some way). This feature is grayed-out if no clipping occurs in the current document.
  • Select All: Selects all graphic objects on the current document page.
  • Select None: Deselects all graphic objects on the current document page.
  • Edit Image: Opens the selected graphic in the default image-editing program.
When a graphic object is selected, this option changes to Edit Object, and choosing it opens the object in the default page/object editing program. When multiple graphic objects are selected, this option becomes Edit Objects. When no graphic images are selected, this option becomes Edit Page, and choosing it opens the object in the default page/object editing program as well.
When you choose the Edit Image/Object(s)/Page option, Acrobat attempts to launch the program specified as the image editor or the page/object editor in the TouchUp section of the Preferences dialog box and open the selected image or graphic object in the application for editing. If Acrobat cannot launch the specified program, its displays an alert dialog box that informs you of this fact.
To specify a new program as the default image editor or the page/object editor, press Ctrl+K (Ô+K) to open the Preferences dialog box. Then click TouchUp in the list box on the left. To select a new image editor, such as Photoshop 7.0, click the Choose Image Editor button. The Choose Image Editor dialog box appears; open the folder that contains the application, select its program icon, and click the Open button. To select a new page/object editor, such as Illustrator 10, click the Choose Page/Object Editor button. In the Choose Page/Object Editor dialog box, open the folder that contains this application, select its program icon, and click the Open button. When using programs like Photoshop 7.0 and Illustrator 10 as your image editing and graphics object editing programs, respectively, you can make your changes in the programs launched from Acrobat 6 with the Edit Image or Edit Object command, and then, when you save your editing changes to the image or graphic in these programs, they are automatically updated in your PDF document.

Using the layout grid in repositioning graphics


Acrobat has a layout grid that you can use to help you in repositioning graphic images. To turn on the display of the layout grid in the PDF document, choose View➪Grid or press Ctrl+U (Ô+U on the Mac). When working with the layout grid, you can modify the default grid settings in the Units & Guides section of the Preferences dialog box by pressing Ctrl+K (Ô+K on the Mac) and then clicking Units and Guides in the list box on the left. The Layout Grid section of the dialog box contains a number of grid options that you can change:
  • By default, Acrobat subdivides each of the major grid squares into three divisions across and three down, making a total of nine little subdivisions. To increase the number of squares in each of the major grid squares, increase the value in the Subdivisions text box.
  • To offset the layout grid in relation to the top and left margin of the page, enter a value in the Grid Offset from Left Edge and the Grid Offset from Top Edge text boxes.
  • By default, Acrobat makes each major grid square one-inch square with one inch between their vertical lines and one inch between their horizontal lines. To make the major grid squares larger so that there are fewer, farther apart, increase the values in the Width Between Lines and Height Between Lines text boxes. To make the grid squares smaller so that there are more, closer together, decrease the values in these text boxes. Note, however, that if you decrease the values in these text boxes too much, Acrobat is no longer able to subdivide the square using the value entered in the Subdivisions text box.
  • By default, Acrobat colors the lines in the layout grid blue. To select a new color for all grid lines, click the Grid Line Color button and then click the desired color in the color palette.

Touching up your graphic images


You can use the TouchUp Object tool to select graphic images or other objects that have been embedded in a PDF document. This tool uses an arrowhead with a tiny square icon. You can switch between selecting the TouchUp Text tool and the TouchUp Object tool from the Advanced Editing toolbar by pressing Shift+T. As you hold the Shift key and press T, the arrowhead icon used by the TouchUp Object tool and outlined T icon used by the TouchUp Text tool toggle between one another on the toolbar. To select a graphic with the TouchUp Object tool, you simply click it with the arrowhead pointer. After a graphic is selected (indicated by a gray bounding box around the image or object — there are no sizing handles because you can’t resize graphics in Acrobat), you can then reposition it by dragging its outline to the new position before you release the mouse button. You can also nudge a selected graphic image with the arrow keys: Just press the ←, →, ↑, and ↓keys to move the graphic by small increments until it’s in the desired position.
To select more than one graphic image or object on the page at the same time, Shift+click each object. To select a group of graphic images or objects on the page, drag the TouchUp Object tool to draw a bounding box around all the graphics to select them all together.
When you’re trying to move charts and graphs embedded on the document page (especially those originally generated in a spreadsheet program like Microsoft Excel), drag a bounding box around the entire chart to ensure that you select all the components (such charts are actually composed of a whole bunch of individual graphic objects) before you attempt to reposition it on the document page.

Thursday, December 11, 2008

Modifying text attributes


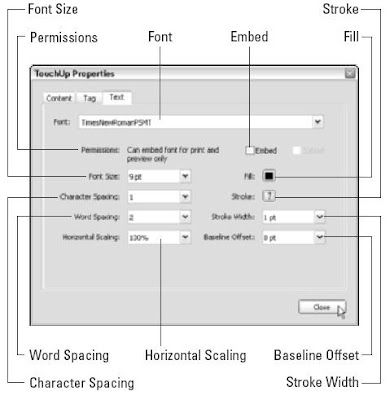
Provided that you have the font (or someone’s been nice enough to have embedded it in the PDF document for you), you can modify the attributes of the characters that you highlight with the insertion point in text selected with the TouchUp Text tool. Note that if your system doesn’t have the font and it hasn’t been embedded, Acrobat displays a nice little alert dialog box saying, Warning. You cannot edit text in this font. After selecting text within a bounding box, right-click and choose Properties on the context menu to open the TouchUp Properties dialog box with the Text tab already selected. This dialog box contains the following attribute options that you can change:
  • Font: Specify a new font for the selected text from the Font drop-down list.
  • Embed: Embed the font displayed in the Font drop-down list and, if desired, its subset fonts (Italic, Bold, and so on) in the PDF document. Note that the default Permissions, Can Embed Font for Print and Preview Only, appear in the area to the left of the Embed button. This setting allows you to embed or unembed a font and its subsets. Permissions settings may differ depending on the security put in place by the author of the PDF document.
  • Font Size: Specify a new font size for the selected text in the Font Size drop-down list.
  • Character Spacing (also known as tracking): Uniformly adjust the spacing between more than two characters selected in the text by the amount you specify in this drop-down list box.
  • Word Spacing: Uniformly adjust the spacing between two or more words selected in the text by the value (in thousandths of an em space) you specify in this drop-down list box.
  • Horizontal Scaling: Horizontally compress or expand the selected text by the percentage you enter in this drop-down list box.
  • Fill: Specify a new fill color (interior color) for the selected font on the color palette.
  • Stroke: Pick a new stroke color (outline color) for the selected font on the color palette.
  • Stroke Width: Specify a stroke width from between 1point and 4 point thickness in the drop-down list.
  • Baseline Offset: Shift the selected text vertically up or down in relation to the text baseline by the number of points you specify in this dropdown list box.
In addition to allowing you to edit text in a PDF document, the TouchUp Text tool also lets you add new text as well. Simply Ctrl+click (Option+click on Mac) the area in a PDF document where you want to enter new text to open the New Text Font dialog box. Here you choose a font in the Font drop-down list, choose the text display direction by selecting Horizontal or Vertical in the Mode drop-down list, then click OK to close the New Text Font dialog box and begin typing your new text.

Editing text from the context menu

When text is selected, you can also edit it using the options available on its context menu. To open selected text’s context menu, right-click (Control+click on the Mac) the text with the TouchUp Text tool. The context menu includes the following options:
  • Cut: Removes selected text from the PDF document and adds it to the Clipboard.
  • Copy: Copies selected text to the Clipboard.
  • Paste: Inserts text stored in the Clipboard into selected text or onto the current document page if no text is selected.
  • Delete: Removes selected text.
  • Select All: Selects all text within a bounding box on the current document page.
  • Select None: Deselects all text within a bounding box on the current document page.
  • Create/Delete Artifact: Designates or deletes text or an object in a PDF as either a Page (such as printing crop marks), Pagination (such as page numbers), or Layout (such as dividing lines between columns of text or footnotes) Artifact that may or may not be included in the document when it is repurposed in another format. For example, you may want printer’s marks on a PDF that will be printed, but not on the same PDF repurposed as a Web page.
  • Insert: Inserts various formatting elements into your text selection that improve the flow of text when you right-click and choose the desired element on the Insert submenu. Options available are: Line Break, Soft Hyphen (that is, one that disappears when the word doesn’t break across two lines), Non-Breaking Space (a space that keeps hyphenated words together on the same line at all times), and Em Dash (a longerthan-usual dash usually equal to the width of the letter M in the selected text that does permit line breaks across words).
When you finish editing text, click the Hand tool to ensure that you don’t inadvertently select other lines of text and do unintentional editing to them. Just be aware that you can’t use your good ol’ H keystroke shortcut to select the Hand tool because this only succeeds in typing the letter h in the line! Remember that some PDF files use the restrictions in the Changes Allowed security option to prevent anyone from making further editing changes. When this option is in effect in your document, you can’t get the TouchUp Text tool to select any text in the PDF document no matter how hard you click.

Using the TouchUp Text tool to edit text


You use the TouchUp Text tool much like the mouse cursor in a word processing program. You can either select the text containing the characters you want to edit or simply insert the cursor into the text and edit text on either side of the cursor. Thanks to Acrobat 6 support of document structure tags, you can now make much larger text selections than previously possible. The Acrobat 6 TouchUp Text tool lets you make text selections based on a heading or paragraph style tag present in the original document you converted to PDF — hopefully, a document created in an RTF (Rich Text Format) word processing program like Microsoft Word that adds these structure tags automatically. The end result is that clicking on text in a PDF document with the TouchUp Text tool displays a bounding box (also referred to as a container) around the text, based on its underlying document structure.

You can then select any or all text within the bounding box. For example, if the text you click has tags that define it as Normal paragraph style, a bounding box appears around the whole paragraph, indicating that you can select any part or the entire paragraph for editing. This is great progress for a program that until recently only allowed you to select one line of text at a time for editing. When you select the TouchUp Text tool on the Advanced Editing toolbar, the mouse pointer changes to an I-beam. Click the I-beam on a line or block of text where you need to make your first edit. When you click, Acrobat encloses the text in a bounding box defined by the underlying document structure tag. You can select any or all the text within the bounding box by dragging the I-beam through the desired text. To make editing changes to the surrounding characters when you insert the I-beam into text, use one of the following techniques:
  • To insert new characters at the insertion point, just type the characters.
  • To delete characters to the immediate right of the insertion point, press the Delete key.
  • To delete characters to the immediate left of the insertion point, press the Backspace key.
  • To restore characters deleted in error or remove ones incorrectly inserted, press Ctrl+Z (Ô+Z on the Mac), your good ol’ trusty Undo key.
Note that Acrobat 6 now supports multiple levels of undo. To make editing changes to text you’ve selected by dragging the I-beam cursor, use one of the following techniques:
  • To replace the text you’ve selected with new text, just begin typing.
  • To delete selected text, press the Delete key or right-click the text selection and choose Delete on the context menu.

Touching Up the Text and Graphics


You use the TouchUp tools on the Editing toolbar to make last-minute changes to the text and graphics in your PDF document. Acrobat includes two TouchUp tools that share a single button: the TouchUp Text tool (T) that you can use to do text corrections in individual lines of text in a PDF file, and the TouchUp Object tool (Shift+T) that you can use to reposition graphics. The single-key accelerator feature that allows keyboard shortcuts, such as pressing T to select the TouchUp Text tool, is not turned on by default in Acrobat 6. To enable single-key accelerators, choose Edit➪Preferences or press Ctrk+K (Ô+K on Mac) to open the Preferences dialog box, click General in the list box on the left to display the general options, and then select the Use Single-Key Accelerators to Access Tools check box. Finally, click OK to enable your settings. After turning on this feature, when you point to an editing tool button on the Acrobat 6 toolbars, a screen tip displays the name of the tool, as well as the key that can be pressed to quickly select the tool.

Removing all comments


After you’ve made all the required editing changes, you can remove all the comments and various markings from the original PDF document by opening the Comments palette, selecting all the comments listed, and then clicking the Delete the Selected Comment button on the Comments palette button bar. To select all comments, make sure all comments are collapsed by clicking their Collapse buttons (minus sign in Windows, triangle pointing down on the Mac), click the top comment group in the Comments pane, and then Shift+click the remaining comment groups. Note that Acrobat does not display an alert dialog box asking for your confirmation before removing all the comments in the current PDF document. You can, however, restore them by choosing Edit➪Undo Multiple Deletes or by pressing Ctrl+Z (Ô+Z on the Mac). Before you make your edits and remove all the comments, use the File➪Save As command and rename the file to make a copy of the PDF document with all its comments. That way, you always have a copy of the original file with all the reviewers’ feedback.