Monday, July 27, 2009

Palm handheld users take note!


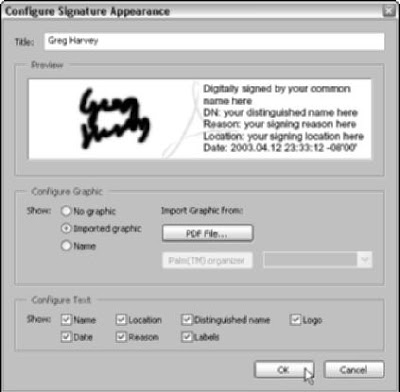
If you have a Palm handheld connected to your computer, you can use the Palm ™ Organizer button (no longer grayed-out when Acrobat detects graphic files on the device) in the Configure Signature Appearance dialog box to select a version of your handwritten signature as the graphic to be used in your digital signature in Acrobat. You can create this picture of your handwritten signature by writing with your stylus on the Palm screen and then saving the handwriting as a graphics file on your device. When you click the Palm Organizer button, you can then select the graphics file with your handwritten signature in the Palm Organizer dropdown list, which appears to the immediate right of the button.

Adding a graphic to your signature in a signature appearance

Although they’re called digital signatures, they don’t look anything like signatures you’re used to seeing on documents, unless you add a picture of your handwritten signature. If you have an image of your handwritten signature or a particular picture that you’d like to use as your identifying mark, and the image is saved as a PDF file, you can add it by creating a signature appearance as outlined in the following steps:
  1. Choose Edit➪Preferences or press Ctrl+K (Ô+K on the Mac) to open the Preferences dialog box in Acrobat. Click Digital Signatures in the list box on the left side of the Preferences dialog box to display the Digital Signatures options.
  2. Click the New button. The Configure Signature Appearance dialog box appears.
  3. Click the Title text box and enter a descriptive name for the new signature appearance you’re creating.
  4. Select the Imported Graphic radio button.
  5. Click the PDF File button. The Select Picture dialog box opens.
  6. Click the Browse button to display the Open dialog box, where you open the folder and click the icon of the PDF file that contains the graphic of your handwritten signature, and then click the Select button to close the Open dialog box and return to the Select Picture dialog box.
  7. Check that you’ve selected the correct image in the Sample area in the Select Picture dialog box, and then click the OK button. The Select Picture dialog box closes, and you return to the Configure Signature Appearance dialog box.
  8. Check the preview of your digital signature in the Preview area. To remove various pieces of information from the signature display, deselect their check boxes in the Configure Text area of the dialog box. Keep your eye on the Preview area as you remove individual items.
  9. When you have the digital signature looking the way you want it to appear in the PDF document, click the OK button to close the Configure Signature Appearance dialog box, and then click the Close button in the Digital ID File Settings dialog box.

Changing your password settings


You can change the password you assigned to your Digital ID, or you can change your password timeout settings (that is, how often you’re prompted for a password when working with a PDF document that you’ve signed). Note that changing your password has no noticeable effect on your digital signature.
To change your password, follow these steps:
  1. Click the Change Password button in the Digital ID File Settings dialog box for your Digital ID.
  2. Click in the Old Password text box and enter your current password.
  3. Click in the New Password text box and enter the new password you want to set.
  4. Click in the Confirm Password text box and reenter the new password.
  5. Click the OK button. An alert dialog box appears, telling you that your password has been successfully changed.

By default, Acrobat prompts you for your password each time you digitally sign a PDF document. If you don’t ever want to be prompted for your password when signing off on a bunch of PDF files, or you want the program to prompt again only after a certain time period has elapsed, you can change these password options as follows:
  1. Click Password Settings button in the Digital ID File Settings dialog box for your Digital ID.
  2. To not be prompted for your password when signing, deselect the Require Password to Access When Signing check box.
  3. To select a time period before being prompted for your password, select the After radio button (the default is Always), and then choose a timeout setting on the After drop-down list. The settings on this list include a fair number of timeout intervals between 30 seconds and 24 hours.
  4. Enter your password in the Enter Password (Needed to Apply the Change) text box.
  5. Click OK. An alert dialog box appears, telling you that your password timeout has been successfully changed.
If you change the password and password time period settings for your Digital ID, don’t forget to replace all backed-up versions of your Digital ID (the .apd file) with the new version that contains your updated password settings. Should you forget to do this and ever have to rely upon a backup of your Digital ID, you’ll have to be able to reproduce your old password in order to log in and sign documents with it.