Friday, November 28, 2008

Searching for comments


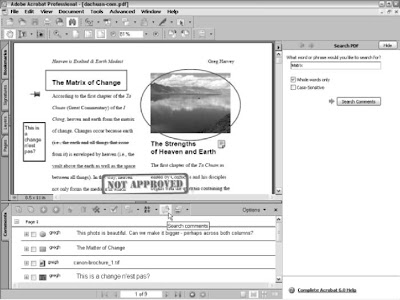
You can have Acrobat search comments for particular words or phrases by clicking the Search Comments button on the Comments palette button bar to open the Search PDF pane with only Search Comments options displayed.
Follow these steps in using the Find Comment dialog box:
  1. In the What Word or Phrase Would You Like to Search For? text box, enter the word or phrase in the comment(s) you want to locate as the search text.
  2. To prevent Acrobat from finding the search text inside of other words (as in her in the word there), select the Whole Words Only check box.
  3. To match the capitalization of the search text, select the Case-Sensitive check box.
  4. Click the Search button to begin your search. After Acrobat scans the PDF document, it displays the search result in the Search PDF pane, letting you know that it’s finished searching for your term, displaying the number of total instances found and the actual result(s) in the Results list box. Clicking an item in this list selects not only the icon or markup associated with the search result comment text in the PDF document, but also the associated comment in the Comments palette.
  5. If no results appear after a search, click the New Search button to start the process over.
  6. When you finish searching the comments in the PDF document, click the Done button or the Hide button in the Search PDF pane.
Note that you can enter the name of an author (as it appears on the title bar of the comment boxes) in the What Word or Phrase Would You Like to Search For? text box to use the Search Comments feature to locate and select comments made by a single reviewer.
Don’t confuse searching for comments in a PDF document with searching for text in the document. You use the regular Edit➪Search command to search for words or phrases in the general text of the document. You use the Search Comments button in the Comments palette to search for words or phrases only within the comments that you’ve added or imported into the PDF document.

Locating comments in the Comments palette

To use the Comments palette to locate and select a particular comment in the document, follow these steps:
  1. Click the Comments tab on the Navigation pane or choose View>Navigations tabs>Comments to display the Comments palette.
  2. To choose a different sort order for the comments, select one of the options on the Sort By pop-up menu: Type, Author, Date Last Modified, Color, Checkmark Status, or Status by Person. By default, Acrobat sorts the comments in the Comments palette by page.
  3. Click the Expand button (a plus sign on Windows and triangle pointing right on the Mac) for the page, comment type, author, or date modified (depending upon how the list in the Comments palette is sorted) that you think contains the comment or comments you want to find.
  4. Click the icon for the comment you want selected in the expanded list of comments on that page.

When you click a comment in the Comments palette, Acrobat displays the page and the comment markup in the Document pane. Because the comment you selected in the Comments palette is also selected in the PDF document, if you want to change its setting, you can then open its Properties dialog box by rightclicking the markup and choosing Properties on the context menu. To open its comment box, however, you still have to double-click the selected text or icon. Note that you can also edit a comment directly in the Comments palette without opening the comment box attached to the markup in the PDF document.

Finding comments


Acrobat provides a couple of methods for locating the comments that you’ve added and imported into a PDF document: You can use the Comments palette in the Navigation pane to identify all the comments made on particular pages of the PDF document, or you can use the Search Comments button in the Comments palette button bar to search comments for particular words or phrases. The Search PDF pane is displayed by clicking the Search Comments button shown in the figure. Note that the Comments palette, because of its expanded button bar and greater content, is the only Navigation pane that displays horizontally rather than vertically. Unlike the other Navigation panes (Bookmarks, Pages, and so on), if the Navigation pane is open when you select the Comments palette, you can close the Navigation pane by clicking its Close button while leaving the Comments palette open, thus giving your document more horizontal viewing space. If the Navigation pane is closed when you select the Comments palette, it remains closed.

Showing and hiding comments

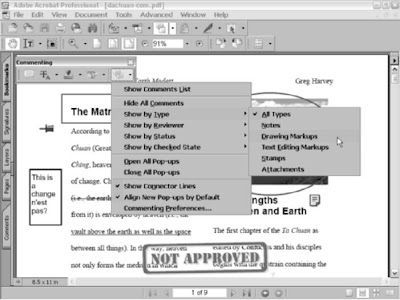
The Show menu button, located at the end of the Commenting toolbar, contains a large variety of options for displaying and hiding (also known as filtering) review comments attached to a PDF document, as shown in Figure. Filtering makes it easier to review annotations by allowing you to temporarily hide certain types of comments and only view those that you want to work with. For example, you can use the Show by Reviewer command to display only those comments made by a specific review participant. Note that the first time you use any of the Show menu commands in Acrobat 6, you may get a largely esoteric Hiding Comments with Replies alert dialog box telling you that Filtering does not apply to individual replies and that when you have a comment with replies that is hidden, all of its replies are hidden as well, regardless of whether they match the criteria for being hidden or not.

The gist is that you’ll have to use the Search Comments feature to find these comments and replies if you hide them. Select the Don’t Show This Message Again check box (unless you like this sort of abuse) and then click OK to close the alert dialog box.
To begin filtering a PDF review document, simply click the Show menu button on the Commenting toolbar and select a command on its menu or submenus. In Figure, I’m choosing Show>Show by Type>Drawing Markups. This command displays only those comments in the PDF document that were made with either the Pencil tool or the Rectangle tool. As the figure shows, in addition to displaying only Drawing Markups, you can also choose to display All Types of comments, only Notes, only Text Editing Markups, only Stamps, or only Attachments on the Show by Type submenu. Other filtering criteria on the menu include Show by Reviewer, where you can choose all participants or a specific participant, Show by Status, which gives you the option of displaying comments that have been Accepted, Rejected, Cancelled, or Completed (you can also choose All Status or None), and Show by Checked State, which displays only those comments that you’ve marked Checked or Unchecked.

These markups are for the use of the review initiator only and don’t appear to other review participants.
The following list describes other commands that appear on the Show menu that you can use to filter comments in a PDF document:
  • Show Comments List: Used to open the Comments palette in the Navigation pane.
  • Hide All Comments: This is a no-brainer. When you temporarily hide all comments, this menu command changes to Show All Comments so that you can redisplay all those you’ve hidden.
  • Open/Close All Pop-ups: Used to open or close all pop-up comments attached to markups for display, whether they are hidden or not.
  • Show Connector Lines: Used to add connector lines between markups and their associated comments. This is especially useful for comments placed outside the margins of a PDF document.
  • Align New Pop-ups by Default: Used to line up new pop-up comments along the right side of the screen, regardless of the location of its markup in the PDF document.
  • Commenting Preferences: Used to open the Commenting window in the Preferences dialog box in Acrobat 6.

Using summarize feature


After you’ve received reviewers’ comments in a PDF document, whether e-mail or browser-based, you can use the Summarize feature to create a summary report that lists all the different types of comments attached to a PDF document. This convenient feature lets you sort comments and specify a page layout in order to generate a printable comment synopsis. The summary is a separate PDF document that can be printed directly in Acrobat or saved and distributed to others for viewing and printing.
To generate a summary report, follow these steps:
  1. Choose Document➪Summarize Comments. The Summarize Options dialog box appears, as shown in Figure.
  2. Click one of the radio buttons in the Choose a Layout section of the Summarize Options dialog box to specify how the summary will appear onscreen or when printed. As you can see in Figure, in addition to having a lengthy description of the page layout attached to each radio button, you also get a graphic depiction of the selected page layout in the area above when you click a radio button.
  3. Choose a comment sort order for the summary by clicking the Sort Comments By drop-down list and choosing either Author, Date, Page, or Type.
  4. Select one of the Include radio buttons, either All Comments, which displays all comments whether they are hidden or not in summary, or Only the Comments Currently Showing, which keeps hidden comments hidden in the summary.
  5. Choose a Font Size radio button, either Small, Medium, or Large, to specify the size of displayed text in the summary.
  6. Click OK to close the Summarize Options dialog box and generate the summary report.
  7. Acrobat generates the summary report in a separate PDF document that it displays in the Document window using the Fit Width view. You can then save and print this summary file.

Wednesday, November 12, 2008

Spelling it out


Acrobat includes a spell check feature that you can use to catch typos you make in the comments that you add to a PDF document. You can use this feature to catch and eliminate all those embarrassing spelling errors before you send your comments out to someone else on the review team. To spell-check the text in all comments in the document (along with all text in any form fields you’ve added), go to the first page of the document, choose Edit>Check Spelling>In Comments and Form Fields, or press F7 to open the Check Spelling dialog box, and then click the Start button.
Acrobat will then flag the first unknown word it encounters in either the form fields or the comments in the document, and you can then take one of the following steps:
  • To replace the flagged word with one of the suggested corrections listed in the Suggestions list box, click the correction and then click the Change button.
  • To replace the flagged term with the selected correction in all instances in the other form fields and comments in the document, click the Change All button.
  • To ignore the flagged word, click the Ignore button.
  • To ignore the flagged word in all the other form fields and comments in the document, click the Ignore All button.
  • To add the word to the dictionary, click the Add button.

When Acrobat finishes checking the spelling in the last form field or comment on the last page of the document, it automatically returns to the first page and displays the message Spell Check Complete in the Check Spelling dialog box. You can then click the Done button to close the Check Spelling dialog box. If you want to have Acrobat spell-check a passage in the document text, use the Highlight tool to highlight the text to be spell-checked, which is then automatically added to a hidden comment box. Run the spell check feature and use it to correct all the misspellings in the text’s comment box.

You can then use the corrected text stored in the comment box when making the corrections during the final editing phase. Note that in order for the process described previously to work in Acrobat 6, you need to make sure that the Copy Selected Text into Highlight, Cross-Out, and Underline Comment Pop-ups check box is selected in the Commenting section of the Preferences dialog box. To check if this feature is selected, choose Edit➪Preferences or press Ctrl+K (Ô+K on Mac) and click Commenting in the list box on the left side of the Preferences dialog box.

Mark it well

The graphic markup tools (Pencil and Rectangle) found on the Advanced Commenting toolbar enable you to mark up elements that need changing in the PDF document you’re reviewing. When you use these graphic markup tools to call attention to particular passages of text and graphics, you can add hidden notes (like you can do when using the Stamp and Note tools) that explain the type of changes you’d like to see made to the elements you’ve marked. All the graphic tools work in a similar manner and share the same Appearance, General, and Review History properties as associated with Commenting toolbar markup tools. The Pencil tool comes with its own Pencil Eraser tool (just like a real pencil!), and the Rectangle tool is actually one of seven shape tools found on its pop-up menu. Which of these tools you select varies according to the kind of document elements you want to mark up:
  • Pencil tool: Draws freehand shapes around text and graphics.
  • Rectangle tool: Draws rectangular and square boxes around text and graphics. Hold down the Shift key to constrain the shape to a square as you draw with this tool.
  • Oval tool: Draws a circle or oval around text and graphics. Hold down the Shift key to constrain the shape to a perfect circle as you draw with this tool.
  • Arrow tool: Draws arrows that point to a specific document element.
  • Line tool: Adds a line to text or graphics (often referred to as adding a rule). Hold down the Shift key to constrain the shape to a straight line and drag left and right for a horizontal rule, up and down for a vertical rule, and diagonally for a rule on the bias at 45 degrees.
  • Cloud tool: Draws a nice puffy cloud around text or graphic elements you want to call attention to. Using this tool greatly enhances the cuteness quotient of your reviewing contribution.
  • Polygon tool: Draws a closed multisegment polygon shape around a document element.
  • Polygon Line tool: Draws an open multisegment polygon shape around a document element.
To use one of these tools to mark up a PDF document, follow these general steps:
  1. To use the Pencil tool, click its button on the Advanced Commenting toolbar or press N. To use one of the other markup tools, press Shift+D until its icon (rectangle for the Rectangle tool, oval for the Oval tool, diagonal line for the Line tool, and so on) is selected.
  2. Position the cross-hair mouse pointer near the text or graphic that you want to mark up, and then drag to draw the line or shape made by the tool to call attention to it. When using the Pencil tool, you can draw a freehand line or enclosing shape. When using the Square, Circle, or Line tool, remember that you can constrain the shape or line by holding down the Shift key. When using the Cloud or Polygon tools, click the point where you want to start drawing and drag to draw a line. When you want to change direction, click again to start a new line in the same manner. Continue clicking and dragging until you’ve either enclosed the desired document element with a final click at your starting point, or in the case of the Polygon Line tool, make a final click to end your drawing. Note that you can cancel or complete a drawing at any time during the process by right-clicking and selecting either Cancel or Complete on the context menu.
  3. Release the mouse button when you finish drawing the desired line or shape with the selected tool.
When you release the mouse button, Acrobat lays the graphic down on the page. To select the markup graphic to resize it, move it, or change its graphic settings, select the Hand tool by pressing H, and then click the line or shape with the arrowhead pointer. If the graphic is a shape made with any tool other than the Line tool, Acrobat encloses it in a bounding box with sizing handles at the corners. If the graphic is a rule made with the Line tool, the program selects the line with sizing handles at either end.

To move a markup graphic, drag its outline with the arrowhead pointer and then drop it in its new position. To resize it, drag one of its sizing buttons. Remember that you can have Acrobat automatically open a comment box each time you add a markup graphic by selecting the Automatically Open Comment Pop-ups for Comments Other Than Notes check box in the Pop-up Behavior area of the Commenting Preferences dialog box. You can also have Acrobat automatically display a hidden comment when you position the mouse on the markup graphic by selecting the Automatically Open Pop-ups on Mouse Rollover check box as well.

Using the File Attachment tool

You can use the File Attachment tool to attach or append another file (not necessarily saved as a PDF) to the PDF document you’re reviewing. You can use this feature to attach new copy and graphics that you’d like to see replace particular text passages and images in the PDF file. You can also use this tool to attach a memo or some other text document that outlines the review steps or special instructions to the design or review team. Don’t use this feature to attach files saved in other file formats besides PDF unless you’re sure that each reviewer has the software necessary to open it installed on his or her computer. Of course, the way to be sure that each and everyone concerned will be able to open and evaluate all the files you attach to a PDF document under review is to save them as PDF files before you attach them.
To attach a file to the PDF file you’re reviewing, follow these steps:
  1. Click the Attach File tool on the Advanced Commenting toolbar or press Shift+J until its icon (the one with the pushpin) is selected.
  2. Click the Pushpin pointer at the place in the PDF document’s text or graphics where you want the File Attachment icon (a paper clip by default) to appear, indicating to other reviewers that a file has been attached. Acrobat responds by opening the Select File to Attach dialog box.
  3. Open the folder and select the icon for the file that you want to attach to the current PDF document, and then click the Select button. The File Attachment Properties dialog box opens.
  4. Change the properties of the file attachment as follows:
    • To select a new icon besides the default paper clip, click the Appearance tab and choose an item in the Icon list box.
    • To change the color of the File Attachment icon, click the Color button and then click the new color in the palette.
    • To increase or decrease the opacity of the file attachment icon, type in a new percentage number in the Opacity text box or use the slider button.
    • To modify the ToolTip description that appears when the user positions the mouse over the File Attachment icon, click the General tab and replace the filename in the Description text box. Acrobat automatically displays the filename as the ToolTip if you don’t modify this text box.
    • To change the author or subject associated with this file attachment, click the Author or Subject text box and edit the default text that appears there.
  5. Click the Close button to close the File Attachment Properties dialog box. As soon as you close the File Attachment Properties dialog box, you see the File Attachment icon (a paper clip unless you changed it) at the place you clicked in the document. To move this icon, drag it with the arrowhead pointer. To display the ToolTip with the name of the attached file (or some other description if you modified the Description text box), position the arrowhead mouse pointer over the File Attachment icon. To open the attached file, double-click its File Attachment icon, or right-click (Control+click on the Mac) the icon and then click Open File on the context menu. Acrobat responds by displaying an Open Attachment alert dialog box, warning you about possible dangers in opening the file. When you click the Open button in the alert dialog box, Acrobat then goes ahead and opens the file.
If the attached file is a PDF document, Acrobat opens it and makes it the current document (you can then return to the original PDF document by selecting its name at the bottom of the Windows menu). If the attached file is saved in some other file format, your computer’s operating system launches the program that created the file (provided that it can be identified and that the program is installed on the computer), opening it in a new window. You can then return to the original PDF document by clicking its program icon on the Windows taskbar or clicking the Application icon on the OS X Dock. To remove an attached file from the PDF document, right-click the File Attachment icon (Control+click on the Mac) and then click Delete on its context menu. To save the attached file on your hard drive before you delete it, click Save Embedded File to Disk on its context menu, select the folder in which you want it saved, and click the Save button.

Using the Attach Sound tool


You use the Attach Sound tool to record a sound note or select an audio file that is played back when the user double-clicks the Sound Note icon. Note that your computer must have a microphone in order to record your own sound notes and add them to your PDF document.
To record a sound note for playback in your PDF document, follow these steps:
  1. Click the Attach Sound tool on the Advanced Commenting toolbar pop-up menu.
  2. Click the Speaker mouse pointer at the place on the page in the PDF document where you want the Sound Note icon to appear. When you click this pointer, Acrobat opens a Sound Recorder dialog box.
  3. To record the sound note, click the Record button and speak into your computer’s microphone. When you finish recording, click the Stop button. To play the note before adding it to your document, click the Play button (which replaces the Stop button).
  4. Click OK in the Sound Recorder dialog box. The Sound Recorder dialog box closes, and the Sound Attachment Properties dialog box opens.
  5. Click the Appearance tab and select an icon for the sound attachment —either Ear, Microphone, or Sound (speaker) in the Icon list box. Click the Color button and select a new color for the sound attachment icon on the color palette that appears. Increase or decrease the opacity of the sound attachment icon by typing in a new percentage number in the Opacity text box or using the slider button.
  6. Click the General tab and edit the default text in the Author, Subject, and Description text boxes. Text entered in the Description text box identifies the sound file when you position the mouse pointer over its attached sound icon.
  7. Click the Review History tab to view any recent changes to the status of the attached sound during a review cycle. When you’re finished changing Sound Attachment properties, click Close to exit the dialog box.
You can also select a prerecorded sound file to play back when the Sound Attachment is played. To select a prerecorded sound file, click the Browse button in the Sound Recorder dialog box to open the Select Sound File dialog box. Click the folder that contains the desired sound file, click the sound file icon, and then click the Select button.
To play a sound note that you’ve added to a PDF document, double-click its Sound Note icon with the Hand tool or right-click (Control+click on Mac) its icon and then click Play File on the context menu.

Using the Text Box tool


You use the Text Box tool to create comments in the PDF document that are always visible. Because free-text comments are always displayed, you need to position them in margin areas or places where they won’t obscure document text or graphics text underneath.
To create a comment with the Text Box tool, follow these steps:
  1. Click the Text Box tool on the Advanced Commenting toolbar or press X if the single-key accelerator feature is turned on.
  2. Click the I-beam mouse pointer or draw a marquee at the place on the page in the PDF document where you want the text of the comment to appear. When you click or draw a marquee with this pointer, Acrobat opens a yellow bounding box (which appears dotted on some monitors) in which you type the note.
  3. Type the text of the free-text note in the note’s bounding box. As you type a note in a bounding box you created by drawing a marquee with the I-beam pointer, Acrobat automatically breaks the lines of text to fit within the width of the bounding box and expands its height.
  4. When you finish typing the text of the free-text note, click the Hand tool and then click outside of the note’s bounding box. Acrobat displays your free-text note in a box.

If you create a bounding box by simply clicking an area in your document with the I-beam pointer, you must make the first line break in your text note by pressing Enter (Return on the Mac) in order for Acrobat to make subsequent automatic line breaks. Otherwise, you end up typing a never-ending line of text that expands the width of the bounding box right off the page! To resize the Text Box note to make all of its text visible or to eliminate excess white space around the note text, position the Hand tool somewhere on the note and then click the arrowhead pointer to display the sizing handles at the four corners of the free-text note box. Next, position the pointer on one of the sizing handles and drag the double-headed pointer diagonally until the outline of the note box is the shape and size you need. Click outside the note box to deselect the sizing handles.

To move a free-text note, click within its note box to display the sizing handles and then, with the arrowhead mouse pointer inside the box, drag the outline to a new position on the page before releasing the mouse button. To delete a free-text note from the PDF document, right-click (Control+click on the Mac) the note text or its bounding box, and then click Delete on its context menu. As with comments added with the Note tool, you can change the default settings for the free-text notes you create with the Text Box tool. Right-click the text box and select Properties on its context menu to open the Text Box Properties dialog box. As you can see, the setting options in this dialog box enable you to change the Appearance, General settings, and display Review History by clicking the appropriate tab. On the Appearance tab, select a border style in the Style drop-down list. Your choices are Solid or six different dashed-line styles. To make the border of the text box thicker, increase the value in the Thickness text box. To remove the border entirely from text box, set this value down to 0.

To change the color of the box border, click the Border Color button and then click a new color on the palette. To decrease or increase the opacity of the text box so that you can see more or less of the document background, enter a percentage number in the Opacity text box or move the slider button to the left to decrease the opacity or to the right to increase the opacity of the text box. To add a background color to the text box, click the Fill Color button and click the background color from its color palette (but for heaven’s sake, don’t select a background color on this palette that’s so dark that you can’t read the note text). The options on the General and Review History tabs are exactly the same as those for the other markup tools (Note, Stamp, and Indicate Text). Change the author or subject of a comment attached to a Text Box on the General tab or display changes of status to the Text Box comment on the Review History tab. When you finish making changes in the Text Box Properties dialog box, click Close to see the effects of your changes on the currently selected text box.