Showing posts with label a51. PDF Form Fields. Show all posts

Thursday, April 28, 2011

Converting FrameMaker 7.0 documents to PDF


FrameMaker is much like PageMaker, in that you can create linked tables of content and indexes, as well as compile book publications from separate documents. It’s designed to create long, content-rich documents and also comes in a version (FrameMaker SGML) that lets you publish complex documents in Standard Generalized Markup Language, which is a required format in some industries. The good news is that FrameMaker 7.0 now supports the export of tags to Adobe PDF. Like InDesign and PageMaker, you can now easily create a tagged PDF eBook from within the program. When you’re ready to convert a FrameMaker 7.0 eBook document to PDF, follow these steps:
  1. Choose File➪Save As; in the Save As dialog box, select PDF from the Save As Type drop-down list. Enter a name for the eBook file and click the Save button to open the PDF Setup dialog box.
  2. In the PDF Setup dialog box, select Settings from the drop-down list; in the Settings panel, choose eBook from the PDF Options drop-down list.
  3. To generate bookmarks in your eBook, choose the Bookmarks panel in the PDF Setup dialog box and select the Generate PDF Bookmarks check box. Note that these bookmarks are based on the paragraph styles in your FrameMaker document. If you’ve already created an internally linked Table of Contents, these bookmarks serve as an additional navigation device when your eBook is viewed in Adobe Reader 6 or Acrobat 6.
  4. Click Tags on the Setup PDF drop-down list to display the Tags panel, and then select the Generate Tagged PDF Bookmarks check box. This option ensures that your PDF eBook text can be reflowed when viewed on smaller devices, such as handhelds or cell phones.
  5. Click OK to close the PDF Setup dialog box and generate your Adobe PDF eBook.

It’s not the end of the world if your program doesn’t export its documents to tagged PDF files. You can still add internal and external interactive links to your document in Acrobat 6, as you find out later in this chapter, and Windows users have the added ability to use Acrobat’s Make Accessible plug-in to scan their PDF files and create tags that allow the document text to reflow. The plugin is designed to create tagged files out of older PDF files so that they can be used in screen-reading programs for the visually challenged. Users of Acrobat 6 for Windows can download the plug-in at:
www.adobe.com/support/downloads/detail.jsp?ftpID=1161
There is not, as yet, a Make Accessible plug-in for Acrobat 6 for Macintosh (somebody write Adobe a letter!). After you’ve downloaded and installed the plug-in, open your PDF file in Acrobat and choose Document➪Make Accessible. The utility scans your document’s formatting structure, and if enough structure is available, it converts that information to reflowable tags.

Wednesday, March 30, 2011

Converting QuarkXPress 5 documents to PDF

QuarkXPress 5 does not provide the export to tagged PDF feature for its documents that are converted to PDF.
You can also get information about the PDF Filter XTension utility that integrates Distiller options into Quark. Otherwise, to convert a Quark 5 file to Adobe PDF, follow these steps:
  1. Open the document you want to export and choose File➪Page Setup or File➪Print. The Print dialog box appears.
  2. Choose Acrobat Distiller (Windows) or Create Adobe PDF (Mac) on the Printer drop-down list.
  3. Select the eBook job option on the PDF options drop-down list.
  4. Click the Print button.

Using InDesign 2.0 to create tagged PDF files


The latest version of InDesign is a feature-rich hybrid of layout and graphics editing programs. To date, it has the most advanced integration of Distiller properties of any Adobe program and allows complete configuration within the program. It also has the advantage of directly opening Quark 3.3–4.1 and PageMaker 6.5–7.0 documents. InDesign 2.0 is a great tool for designing and developing eBooks because of its extensive PDF conversion tools, and for Mac users, OS X and Acrobat 6 compatibility. But for this overview, here are the simple steps for exporting a document to tagged PDF:
1. Open the document you want to export and choose File➪Export. The Export dialog box opens.
2. In the Save as Type (Windows) or Formats (Mac OS) drop-down list, choose Adobe PDF.
3. Type a name for the converted PDF file, select a location on your hard drive, and click Save. The Export PDF dialog box opens.
4. In the Export PDF dialog box, shown in Figure above, select an export style from the Style drop-down list. To edit a selected style, choose the panel names on the left side of the dialog box and go to town.
5. Click the Export button.

What about other layout programs?

As mentioned earlier, InDesign 2.0 is capable of converting its documents to tagged PDF, and the process is similar to the export function in PageMaker 7.0. It also has the added advantage of having Mac OS X and Windows XP versions, so there are no problems exporting documents directly to PDF in Acrobat 6. The following sections provide an overview of this program, as well as FrameMaker 7.0 and Quark 5, should you prefer using those authoring programs to create your eBook, rather than PageMaker. Acrobat Distiller 6.0 does not provide the ability to specify the exporting of tags to PDF as part of configuring its job options. All layout programs, whether they are Windows or Mac OS versions, perform the conversion of documents to PDF by using either a Save as PDF, Export to PDF, or Print to Distiller type of command. The Save As and Export to PDF commands allow you to choose or edit Distiller job options right inside the program, and Adobe has only recently integrated the export tags feature within those programs listed at the beginning of this chapter. Older versions of these programs do not have this capability, and this is also the case with programs such as QuarkXPress 5 and FrameMaker 6.0 that use the Print to Distiller command for converting their documents to PDF.

Friday, February 25, 2011

Specifying PDF options for eBooks


The PDF Options dialog box in PageMaker contains five tabs of options for configuring the way your eBook publication is exported to Adobe tagged PDF. Many of the options add functionalities that are specific to electronic publishing, such as setting up document information metadata that can be used as search criteria. The printing options don’t really apply to eBooks, because they will most likely stay in their electronic form. The following list describes these tabs and their options:
_ General: Make sure to select the Embed Tags in PDF (for Accessibility and Reflow) check box. This is the only way to specify that your eBook be converted to tagged PDF. To use a preconfigured Distiller job option, select from the Job Name drop-down list. Click the Edit Job Options button to make changes to the selected job. To find out more about Distiller job options.
Choose one of the appropriate radio buttons in the Pages area to either export all the pages in a Book publication, all the pages in the current single publication, or a range or ranges of pages in the current publication. Select Same as Current Publication from the Paper Size(s) drop-down list to send the optimized PageMaker document settings you specified for your eBook to PDF. If you created separate document settings, choose Apply Settings of Each Publication. Leave the Style as Acrobat and the Check for PageMaker Printer Style Conflicts check boxes selected, which are the default settings; these options don’t affect your eBook.
  • Doc. Info: Information entered in the Doc. Info tab appears as metadata in the document properties of the tagged PDF file. For this reason, it can also be used as search criteria. You can specify the author, title, subject, and keywords of a document and create a note that appears on the first page of your PDF document that might contain an introduction or instructions for your PDF file. For more info on searching and cataloging a PDF file.
  • Hyperlinks: These commands let you specify the links you want to activate in your eBook and their appearance and magnification after conversion to PDF. Select all applicable link types in the Export Links area. If you haven’t defined these types of links in the PageMaker publication, the check box will be grayed out. Choose the Type, Highlight, Width, Color, and Style of your hyperlinks in the Default Appearance area. Note that most of these settings are more appropriate for PDF documents other than eBooks. Choose Fit Page in the Magnification drop-down list to have your linked destination page fit in the Acrobat eBook Reader window. Note that you can add, delete, and edit hyperlinks in Acrobat 6 after you’ve converted your eBook.
  • Articles/Bookmarks: PageMaker allows you to export text stories as PDF articles. It automatically finds these when you use the export command, and you can also define your own within the PageMaker story by clicking the Define button in the Articles area. If you’ve created index or table of contents links in your publication, you can convert these to PDF bookmarks by selecting the appropriate check box in the Bookmarks area. Select the Fit Page setting from the Magnification drop-down list to have your bookmarked destination page fit in the Acrobat eBook Reader window.
  • _ Security: You can select security settings for a PDF document, such as limiting access by assigning passwords and restricting printing and editing. Use these settings if you don’t plan to distribute your eBook commercially through an online retailer or distributor. Note that if you do plan to market your eBook, you must leave these settings blank because security for commercial eBooks is determined as part of the distribution process.
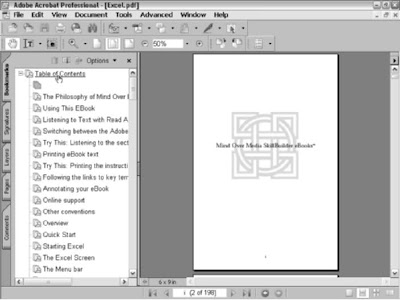
When the export job is finished, your new, tagged PDF opens automatically in Acrobat 6 for viewing. The first page of the document is displayed (in this case, the inside cover page of my Excel SkillBuilder eBook), and the Bookmarks palette shows the table of contents headings that were converted to PDF bookmarks. You can now test your links and use Acrobat’s PDF editing features to make final adjustments to your eBook. As of this writing, PageMaker 7.0 for Macintosh only runs in Classic mode on OS X. You can create an eBook as described in the previous sections, but when it comes time to exporting it to Acrobat, you’ll run into problems because Acrobat 6 only runs under OS X version 10.2.2 or greater. If you have Acrobat 5, start up in OS 9 and create your eBook in PageMaker 7.0 from that environment. When it comes time to export your eBook to Acrobat, do so using Distiller 5.0, save the eBook, and then open it in Acrobat 6 from the OS X environment. If you have InDesign 2.0, which is OS X and OS 9 compatible, you could convert your PageMaker eBook document with that program (or better yet, build your eBook in that program to start with), and then export the InDesign eBook document directly into Acrobat 6 under OS X.

Using mixed page-numbering schemes


The main reason for using PageMaker’s Book utility to combine separate sections of your eBook is that doing so enables you to create different numbering schemes for those parts. A typical example is the way printed books use Roman numerals for their front matter (copyright, title, acknowledgment, and table of contents pages) and Arabic numerals for the body. Some books will also use different number formats for their appendixes and index.
PageMaker allows you to renumber pages in a single publication but not change their format, which works well for many types of publications. As an eBook publisher, though, it’s nice to know you can add these little details to re-create the look and feel of printed books.
To apply a different number format to one of your eBook publications, follow these steps:
  1. Open the publication you want to reformat in PageMaker.
  2. Choose File➪Document Setup, and in the Document Setup dialog box, click the Numbers button. The Page Numbering dialog box opens.
  3. Click one of the five radio buttons to select a numbering format and then click OK.
  4. Click OK to close the Document Setup dialog box and view your newly formatted page numbers in the document.
You can apply these steps to any other eBook sections as desired. The beauty of the PageMaker Book utility is that it compiles your eBook sections in the order in which they appear in the Book List and, at the same time, preserves all your links when you export the eBook to PDF.

Thursday, January 27, 2011

Generating a TOC in Pagemaker


You can create a table of contents from those heading styles that are marked for inclusion in your PageMaker publication. The TOC can reside in the same document as your eBook body or in a separate publication for use with PageMaker’s Book utility. I cover both methods in the following steps for creating a table of contents with hyperlink tags that can be exported to Acrobat.
To create a table of contents in the same publication as your eBook body, follow these steps:
  1. In PageMaker, select the first page in your publication and choose Utilities➪Create TOC. The Table of Contents dialog box.
  2. Type a new title or accept the default “Table of Contents” title in the text box provided and select one of the radio buttons in the Format area to specify the appearance and position of page numbers in the TOC. You can also specify a special character to appear between the entry and the page number (a tab space is the default) here.
  3. Click OK to generate your table of contents story. A story in PageMaker terms is an independent text object with unique formatting that can be positioned anywhere in a page layout. The mouse pointer changes to the story flow cursor. Now you need to create empty pages in which to flow your TOC story.
  4. Choose Layout➪Insert Pages and enter the desired number of empty pages you want inserted, select Before the Current Page from the drop-down list, and click the Insert button.
  5. Go to the first of your newly inserted pages and click to flow your TOC story onto the empty pages from there.

To create a table of contents in a separate publication from your eBook body, follow these steps:
  1. Create a new document from your eBook template containing the desired number of pages for your TOC and then save and name the publication.
  2. Choose Utilities➪Book. The Book Publication List dialog box opens, This dialog box is used to specify the order of the publications you want to include in your book. Your current TOC document appears in the Book List on the right side of the dialog box.
  3. In the list on the left, locate the documents you want to include and add them to the Book List by clicking the Insert button located between the two lists. Click OK to save your changes. You can remove files and change the order of files in the list using the appropriate buttons.
  4. Choose Utilities➪Create TOC. The Table of Contents dialog box opens.
  5. Type a new title or accept the default “Table of Contents” title in the text box provided and select one of the radio buttons in the Format area to specify the appearance and position of page numbers in the TOC. You can also specify a special character to appear between the entry and the page number (a tab space is the default) here. Note that when you’re creating a TOC from a document listed in a book publication, the Include Book Publications check box is automatically selected.
  6. 6. Click OK to generate your table of contents story; then go to the first page of your TOC publication and flow your TOC story from there.
Your brand-new table of contents contains tagged hyperlink entries that will produce accurate bookmarks and page references in your eBook when converted to PDF and viewed in Acrobat. You can check your links in PageMaker by selecting the Hand tool on the floating toolbox. PageMaker inserts a text marker in front of every entry in the placed table of contents story in order to create hyperlink tags that will function when exported to tagged PDF. These text markers are visible only in story editor, (PageMaker’s text editing window) and if they are removed, the links will not operate. For this reason, if you are editing a TOC entry, be very careful not to press the Delete key when the insertion point is directly in front of a TOC entry or page-number reference, because this will remove the text marker from the publication. Your only recourse in such an event is to either close and reopen the document without saving (if you haven’t saved the changes already) or regenerate the TOC.
You can make text edits to your TOC entries (heeding the warning in the preceding paragraph), but if you decide to add any new entries in either the TOC or the body of your eBook, you will have to regenerate a new TOC to create links for those entries that will export to tagged PDF.

Four things to consider when optimizing e-books for mobile devices


Graphic size and page layout are definitely restricted by the screen size of handheld devices, so it’s better to develop eBooks that you want to view on those devices in Microsoft Word, which is text-based and has Acrobat 6 features built in that enable you to create tagged PDF files with the click of a button. Here are a few considerations to take into account in order to optimize eBooks designed for Palm OS or Microsoft Pocket PC handheld devices:
  • Graphics: With handheld device screen resolutions running between 320 x 320 for Palm OS devices and 320 x 240 for Pocket PC devices, graphics must be optimized for the target screen size if they’re used at all. Note that while the majority of Pocket PC and newer Palm devices in use have color screens, many more older Palm devices are out there right now without color. You could consider preparing your graphics in grayscale (thus creating a smaller file) for this reason.
  • Fonts: Use the common Base 14 system fonts that are installed on your computer. These typefaces have been optimized for on-screen viewing and produce the best results when viewed on a handheld device.
  • Paragraphs: Separate paragraphs with an additional hard carriage return for clearer visibility on the Palm handheld screen.
  • Conversion settings: For grayscale Palm handheld devices, Adobe suggests some slight changes to the eBook job option in the Acrobat Distiller.
Adobe currently offers three free versions of Adobe Reader for hand-held devices that support Palm OS, Pocket PC, or Symbian OS (which runs on Nokia Communicator devices).
The Acrobat Readers are applications that are installed on their respective handheld devices and are designed to accommodate their specific screen characteristics. In addition to the reader software, the PocketPC and Symbian OS versions includes a Windows desktop application for preparing and transferring a PDF to a user’s handheld device. The Palm OS reader includes a desktop application for both Macintosh and Windows and a HotSync conduit. To handle synchronization, the Pocket PC version includes the ActiveSync filter, which has an added feature that attempts to create tags from untagged PDF files prior to uploading them to the Pocket PC handheld device.

Thursday, December 30, 2010

Designing eBooks for Different Devices

You design Adobe Acrobat eBooks in a word processor or page layout program and then convert their documents to PDF. You can then perform any lastminute tweaks in Acrobat, such as adjusting text flow or linking multimedia objects, and then view your final product in the Adobe Acrobat eBook Reader on your computer, laptop, or on a Palm OS or Microsoft Pocket PC handheld device. Note that Acrobat 6 and Adobe Reader 6 now support the purchase and downloading of eBooks. As of this writing, Adobe plans to discontinue the Acrobat eBook Reader, though users of that program can continue to purchase and download eBooks as long as current eBook distributors support that program. PDF files come in three document structure flavors — unstructured, structured, and tagged. Structured PDF files enable you to convert or repurpose a PDF for another format, such as RTF (Rich Text Format), while retaining much of the original page layout and reading structure. Tagged PDF files have the highest degree of success in retaining their original formatting when converting to RTF and are also able to reflow text, which is not the case with unstructured or structured PDF files. For the purpose of creating eBooks, then, you should always use tagged PDF files, because they offer the most flexibility when it comes to viewing the final product on the greatest number of viewing devices.
The following programs allow you to convert their documents to tagged PDF files in order to build an eBook:
_ FrameMaker SGML 6.0 (Windows and Mac OS)
_ FrameMaker 7.0 (Windows and Mac OS)
_ PageMaker 7.0 (Windows and Mac OS)
_ InDesign 2.0 (Windows and Mac OS)
_ Microsoft Office (Windows 2000 and XP only)

Adobe Reader 6 and Acrobat 6 were developed to provide a means of viewing PDF eBooks on a computer screen or laptop. Because of their size, computer screens are well suited to display graphically rich page layouts that re-create the reading experience of a printed book. For designing these types of eBooks, page layout programs (PageMaker, InDesign, or FrameMaker) are the best tools to use. In addition to allowing complex page layouts, their ability to create tagged PDF files adds a higher degree of accessibility for visually challenged users viewing PDF files in either Adobe Reader or Acrobat.

Importing/exporting form data

The Acrobat 6 Import/Export feature allows you to move data in and out of a PDF form. That data can be imported into another PDF form or archived in a file format that is optimized to save space. When you export data from your form, Acrobat creates an FDF (Forms Data Format) file. This file contains only the data found in a form’s fields, so it’s much smaller in size than the original PDF form. After converted to FDF, any other PDF can import that data, as long as its field names match those of the original form. Field names that don’t match are ignored in the import process.
After you have your form up and running, you can export its data by choosing Advanced➪Forms➪Export Forms Data. Type a file name for the FDF file in the Export Form Data As dialog box and click the Save button. To import data from an FDF file, choose Advanced➪Forms➪Import Forms Data and then, in the Select File Containing Form Data dialog box, locate the file and click Select (Open on the Mac).
Keep in mind that importing and exporting field data is not the same as collecting and distributing form data through a browser on the World Wide Web. FDF files can reside on a network server, and users can access them on a company intranet, and you can even e-mail the FDF files to others to perform import/export functions right on their computers. In order to collect your form data and distribute it over the Web, you need to use a CGI script written specifically for the form you want to use. If you’re not familiar with coding CGI scripts, you’ll have to leave it to the IT administrator of your company or Internet service provider’s Web server.
Acrobat 6 also allows you to import data from a tab-delineated text file into a PDF form. This type of file is a text table that you create by placing a tab between each entry to create table rows. The first row serves as columnar field headings for the table and is filled with names that correspond to the field names found in your PDF form. Subsequent rows correspond to the data to be entered in those form fields. You can create this text file in a word processor such as Microsoft Word, but I find it easier to create the data table in Microsoft Excel and then save it as a tab-delineated text file in that program.

Tabbing through a form

A form’s tabbing order is the order in which the user selects fields when he or she presses the Tab key. This order is initiated when you add the first field and continues from there as you add fields to a form. Now if you know this ahead of time and are keeping track of the way you want the form filled out as you add fields, everything will work out fine. If you’re like the rest of us, you’ll probably have to set the tabbing order after you’ve finished adding fields to your form. Here’s how:
1. Click the Pages tab on the Navigation pane to open the Pages palette and select the page containing the form fields you wish to set tabbing order for.

2. Choose Page Properties on the Options menu at the top of the Navigation pane; in the Page Properties dialog box that appears, click the Tab Order tab.

3. Select from the options on the Tab Order tab as follows:
  • Select the Use Row Order radio button to tab through rows from top to bottom and right to left.
  • Select the Use Column Order radio button to tab through columns from left to right and top to bottom.
  • Select the Use Document Structure radio button to use the document structure tree in a tagged PDF document.
  • Select the Unspecified radio button (for compatibility with earlier versions of Acrobat) to tab through rows first and annotations second. This option is chosen by default for documents created in Acrobat 4 and earlier.

4. Click the Close button to set your new tab order.

Tuesday, November 30, 2010

Creating form field tables


Building a table of form fields is a snap. The fields can be all the same type or different types, and the methods for creating a table vary slightly, depending on which case is true. To create a table made up of form fields that are all the same type, follow these steps:

1. Add a form field to your PDF in the area you want to serve as the corner of your table.

2. Hold down the Ctrl key (the Option key on the Mac) and draw a marquee around the single field to select it.
If you’re selecting one field only, it’s just as easy to click the field to select it. Using the Ctrl key (Option key on Mac) is better for selecting multiple fields and ensures you won’t create one big form field when what you really want is to make a multiple selection.

3. Choose Advanced➪Forms➪Fields➪Create Multiple Copies or rightclick the selected field and choose Create Multiple Copies on the context menu.
The Create Multiple Copies of Fields dialog box appears.

4. Specify the layout for your form field table by choosing options in the following areas of the Create Multiple Copies of Fields dialog box:
• Number of Fields: Use the spinner buttons or enter a value in the Copy Selected Fields Down or Copy Selected Fields Across text fields. If the Preview check box in the lower left corner of the dialog box is selected, all changes made in this dialog box are displayed for preview in the current document behind the dialog box.
• Overall Size (All Fields): Use the spinner buttons or enter a value in the Change Width or Change Height text fields to alter the size of the fields in your table. The default values in these fields reflect the size of the original field selected in the current document.
• Overall Position (All Fields): To move the entire table in the current document to a new position, click the Up, Left, Right, or Down buttons.

5. When you’re finished selecting options, click OK to close the Create Multiple Copies of Fields dialog box and view your form table in the current document.

To create a table made up of different field types, you need to vary the preceding steps slightly. Instead of creating a single field (as in Step 2), you need to create an initial row or column of different field types that will serve as a basis not only for the number of rows or columns that appear in your table but also for how the different field types will occur in the table. After establishing that, you then individually select and copy each field type in the Create Multiple Copies of Fields dialog box using the Copy Selected Fields Down or Across options, depending on the original location (at the head of a column or beginning of a row) of the selected field in the current document. Creating fields for tables in the manner just described is not the same as duplicating form fields. In this process, you give each field a unique name, which allows a higher degree of individual editing choices. Therefore, it’s not the method to use if you want to create a group of related radio buttons that must have the same name. See the “Understanding the Options tab” section, earlier in this chapter, for more on creating radio buttons. When your form is in the development stage and you’re beginning to accumulate a number of fields, it’s a good idea to take advantage of the Fields palette. Choose View➪Navigation Tabs➪Fields to display the Fields palette, as shown in Figure. The Fields palette is a floating navigation pane that provides a hierarchical, icon view of the fields in a PDF. It allows you to remotely select, rename, delete, edit the properties of, and more importantly, lock/unlock a field. Locked fields can’t be moved or edited, which comes in handy when you’ve gotten a number of fields just where you want them but are still fiddling with others in the form. To access these commands, right-click (Control+click on the Mac) a field icon in the Fields palette and choose the desired command from the context menu that appears. To lock/unlock a field, choose Properties on the context menu and select or deselect the Locked check box in the Properties dialog box that appears.

Setting Layout Grid Preferences


Acrobat 6 provides a wealth of tools that make the process of laying out and modifying form fields quick and easy. One of these tools is the Layout Grid —a non-printing, customizable on-screen grid that provides guidelines for drawing field boxes with the seven form field tools. To show or hide the Layout Grid, choose View➪Grid or press Ctrl+U (Ô+U on the Mac). The best part of the Layout Grid, however, is its Snap to Grid feature, which causes field boundaries to snap to gridlines when they’re being drawn, as shown in Figure. To turn this feature on or off, choose View➪Snap to Grid or press Ctrl+Shift+U (Ô+Shift+U on the Mac). Note that because these two features are discrete, the Snap to Grid feature will still work even if the Layout Grid is hidden and vice versa. A check mark next to either command’s name on the menu bar lets you know the feature is turned on.
Layout Grid preferences let you specify a grid’s spacing, position on a page, subdividing lines, and color. Choose Edit➪Preferences or press Ctrl+K (Ô+K on the Mac) to open the Preferences dialog box, and then click Units & Guides in the list box to display the options.
The following options are found in the Layout Grid area:
  • To specify the space between major gridlines, click the spinner buttons or enter a measurement in the Width and Height between Lines text boxes.
  • To offset the Layout Grid from the top-left corner of the page, click the spinner buttons or enter a measurement in the Grid Offset from the Left Edge or Grid Offset from the Top Edge text boxes.
  • To display a specified number of subdividing lines between major gridlines, click the spinner buttons or enter a number in the Subdivisions text box.
  • To specify the color of the gridlines, click the Grid Line Color button and select the desired color on the color palette (Windows) or the color picker dialog box (Mac) that appears.
When you’re finished selecting Layout Grid preferences, click OK to apply your changes and close the Preferences dialog box. You’ll probably find that the Layout Grid isn’t really very useful for adding fields to ready-made forms that you’ve scanned into Acrobat 6 because its gridlines will rarely match the cells that are already drawn in your paper form. In these cases, use the Align commands to keep your fields straight. Where it really makes sense to use the Layout Grid is in designing and building a form from scratch. Here’s a quick and easy method of getting a blank page into Acrobat 6 so you can use the Layout Grid to custom build a form: Open a new blank document in Microsoft Word (Windows or Mac) and click the Convert to PDF button on the PDFMaker 6.0 toolbar. You can open the resulting blank PDF in Acrobat 6, configure and display the Layout Grid, and then start cranking out a form of your own design.

Singling out the Signed tab

Options on the Signed tab apply only to the Signature field type. Its commands enable you to specify actions that occur in a form when data is entered into a blank signature field. You add signature fields to a form in the same manner as you do other form fields by using the Digital Signature tool. The Digital Signature tool creates a blank signature field that can
be filled out as part of completing a form.
To configure a blank signature field, click one of the three radio buttons on the Signed tab:
  • Nothing Happens When Signed: Use this default option if you don’t want any actions to occur to data entered in a field.
  • Mark as Read-Only: Provides a means of locking portions of a form at the time it is signed off in the signature field, in essence “freezing” the form at that moment in time. Select one of three items on the drop-down list: All Fields, All Fields Except These, and Just These Fields. If you select either of the latter two options, click the Pick button to open the Field Selection dialog box, where you choose the fields you want to render as read-only. Pick a field by selecting the check box next to the field name in the Mark Fields as Read Only list box. When you’re finished adding fields, click the OK button.
  • This Script Executes When the Signature Field Is Signed: Click this radio button to execute a specific JavaScript action when data is entered in a signature field. Click the Edit button to open the JavaScript Edit window. If you’re familiar with JavaScript languagBulleted Liste, you can write your own or copy and paste a predefined JavaScript in the script editing window. Click OK to close the JavaScript Edit window. The action script appears in a preview box below the radio button. Note that you can use the arrow keys to view the script, but you can’t edit it.

Sunday, October 31, 2010

Sizing up the Selection Change tab

The Selection Change tab provides you with the means to execute JavaScript actions when making a selection in the List Box field type. To use this feature, click one of the two radio buttons on the Selection Change tab:
  • Do Nothing: Use this option if you don’t want to run a JavaScript action when a user makes a list box selection.
  • Execute This Script: Use this option to attach an action, and then click the Edit button to open the JavaScript Edit window. If you’re familiar with JavaScript language, you can write your own or copy and paste a predefined JavaScript in the script editing window. Click OK to close the JavaScript Edit window. The JavaScript appears in a preview box on the Selection Change tab. Note that you can use the arrow keys to view the script, but you can’t edit it.

Wednesday, September 29, 2010

Cruising the Calculate tab

Like its Format and Validate tab brethren, options on the Calculate tab apply only to Combo box and Text field types. You use these commands to perform mathematical calculations on data entered in two or more form fields and display the result in another field. This feature is often used in an interactive order form where the product of an item’s quantity and price is automatically displayed in a total field. In addition, it’s possible to perform more advanced calculations using JavaScript.
To define the fields in a form that will perform calculations or attach a JavaScript calculation to a field, select one of the three radio buttons on the Calculate tab:
  • Value Is Not Calculated: The default state. Select this option if you don’t want to perform a calculation on data entered in a field.
  • Value Is the of the Following Fields: Provides a drop-down list of five operations: sum (+), product (), average, minimum, and maximum. Select an operation option and then click the Pick button to open the Field Selection dialog box, which displays a list of fields in your form. Select a field’s check box in the Select Fields for Calculation list box. You can select more than one field at a time, and you can select or deselect all the fields by clicking the appropriate button. When you’re finished selecting fields, click the OK button.
  • Custom Calculation Script: Click the Edit button to open the JavaScript Edit window. If you’re familiar with JavaScript language, you can write your own or copy and paste a predefined JavaScript in the script editing window. Click OK to close the JavaScript Edit window. The calculation script appears in a preview box below the Custom Calculation Script radio button. Note that you can use the arrow keys to view the script, but you can’t edit it.
By default, field calculations are performed in the same order as the form field’s tab order — that is, the order in which the fields are selected when the user presses the Tab key. This is not always a good idea, especially if your form contains multiple calculations where the result of one calculation depends on the result of another calculation. To override the default, set your own calculation order by choosing Advanced➪Forms➪Set Field Calculation Order to open the Calculated Fields dialog box. Select fields in the window and use the Up and Down buttons to arrange their calculation order, and then click OK to save your changes.

Viewing the Validate tab

Like the Format and Calculate tabs, options on the Validate tab apply only to Combo box and Text field types. You use these commands to restrict data entry in a field to a specific range, such as a dollar amount less than or equal to $1,000. Note that in order to specify a data range, the selected form field must be formatted with either the Number or Percentage category on the Formatting tab of the field type Properties dialog box.
You can accomplish more sophisticated validation, such as restricting data to specific values and characters, through the use of JavaScript. You might, for example, want to limit a date entry to only the years between 1950 and 2000 or allow a password that only contains three letters and four numbers separated by a dash.
To set a data range or attach a JavaScript to validate a field, click one of the radio buttons on the Validate tab:
  • Field Value Is Not Validated: The default state. This radio button is selected automatically if a field does not use number or percentage formats (selected on the Format tab). Otherwise, click this option if you don’t want validation applied to data entered in a field.
  • Field Value Is In Range: Provides two text boxes in which to define upper- and lower-range parameters. Type a number in the From or To field to specify limits on a data range.
  • Run Custom Validation Script: Click the Edit button to open the JavaScript Edit window. If you’re familiar with JavaScript language, you can write your own or copy and paste a predefined JavaScript in the script editing window. Click OK to close the JavaScript Edit window. The validation script appears in a preview box below the Run Custom Validation Script radio button. Note that you can use the arrow keys to view the script, but you can’t edit it.

Getting familiar with the Format tab


The commands on the Format tab are applicable only to Combo Box and Text field types. The same can be said of the Validate and Calculate tabs as well. These format options enable you to specify a particular numerical format for data entered in the form field. For example, you can create a text field for entering a Social Security number that must contain nine numbers and automatically places dashes after the third and fifth numbers.
The Format tab presents a list of format categories in the Select Format Category list box. Clicking a category displays specific options for that category in the Options area below the drop-down list. Choose formatting options and click OK to apply that formatting to your form field. The following list describes the categories and options provided on the Format tab:
  • None: The default setting that specifies that no formatting is applied to data entered in a field.
  • Number: Type a number in the Decimal Places field or click the attached spinner buttons to set the number of decimal places for the number entered in the text field. Use the Separator Style drop-down list to select a comma and decimal separators preference. Use the Currency Symbol drop-down list to select from a wide variety of foreign currency symbols. Select how negative numbers appear in a field by selecting the Show Parentheses or Use Red Text check box. (If neither check box is selected, negative numbers appear with a minus sign before the number.)
  • Percentage: Automatically displays the percent symbol with numbers entered in a Text or Combo Box type field. Type a number in the Decimal Places field or click the attached spinner buttons to set the number of decimal places. Click the arrow on the Separator to select a comma and decimal separators preference. The sample area provides a preview of your selected percentage options.
  • Date: Choose from a wide variety of date-only or date and time formats (choose the Time category for time-only formats) in the Date Options list box. The sample area below the Date options list box displays the format style of a selected formatting code. For example, selecting the formatting code m/d/yy in the Date Options list displays its format style as 4/19/03. When you’re familiar with these simple date and time formatting codes, you can select Custom at the bottom of the Date Options list box and create custom date and time formats in the text box provided.
  • Time: Choose from four time formats provided in the Time Options list or choose Custom to create your own. View the time format style for the selected time formatting code in the sample area below the list box.
  • Special: Choose from the list of five options that appear in the Special Options list: Zip Code, Zip Code+4, Phone Number, Social Security Number, or Arbitrary Mask, which is used to specify the types of characters a user can enter in any given position and how the data displays in a text field.
  • Custom: Provides a means of using JavaScript to format text or apply keystroke validation to text entered in a field. (See the next section to find out about field validation.) Click the Edit button next to either the Custom Format Script or Custom Keystroke Script area to open the JavaScript Edit window. If you’re familiar with JavaScript language, you can write your own or copy and paste a predefined JavaScript in the script editing window. Click OK to close the JavaScript Edit window. The keystroke or formatting script appears in its proper Custom Options area. Note that you can use the arrow keys to view the script, but you can’t edit it.

Tuesday, August 31, 2010

Applying Appearance tab options

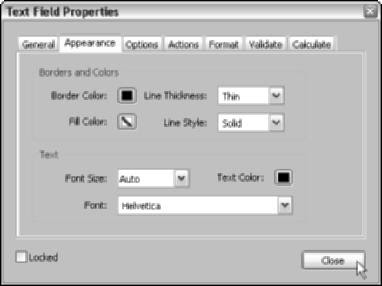
The options on the Appearance tab are applicable to every field type and are used to specify the way a field is displayed in a PDF form. Note that to apply appearance options (or any other field option for that matter) to a selected form field, you first click Close to close the Properties dialog box, and then click the Hand tool on the Basic Tools toolbar or press H in order to view your changes. The following list describes the options found in the labeled areas of the Appearance tab that you can use to change the way a form field is displayed in a PDF form:
  • Borders and Colors: Provides options for setting the border and background of a field. Click the Border Color or the Fill Color buttons and choose from the color palette (Windows) or the color picker dialog box (Mac OS) that appears. From the Line Thickness drop-down list, select Thin, Medium, or Thick border lines; from the Line Style drop-down list, select Solid, Dashed, Beveled, Inset, or Underlined border line styles.
  • Text: Provides options for setting the color, font, and font size of text as it appears when either typed in a text or signature field or displayed in a button label, combo box, or list box. Click the Text Color box to select from the color palette (Windows) or the color picker dialog box (Mac OS) that appears. Click the Font or Font Size drop-down list to make font selections. The Font option is not available for check boxes and radio buttons; however, Font Size and Text Color options do affect the dot in the middle of a selected radio button or the check mark that appears in a selected check box.
You can apply appearance changes to multiple form fields, even if they are different field types. Hold down the Shift key and click to select multiple fields, and then double-click one of the selected fields to open the Field Properties dialog box. The Appearance tab is always displayed, and on occasion, the Option tab appears as well. Sometimes a particular field property differs among the selected fields. In these instances, the option either appears blank, in which case you can’t select the option, or contains a grayed-out check or question mark, which allows you to apply the setting to all selected form fields or keep their existing properties so they can be edited separately.

Jawing about General tab options

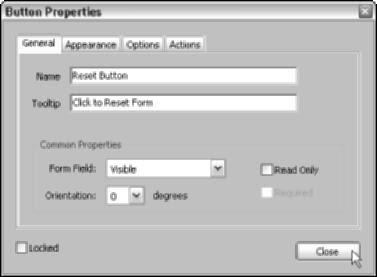
The options on the General tab are applicable to every field type and are used to specify the identity of the field and select common display and function properties. General tab of the Button Properties dialog box shows the same options you find on the General tab regardless of which field type properties dialog box is opened. Note that after selecting General options (or any other field option for that matter), you must click Close to close the Field Properties dialog box, and then click the Hand tool on the Basic Tools toolbar or press H in order to view your changes.
The following list describes the options found in the labeled areas of the General tab:
  • Name: Enter a descriptive name for a form field in this text box. When you create a form field, it is given an incremental default name, such as Button1, Button2, and so on.
  • ToolTip: Enter a descriptive name or short instruction in this text box; this text appears as a ToolTip when the user hovers the mouse pointer over the form field element.
  • Common Properties: These miscellaneous options apply to all field types. Select the Read Only check box to specify text fields that cannot be modified by a user. Select the Required check box to specify that a field must be filled in before form data can be submitted.
Use the Form Field drop-down list to select whether a field is Visible, Hidden, Visible but Doesn’t Print, or Hidden but Printable. The Orientation drop-down list lets you choose the text orientation in 90-degree increments for text that is either entered in a text field, selected in a combo or list box, or used as a button label. The Orientation option also applies to graphic icons used as button labels. To restrict any future changes to the selected form field, select the Locked check box in the lower left corner of the General tab.