Wednesday, February 25, 2009

Defining articles

To add articles to a PDF document you’re editing, you divide a section of text into blocks by enclosing them in a series of boxes (invisible to the user when he or she reads the article) that control the sequence in which the text blocks are displayed in the Document pane. This sequence of boxes creates a navigation path through the text formally known as an article thread. You use the Article tool on the Editing toolbar in Acrobat 6 to draw the succession of boxes that create the article thread and define its order.
To define a new article in a PDF document, follow these steps:
  1. Open the PDF document to which you want to add an article.
  2. If the Navigation pane is open, press F6 to close it.
  3. If the page view is not in Fit Page and Continuous page mode, click the Fit Page button on the Zoom toolbar and the Continuous button on the status bar of the Document pane.
  4. Click the Article tool button (the one with a serpentine arrow icon) on the Advanced Editing toolbar, and then drag the cross-hair pointer to draw a bounding box that encloses the first block of text in the article (including all the text up to any excluded element, such as a figure you don’t want included or the end of the column).
  5. After you have the first text block outlined in the bounding box, release the mouse button to add the first article box. This article box is labeled 1-1 at the top with sizing handles around the perimeter and a continuation tab (with a plus sign) at the bottom (see Figure 1). Note that the mouse pointer changes from a cross-hair to the Article pointer (with a serpentine arrow).
  6. Scroll the page as required to position the Article pointer in the upper-left corner of the next block of text to be added to the article, and then drag the pointer to draw a bounding box around its text. Release the mouse button. The second article box, which is labeled 1-2, is created (see Figure 2).
  7. Repeat Steps 4 through 6, adding as many article boxes as are required to define the reading path of the article.
  8. To end the article, click the Hand tool (H) or press the Enter key (Return on the Mac). The Article Properties dialog box opens.
  9. Replace Untitled in the Title text box with a descriptive name for the article. This name is displayed in the Articles palette that enables users to select the articles they want to read —
  10. If you want, add a brief description of the contents of the new article in the Subject text box, the name of the author in the Author text box, and key terms, separated by commas, that describe the contents in the Keywords text box (terms that you can use in searching the PDF document).
  11. Click OK to close the Article Properties dialog box. If you pressed the Enter key (Return on the Mac) to end the article, click the Hand tool or press H to select the Hand pointer, which hides all the article boxes in the article. Note that as soon as you select the Hand tool after defining a new article, Acrobat adds an arrow pointing down from a crossbar to the back of the Hand icon (which looks like a tattoo to me). This form of the Hand icon appears whenever a user positions the Hand pointer over an article that you’ve defined in a PDF document.

Adding Articles to a PDF Document

Although Acrobat’s editing features do not enable you to physically restructure the layout of the text in a PDF document in any way, its Articles feature does enable you to restructure the online reading experience. As an essential part of the Accessibility features included in Acrobat 6, articles are designed to make the reading of long, disjointed sections of text, especially those set in newspaper columns that span pages, a smooth experience in Acrobat 6 or Adobe Reader 6.
Articles accomplish this by breaking up sections of text into discrete blocks that are displayed in sequence as you click the Hand pointer, requiring no scrolling and no resetting of the page view. This eliminates the need for you to interrupt your reading experience with any type of scrolling or any other kind of page manipulation in order to get to the following section of text, a common experience in normal online reading where when you reach the end of one column, you must reset the page by scrolling back up (and often over) to continue reading at the top of the next column.

Adding Watermarks and Backgrounds to PDF Documents

Acrobat 6 now supports document layers created in AutoCAD or Microsoft Visio. One of the benefits of this new functionality is the ability to add watermarks and background images to a PDF document. Just remember that you can’t edit watermarks and background layers in Acrobat 6 as you can with AutoCAD or Visio layers.
A watermark in the non-digital world is a faint image impressed on paper during manufacture that appears when the paper is held up to the light, such as the company logo you see on fine manuscript paper. They are also used as a security measure, such as the word “Sample” across a photo that makes it difficult to reproduce, or the authenticating images you find on traveler’s checks and the like. In Acrobat 6, watermarks are placed in a layer on top of the displayed page. Background images are the color, texture, or pattern placed in a layer behind the displayed page. Note that an image must be converted to PDF in order for it to be used as a watermark or background in Acrobat 6. To add a watermark or background image to a PDF document, follow these steps:
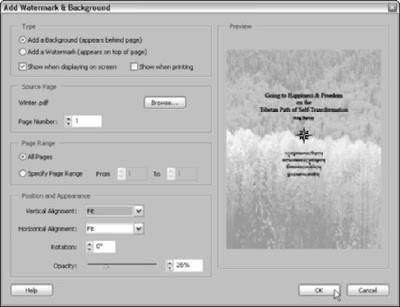
  1. Choose Document>Add Watermark & Background. The Add Watermark & Background dialog box appears, as shown in Figure.
  2. Choose the desired page element in the Type area by clicking either the Add a Background (Appears Behind the Page) or the Add a Watermark (Appears on Top of the Page) radio button. Note that the settings in this dialog box are the same for both watermarks and backgrounds.
  3. Select one or both viewing options in the Type area. To display the watermark/background when viewing the PDF document on your computer screen, select the Show When Displaying On Screen check box. To display the watermark/background when the PDF document is printed, select the Show When Printing check box.
  4. Click the Browse button in the Source Page area to locate the PDF document you want to use for your background or watermark. If the source PDF is a multi-page document, use the Page Number text box to identify which page you want to select as your source.
  5. Click the All Pages radio button in the Page Range area to have the watermark/background appear on all the pages in your document. If you want to be choosier, click the Specify Page Range radio button and then enter a range of pages in the From and To text boxes.
  6. From the Vertical Alignment drop-down list in the Position and Appearance area, choose Top, Center, Bottom, or Fit to specify the vertical placement of your watermark/background on the page. Note that all changes made in the Position and Appearance are displayed in the Preview window on the right side of the Add Watermark & Background dialog box.
  7. From the Horizontal Alignment drop-down list in the Position and Appearance area, choose Left, Center, Right, or Fit to specify the horizontal placement of your watermark/background on the page.
  8. Click the Rotation spinner button to rotate the watermark/background on the page; use the Opacity slider button or enter a percentage value in the text box to increase or decrease the opacity of the watermark/background. The preview window really helps with these two options.
  9. When you’re finished tweaking your watermark/background, click OK to close the Add Watermark & Background dialog box and view your changes in the current PDF document. You can remove or restore deleted watermarks and backgrounds by choosing Edit>Undo Background or Undo Add Watermark to remove a watermark/ background. Choose Edit>Redo Add Background or Add Watermark to restore a deleted watermark/background.