Monday, June 23, 2008

Opening Web Pages as PDF Files


To be able to capture Web pages (and even entire Web sites) as PDF files for viewing in Acrobat or Adobe Reader, all you need is Internet access, Acrobat 6, and the Web site’s URL (Uniform Resource Locator). Before you can use Acrobat to capture Web pages, you must have your computer correctly configured for accessing the Internet. If you already get online with a popular Web browser, such as Microsoft Internet Explorer or Netscape Navigator, Acrobat should be able to detect these settings and use them for Web capture. If you find that you can’t capture Web pages as described in this section, open the Internet Properties dialog box from within Acrobat by choosing Edit➪Preferences➪Internet Settings, and then seek help from your ISP (Internet service provider) or IP personnel in getting your Internet settings correctly configured in Acrobat.
The steps for capturing the pages are easy as can be:
  • In Acrobat, choose File➪Create PDF➪From Web Page, or click the Create PDF button on the Tasks toolbar and choose From Web Page on the pop-up menu. The Create PDF from Web Page dialog box appears.
  • In the URL text box, type or paste in the URL address of the site whose Web pages are to be downloaded. If you’re converting a local HTML document to PDF (that is, one that’s saved on your hard drive or local area network rather than on the Internet), click the Browse button. Then open the folder, select the document’s file icon in the Select File to Open dialog box, and then click the Select button. 3. In the Settings area of the Open Web Page dialog box, select the Get Entire Site radio button to capture all the Web pages on the site.
    • To capture only the Web site’s start page, leave the Get Only radio button selected with 1 in the level(s) spinner button text box to the immediate right.
    • To capture all the pages linked to the start page, increase the value in the level(s) text box to 2; to get all the pages linked to the pages linked to the start page, increase the level(s) value to 3, and so on.
    • To restrict the Web page capture to only pages found on the same Web site or on the same Web server, select the Stay on Same Path and the Stay on Same Server check boxes as well.
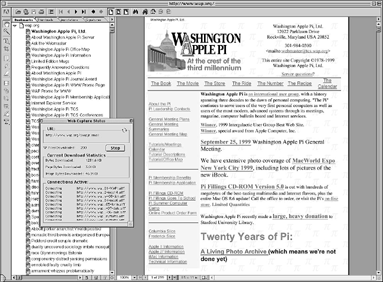
  • Click the Create button to begin capturing the designated Web pages as PDF files.If you select the Get Entire Site radio button, the Potentially Large Download Confirmation alert dialog box automatically appears, warning you that you may have bitten off more than your computer can chew. If you’re sure that you have the patience (or a lightning-fast download connection), have sufficient hard drive space, and are not attempting to download the Library of Congress Web site, click the Yes button to proceed with the potentially large download of the entire site. As soon as you click the Download button or the Yes button in the Potentially Large Download Confirmation alert dialog box, Acrobat begins downloading and converting the designated Web pages and displays the Download Status dialog box, which keeps you informed of the progress of the first part of the downloading process.

As the Web pages start arriving on your hard drive, the Download Status dialog box disappears as quickly as it appeared, and the first page of the Web site appears in Acrobat’s Document pane. The Navigation pane with the Bookmarks palette selected is also automatically displayed in the Acrobat window. The Bookmarks palette illustrates the hierarchical relationship of the pages you downloaded as it continues to display the names of the pages on each level as they are successfully downloaded.
If Acrobat is not able to download the complete contents of all the pages on the levels you designated for download, it displays a dialog box called There Were Errors that lists all the files that it could not find or otherwise successfully download. After reviewing this list of files, click the OK button in the There Were Errors dialog box to close it.
After all the Web pages you asked for on a particular Web site are delivered to your hard drive, you still need to save the pages as a single PDF file so that you can access them in Acrobat or Adobe Reader without being connected to the Internet. To do this, choose File➪Save and then give the new PDF file a name, select the folder in which you want to save it, and click the Save button.

Capturing Web Pages

When you first hear that Acrobat 6 can capture Web pages as PDF files, you may wonder why on Earth anyone in her right mind would want to do such a thing. After all, Web browsers are not only perfectly capable of displaying any and all Web pages in their native HTML (HyperText Markup Language) format, but they are also much more widespread than Acrobat and Adobe Reader. And, of course, this is true — as long as you’re connected to the Internet. The moment you get disconnected from the Internet, all Web browser access to online content shuts off (unless your browser is capable of caching the pages on your hard drive and you know how to set this up). In this chapter, you discover how easy it is to capture Web pages as PDF files that you can browse at any time on any computer equipped with a copy of Acrobat or Adobe Reader. Because the Web pages are PDF files, not only can you browse them when you don’t have Internet access handy, but you can also annotate them and distribute them as you would any other PDF document. This makes internal Web site design reviews a real joy because it’s easy to send the PDF versions of the Web pages to clients and coworkers for approval, as well as elicit feedback from them right on the pages if they’re using Acrobat 6.
One of the best reasons for capturing a Web site in PDF format is to be able to browse its contents when you’re traveling and at other times when you can’t go online. This feature is also a godsend when you need to give a presentation or conduct a training session that involves the use of Web material because you still have access to the Web content (internal links and all), even if you lose your Internet connection or are not able for one reason or another to go online. When viewing Web pages in Acrobat or Adobe Reader, you can use the Full Screen view to get rid of all the distracting menus, toolbars, and so on because you will be using the site’s own links and navigation controls to move from page to page. You control what page transitions are used and how to navigate from page to page in full-screen mode by opening the Preferences dialog box (Ctrl+K on Windows and Ô+K on the Mac) and then clicking Full Screen in the list of preferences.

Using the Paper Capture Online Service


Adobe’s Paper Capture feature in Acrobat 6 is designed for individual or small office use. For the needs of larger businesses, Adobe provides their Create Adobe PDF Online service that enables you convert any type of business document to PDF. Company reports, printed archival materials, spreadsheets, calendars, and even entire Web sites are just a few of the types of documents that you can convert in order to take advantage of the universal file-sharing aspects of PDF. The service is subscription based (U.S. $9.99 per month or about U.S. $99 per year), but Adobe offers the service on a trial basis that allows you to create five PDF files free of charge. You can go to Adobe’s Web site and see what all the excitement is about by typing this URL into your favorite browser’s Address text box:
http://createpdf.adobe.com
After you’ve subscribed to the service, you can then upload as many scanned files (of no more than 50 pages in length) as you want and process them online with Paper Capture as follows:
  1. Use your Web browser to go to createpdf.adobe.com, sign in by entering your username and password in the Adobe ID and Password text boxes, and then click the Login button. The Create Adobe PDF page appears.
  2. Click the Choose a File graphic link to open the Create Adobe PDF Online - Select a File dialog box. Note that you can also click the Submit a URL link in order to capture a Web page. A page appears where you specify which file to process.
  3. Click the Browse button to locate the desired file on your hard drive, click Choose, and then click the Continue button on Adobe’s Select a File dialog box to open the Conversion Settings window . Note that you can click the Supported File Types link to view a list of File types supported by the Create Adobe PDF Online service.
  4. Click the Optimization Settings drop-down list and choose either Web (the default), eBook, Screen, Print, or Press as the output conversion setting for your file.
  5. Click the PDF Compatibility drop-down list to select either Acrobat 3.0 (PDF 1.2) (the default), Acrobat 4.0 (PDF 1.3), or Acrobat 5.0 (PDF 1.4) as the output compatibility setting for your file.
  6. Choose a level of security for the converted PDF by clicking the Security Options drop-down list. The default is No Security. You have the option of choosing two other basic levels of security: No Printing (40 bit) or No Printing (128 bit). You can further customize security settings for your converted PDF by clicking the Adobe Acrobat Security link above the Security Options drop-down list.
  7. Select the desired method for having the processed file returned to you in the Delivery Method drop-down list. Your choices are No E-Mail, Download from Conversion History (which lets you archive PDF files at Adobe and download them as necessary from your Conversion History list), Wait for PDF Conversion in Browser, E-Mail Me a Link to My New PDF, or E-Mail Me My New PDF as an Attachment.
  8. Click the Create PDF button at the bottom of the window to upload your file and have it processed according to your wishes.
Create Adobe PDF Online lets you create and save your own conversion settings, just as you would in Acrobat 6. To do so, click the Preferences link under the heading Set Options in the Conversion Settings window and select the new settings using the drop-down lists provided for various conversion settings in the Preferences window. Then click the OK button, enter a descriptive name for the new settings in the dialog box that appears, and click OK. Your new conversion settings will appear in the Optimization Settings drop-down list in the Conversion Settings window.
When the Create Adobe Acrobat Online service receives your uploaded document, it displays a Confirmation screen that gives you an identification number and that indicates how the processed file will be delivered to you. Depending upon your settings, the service then delivers the processed PDF file to you either by displaying it in your Web browser (assuming that you use one that supports the plug-in for displaying PDF files), in an e-mail message as a link or a file attachment, or as a link in your Conversion History list.

Monday, June 16, 2008

Importing Previously Scanned Documents into Acrobat

If you already have a scanned document or an electronic fax saved on your hard drive in a graphics format such as TIFF or BMP (the Tagged Information File Format and Bitmap format are most commonly used for saving scanned images), you can open the file in Acrobat 6 and then process its pages with the Paper Capture plug-in (as described in the previous section). Note that in order for the Paper Capture plug-in to render a searchable PDF document, the source document must be scanned at a resolution setting between 200 and 600 dpi. To open the scanned graphic file in Acrobat, follow these steps:
  1. Choose File➪Create PDF➪From File to display the Open dialog box.
  2. Browse to the folder that contains the graphics file containing the scanned image and click its file icon. If the graphics file is saved in a graphics format other than TIFF, select this file format in the Files of Type drop-down list (the Show drop-down list on the Mac) so that its file icon is displayed in the Open dialog box.
  3. Click the Open button. The scanned graphic is displayed in the Document window in Acrobat.
  4. To save the graphics file as a PDF file, choose File➪Save, and then edit the filename and the folder in which you want to save it (if desired) before clicking the Save button.
  5. To make the text in the new PDF file searchable, choose Document➪ Paper Capture➪Start Capture. The Paper Capture dialog box opens.
  6. To modify the Paper Capture settings before using it to process the pages of your PDF document, click the Edit button to open the Paper Capture Settings dialog box. Otherwise, skip to Step 11.
  7. Select the language of the text in the Primary OCR Language dropdown list.
  8. In the PDF Output Style drop-down list, select one of the following:
    • To be able to both search and edit the text, select the Formatted Text & Graphics option.
    • To make the document text searchable only, select the Searchable Image (Exact) option.
    • To make the text in a document containing many images searchable, select the Searchable Image (Compact) option instead.
  9. To compress the graphics in the PDF document, select the amount of compression in the Downsample Images drop-down list. Your choices are Low (300 dpi), Medium (150 dpi), or High (72 dpi).
  10. Click OK to close the Paper Capture Settings dialog box and return to the Paper Capture dialog box.
  11. Click OK in the Paper Capture dialog box to begin the page processing.
  12. Choose File➪Save a second time to save your changes. After processing the pages of a scanned image that you’ve saved as a PDF document with Paper Capture, if you used the Formatted Text & Graphics output style, you can locate and eliminate all OCR errors in the text by following the steps in the preceding post, “Correcting Paper Capture boo-boos.”

Correcting Paper Capture boo-boos


Although the OCR (Optical Character Recognition) software used by Paper Capture has become better and better over the years, it’s still far from perfect. After processing a scanned PDF document using the Formatted Text & Graphics output style, you need to check your processed document for words that Paper Capture didn’t recognize and therefore wasn’t able to convert from bitmapped graphics into text characters.
To make this check and correct these OCR errors, follow these steps:
  1. Choose Document➪Paper Capture➪Find First OCR Suspect. The program flags the first unrecognized word in the text by putting a gray rectangle around it and opens the Find Element dialog box. Acrobat shows a magnified view of the unrecognized word in the Find Element dialog box,
  2. Choose the TouchUp Text tool by clicking its button on the Advanced Editing toolbar.
  3. In the Find Element dialog box, choose one of the following options:
    • To accept the word displayed and convert it from a graphic into text and then continue to the next capture suspect, click the Accept and Find button.
    • To edit the suspect word directly in the Find Element dialog box, type over incorrect characters in the suspect word and then click the Accept and Find button and go to the next suspect.
    • To ignore an unrecognized word and not convert it to text, just click the Find Next button to move right on to the next suspect.
  4. Repeat Step 3 until you’ve checked and corrected all the unrecognized words in the processed document. Note that if you choose Document➪Paper Capture➪Find All OCR Suspects, the program finds and highlights all suspect elements in the document without opening the Find Element dialog box. This allows you to individually choose which OCR suspect you’d like to edit.
  5. To edit one of the OCR Suspects in a document after choosing Find All OCR Suspects command, make sure the TouchUp Text tool is selected and double-click the desired element to open the Find Element dialog box. The selected OCR Suspect appears in the Find Element dialog box. You can continue by repeating Step 3 or close the Find Element dialog box and repeat Step 5.
  6. Click the Close button in the lower-right corner of the Find Element dialog box to close it, and then choose File➪Save to save your corrections to the PDF document.

How to make scanned documents searchable and editable


When you scan a document directly into a PDF file (as described in the preceding section), Acrobat captures all the text and graphics on each page as though they were all just one big graphic image. This is fine as far as it goes, except that it doesn’t go very far because you can neither edit nor search the PDF document. (As far as Acrobat is concerned, the document doesn’t contain any text to edit or search — it’s just one humongous graphic). That’s where the Paper Capture plug-in in Acrobat 6 for Windows comes into play: You can use it to make a scanned document into a PDF that you can either just search or both search and edit.

To use Paper Capture, all you have to do is choose Document➪Paper Capture to open the Paper Capture dialog box, select the page or pages to be processed (All Pages, Current Page, or From Page x to y), and then click the OK button; the Paper Capture utility does the rest. As it processes the page or pages in the document that you designated, a Paper Capture Plug- In alert dialog box keeps you informed of its progress in preparing and performing the page recognition. When Paper Capture finishes doing the page recognition, this alert dialog box disappears, and you can then save the changes to your PDF document with the File➪Save command When doing the page recognition in a PDF document, the Paper Capture plugin offers you a choice between the following three Output Style options:
  • Searchable Image (Exact): Select this option to make the text in the PDF document searchable but not editable (this is the default setting). This setting is the one to choose if you’re processing a document that needs to be searchable but should never be edited in any way, such as an executed contract.
  • Searchable Image (Compact): Select this option to make the text in the PDF document searchable but not editable and to compress its graphics. Use this setting if you’re processing a document whose text requires searching without editing and that also contains a fair number of graphic images that need compressing. When you select this setting, Paper Capture applies JPEG compression to color images and ZIP compression to black-and-white images.
  • Formatted Text & Graphics: Select this option to make the text in the PDF document both editable and searchable. Pick this setting if you not only want to be able to find text in the document but also possibly make editing changes to it.
To select a different output style setting, click the Edit button in the Paper Capture dialog box to open the Paper Capture Settings dialog box (as shown in Figure 6-5). This dialog box not only enables you to select a new output style in the PDF Output Style drop-down list, but also enables you to designate the primary language used in the text in the Primary OCR Language drop-down list (OCR stands for Optical Character Recognition, which is the kind of software that Paper Capture uses to recognize and convert text captured as a graphic into text that can be searched and edited).

If your PDF document contains graphic images, you can tell Paper Capture how much to compress the images by selecting the maximum resolution in the Downsample Images drop-down list. This menu offers you three options in addition to None (for no compression): Low (300 dpi), Medium (150 dpi), and High (72 dpi). The Low, Medium, and High options refer to the amount of compression applied to the images, and the values 300, 150, and 72 dpi (dots per inch) refer to their resolution and thus their quality. As always, the higher the amount of compression, the smaller the file size and the lower the image quality.

After processing the pages of your PDF document with the Paper Capture plug-in, use the Search feature (Ctrl+F on Windows and Ô+F on the Mac) to search for words or phrases in the text to verify that it can be searched. If you used the Formatted Text & Graphics output style in doing the page recognition, you can select the TouchUp Text Tool by clicking its button on the Advanced Editing toolbar or by typing T, and then click the I-beam pointer in a line of text to select the line with a bounding box to verify that you can edit the text as well. Always remember to choose File➪Save to save the changes made to your document by processing with Paper Capture.


Monday, June 9, 2008

Converting Office X files on the Mac


If you’re using Microsoft Office X for Mac OS X (and you have to because Acrobat 6 runs only on OS X), you have access to both the Convert to Adobe PDF and the Convert to Adobe PDF and E-mail buttons on the PDFMaker 6.0 toolbar in Word, Excel, and PowerPoint after you install Acrobat 6.0 on your computer. Note that although PDFMaker 6 does not support the review and commenting features found in the Windows version, you can use these buttons to convert Office documents to PDF files and e-mail them as you would using Office for Windows. You do not, however, have access to an Adobe PDF menu as you do in the Windows version of Office. This means that you have no way to change the conversion settings as described previously in this chapter. Mac users (I can hear you screaming at Adobe for Acrobat feature parity with your Windows brethren) can, however, choose Acrobat Distiller 6 preset Conversion Settings or any custom conversion settings you’ve created in the Print dialog box of your Office X program. To do so, follow these steps:
  1. With your Office X document open, choose File➪Print or press Ô+P to open the Print dialog box.
  2. Select Adobe PDF on the Printer drop-down list.
  3. Select PDF Options on the drop-down list labeled Pages and Copies. The PDF Options command is added to the list when you choose Adobe PDF as your printer. After selecting PDF Options, the Print dialog box .
  4. Click the Adobe PDF Setting drop-down list to select a preset Distiller Conversion Setting or one you’ve customized. If you hover the mouse pointer over a conversion setting in this list, a screen tip displays the directory path for that conversion setting’s location on your hard drive. You also have the option to choose Launch Nothing or Acrobat on the After PDF Creation drop-down list to specify whether or not you want to view your converted Office document PDF in Acrobat.
  5. Click either the Save as PDF or Print button to open the Save to File dialog box. If you want to see how your converted Office document is displayed in Acrobat, click the Preview button.
  6. Type a filename in the Save As text box, choose a location for the finished PDF file (the default is your desktop), and click the Save button to convert your Office Document to PDF. PDF files that are created from Office X documents do not retain their document structure tags. This means that those PDF files will not have the capability of being reflowed in Acrobat or Adobe Reader.

Converting Office documents to PDF and sending them for review


The third option for creating a PDF file with PDFMaker enables you to create a PDF from an Office document and use the resulting PDF file to initiate a review cycle by sending it out to reviewers. To do so, follow these steps:
  1. Choose Adobe PDF➪Convert to Adobe PDF and Send for Review in the Office application or click the Convert to Adobe PDF and Send for Review button on the PDFMaker 6.0 toolbar. If you haven’t saved your document, an Acrobat PDFMaker alert dialog box prompts you to do so. Click Yes. The Save Adobe PDF File As dialog box appears.
  2. Edit the filename of the converted PDF file in the Name text box and select the folder in which to save it on your hard drive. If you don’t edit the filename, PDFMaker gives the new PDF file the same name as its Office counterpart but with the .pdf filename extension. Note that by default, filename extensions aren’t displayed in Windows XP.
  3. Click the Save button to close the Save Adobe PDF File As dialog box and start the conversion process. When the PDFMaker finishes distilling your Office document, it opens the Send by E-mail for Review dialog box. Note that if you haven’t entered a return e-mail address in Acrobat Preferences, you will be prompted to enter one prior to seeing the dialog box.
  4. Enter e-mail addresses of those you wish to send the PDF file to for review, a subject, and message in the appropriate text boxes. The standard e-mail address text boxes (To, Cc, and Bcc) are provided. The Subject and Message to Reviewers text boxes have default entries that you can use or edit.
  5. Click the Send button to close the Send by E-mail for Review dialog box. An alert from your e-mail client program appears, asking you to verify that you want to send an e-mail with the attached PDF file.
  6. Click the Send button (again) to send out the attached PDF file for review. The Send for Review dialog box, also appears in Acrobat 6 when you choose File➪Send by E-mail for Review. For a complete rundown on commenting and reviewing features in Acrobat 6 as well as the Acrobat Comments menu that appears in Microsoft Word.
You can add to the notes, links, and bookmarks that are carried over from the original Word document in the converted PDF document using the annotation features in Acrobat 6

The PowerPoint-specific application settings

The following PowerPoint-only options appear in the Settings tab on the Acrobat PDFMaker dialog box when you choose Adobe PDF➪Change Conversion Settings in Microsoft PowerPoint:
  • Save Slide Transitions in Adobe PDF: Ensures that the animated transitions setup in a PowerPoint presentation are carried over in the converted PDF file.
  • Convert Multimedia to PDF Multimedia: Ensures that all multimedia elements in a PowerPoint presentation are converted to Adobe Multimedia in a PowerPoint-generated PDF file. Adobe Multimedia format adds interactive features to graphics, sounds, and movies that enhance their appearance in PDF documents.
  • PDF Layout Based on PowerPoint Printer Settings: Ensures that page layout in a PowerPoint-generated PDF file mirrors the printer settings specified in the PowerPoint presentation.

Thursday, June 5, 2008

Using the Bookmarks tab in PDFMaker


The Bookmarks tab is unique to the Word version of the Acrobat PDFMaker dialog box. Its options enable you to convert the headings and paragraph styles found in the original Word document into bookmarks in the resulting PDF document.
The Bookmarks tab contains the following options:
  • Convert Word Headings to Bookmarks: This option automatically converts all Word Heading styles used in the original document to bookmarks in the final PDF document. When this check box is selected (as it is by default), all Heading styles used in the document are selected in the list box below. To restrict bookmark conversion to just particular heading levels, deselect the check boxes for all the Heading styles you don’t want used in this list.
  • Convert Word Styles to Bookmarks: This option automatically converts all styles (not just the heading styles) used in the original Word document to bookmarks in the final PDF document. When you select this check box, the check boxes for all the styles used in your document are selected in list box below. To restrict bookmark conversion to just particular paragraph styles, deselect the check boxes for all the individual styles you don’t want used in this list.
While there are no Excel-specific options on the Acrobat PDFMaker dialog box when you choose Adobe PDF➪Change Conversion Settings in Microsoft Excel, there is an important new command on the Adobe PDF menu —Convert Entire Workbook. The default PDF conversion setting for an Excel document converts only the active worksheet. If you want to convert all the worksheets in your Excel workbook to Adobe PDF, choose this command

Using word tab in PDFMaker


The Word tab in the Adobe PDFMaker dialog box contains a bunch of check box options that enable you to control what Word-specific information is carried over to the new PDF documents you’ll be generating.
The Word Features area on the Word tab contains the following settings for converting very specific word processing features into PDF equivalents:
  • Convert Comments to Notes: Converts all comments added to the Word document into notes in the resulting PDF document.
  • Convert Linked Text Boxes to Article Threads: Convert all notations made in the text boxes found in the Word document into articles that control the way the text is read in Acrobat 6 or Adobe Reader 6.
  • Convert Cross-References and Table of Contents to Links: Changes all cross-references and any table of contents found in the Word document into active hyperlinks in the resulting PDF document.
  • Convert Footnote and Endnote Links: Converts all footnotes and endnotes in the Word document into active hyperlinks in the resulting PDF document.
The Comments area of the Word tab displays all the comments in the current Word document and lets you choose how they will be displayed in the converted PDF document. You can choose whether or not to include the comments, whether they appear open, and also specify a background color.

Using PDFMaker Security tab


The Security tab in the Adobe PDFMaker dialog box contains options that enable you to password-protect the converted PDF file (so that only the people you give the password can open the file) and set the file permissions (which control how the document can be edited and whether or not it can be printed). The options on this tab are identical to the ones found in the Adobe PDF - Security dialog box. Note that the Security tab options are exactly the same whether you are converting a Microsoft Word, Excel, or PowerPoint document to PDF.