Sunday, December 28, 2008

Rotating pages in PDF

Sometimes, you end up dealing with a PDF document that contains one or more sections whose pages need to be reoriented (perhaps switched from portrait to landscape mode) to better suit their text and graphics. To rotate pages in a PDF document, you select the Rotate Pages command on the Pages palette Options pop-up menu or choose Document>Pages>Rotate on the menu bar. (Don’t confuse this command with the Rotate View command found on the View menu, which rotates all the pages in the current PDF document for viewing.) When you choose Rotate Pages, Acrobat displays the Rotate Pages dialog box, as shown in Figure. You can select from the following options in the Rotate Pages dialog box to change the orientation of the desired page or pages:
  • Direction: Choose to rotate the image Clockwise 90 degrees, Counterclockwise 90 degrees, or 180 degrees.
  • Page Range: Determine which pages to rotate: Select the All radio button to rotate all pages, the Selection radio button to rotate only the page(s) selected in the Pages palette, or the Pages radio button to rotate the range you specify in the From and To text boxes.
  • Rotate: Limit what type of pages in the designated page range to rotate with these two drop-down lists. You can choose Even and Odd Pages, Even Pages Only, or Odd Pages Only from the top drop-down list. From the bottom drop-down list, you can select Pages of Any Orientation, Landscape Pages, or Portrait Pages.

Page-Editing Practices


Acrobat makes it easy for you to perform a number of routine page edits on one or more pages of a PDF document. Possible page edits can include rotating and cropping the pages, replacing pages from another PDF document, inserting a new page, deleting pages, and reordering the pages in the document, as well as assigning page numbers. You find all the commands to make these types of page edits on the Options pop-up menu at the top of the Pages palette in the Navigation pane.
When you’re using the Pages palette to navigate or edit pages, you can display more thumbnails of the pages in this palette by selecting the Reduce Page Thumbnails option at the bottom of the Pages palette Options pop-up menu. You can also increase the number of thumbnails visible by dragging the border between the Navigation and Document panes with the doubleheaded arrow to the right to make the pane wider.

Editing graphic images from the context menu

When a graphic is selected, you can also edit it using the options available on its context menu. To open a graphic’s context menu, right-click (Control+click on the Mac) the image with the TouchUp Object tool. These context menu options include many of the same options as the context menu for selected text . The following items on the context menu for selected graphics differ from the context menu for selected text:
  • Delete: Removes the selected image and places it in the Recycle Bin (Trash on the Mac).
  • Delete Clip: Removes any objects that are clipping the selected image (that is, cutting off part of the image in some way). This feature is grayed-out if no clipping occurs in the current document.
  • Select All: Selects all graphic objects on the current document page.
  • Select None: Deselects all graphic objects on the current document page.
  • Edit Image: Opens the selected graphic in the default image-editing program.
When a graphic object is selected, this option changes to Edit Object, and choosing it opens the object in the default page/object editing program. When multiple graphic objects are selected, this option becomes Edit Objects. When no graphic images are selected, this option becomes Edit Page, and choosing it opens the object in the default page/object editing program as well.
When you choose the Edit Image/Object(s)/Page option, Acrobat attempts to launch the program specified as the image editor or the page/object editor in the TouchUp section of the Preferences dialog box and open the selected image or graphic object in the application for editing. If Acrobat cannot launch the specified program, its displays an alert dialog box that informs you of this fact.
To specify a new program as the default image editor or the page/object editor, press Ctrl+K (Ô+K) to open the Preferences dialog box. Then click TouchUp in the list box on the left. To select a new image editor, such as Photoshop 7.0, click the Choose Image Editor button. The Choose Image Editor dialog box appears; open the folder that contains the application, select its program icon, and click the Open button. To select a new page/object editor, such as Illustrator 10, click the Choose Page/Object Editor button. In the Choose Page/Object Editor dialog box, open the folder that contains this application, select its program icon, and click the Open button. When using programs like Photoshop 7.0 and Illustrator 10 as your image editing and graphics object editing programs, respectively, you can make your changes in the programs launched from Acrobat 6 with the Edit Image or Edit Object command, and then, when you save your editing changes to the image or graphic in these programs, they are automatically updated in your PDF document.

Using the layout grid in repositioning graphics


Acrobat has a layout grid that you can use to help you in repositioning graphic images. To turn on the display of the layout grid in the PDF document, choose View➪Grid or press Ctrl+U (Ô+U on the Mac). When working with the layout grid, you can modify the default grid settings in the Units & Guides section of the Preferences dialog box by pressing Ctrl+K (Ô+K on the Mac) and then clicking Units and Guides in the list box on the left. The Layout Grid section of the dialog box contains a number of grid options that you can change:
  • By default, Acrobat subdivides each of the major grid squares into three divisions across and three down, making a total of nine little subdivisions. To increase the number of squares in each of the major grid squares, increase the value in the Subdivisions text box.
  • To offset the layout grid in relation to the top and left margin of the page, enter a value in the Grid Offset from Left Edge and the Grid Offset from Top Edge text boxes.
  • By default, Acrobat makes each major grid square one-inch square with one inch between their vertical lines and one inch between their horizontal lines. To make the major grid squares larger so that there are fewer, farther apart, increase the values in the Width Between Lines and Height Between Lines text boxes. To make the grid squares smaller so that there are more, closer together, decrease the values in these text boxes. Note, however, that if you decrease the values in these text boxes too much, Acrobat is no longer able to subdivide the square using the value entered in the Subdivisions text box.
  • By default, Acrobat colors the lines in the layout grid blue. To select a new color for all grid lines, click the Grid Line Color button and then click the desired color in the color palette.

Touching up your graphic images


You can use the TouchUp Object tool to select graphic images or other objects that have been embedded in a PDF document. This tool uses an arrowhead with a tiny square icon. You can switch between selecting the TouchUp Text tool and the TouchUp Object tool from the Advanced Editing toolbar by pressing Shift+T. As you hold the Shift key and press T, the arrowhead icon used by the TouchUp Object tool and outlined T icon used by the TouchUp Text tool toggle between one another on the toolbar. To select a graphic with the TouchUp Object tool, you simply click it with the arrowhead pointer. After a graphic is selected (indicated by a gray bounding box around the image or object — there are no sizing handles because you can’t resize graphics in Acrobat), you can then reposition it by dragging its outline to the new position before you release the mouse button. You can also nudge a selected graphic image with the arrow keys: Just press the ←, →, ↑, and ↓keys to move the graphic by small increments until it’s in the desired position.
To select more than one graphic image or object on the page at the same time, Shift+click each object. To select a group of graphic images or objects on the page, drag the TouchUp Object tool to draw a bounding box around all the graphics to select them all together.
When you’re trying to move charts and graphs embedded on the document page (especially those originally generated in a spreadsheet program like Microsoft Excel), drag a bounding box around the entire chart to ensure that you select all the components (such charts are actually composed of a whole bunch of individual graphic objects) before you attempt to reposition it on the document page.

Thursday, December 11, 2008

Modifying text attributes


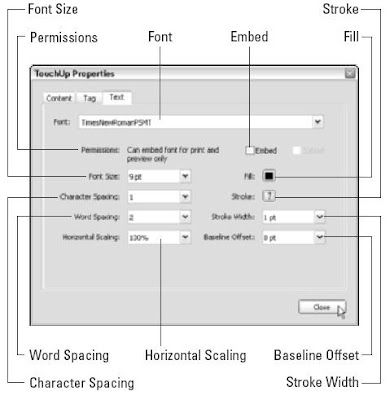
Provided that you have the font (or someone’s been nice enough to have embedded it in the PDF document for you), you can modify the attributes of the characters that you highlight with the insertion point in text selected with the TouchUp Text tool. Note that if your system doesn’t have the font and it hasn’t been embedded, Acrobat displays a nice little alert dialog box saying, Warning. You cannot edit text in this font. After selecting text within a bounding box, right-click and choose Properties on the context menu to open the TouchUp Properties dialog box with the Text tab already selected. This dialog box contains the following attribute options that you can change:
  • Font: Specify a new font for the selected text from the Font drop-down list.
  • Embed: Embed the font displayed in the Font drop-down list and, if desired, its subset fonts (Italic, Bold, and so on) in the PDF document. Note that the default Permissions, Can Embed Font for Print and Preview Only, appear in the area to the left of the Embed button. This setting allows you to embed or unembed a font and its subsets. Permissions settings may differ depending on the security put in place by the author of the PDF document.
  • Font Size: Specify a new font size for the selected text in the Font Size drop-down list.
  • Character Spacing (also known as tracking): Uniformly adjust the spacing between more than two characters selected in the text by the amount you specify in this drop-down list box.
  • Word Spacing: Uniformly adjust the spacing between two or more words selected in the text by the value (in thousandths of an em space) you specify in this drop-down list box.
  • Horizontal Scaling: Horizontally compress or expand the selected text by the percentage you enter in this drop-down list box.
  • Fill: Specify a new fill color (interior color) for the selected font on the color palette.
  • Stroke: Pick a new stroke color (outline color) for the selected font on the color palette.
  • Stroke Width: Specify a stroke width from between 1point and 4 point thickness in the drop-down list.
  • Baseline Offset: Shift the selected text vertically up or down in relation to the text baseline by the number of points you specify in this dropdown list box.
In addition to allowing you to edit text in a PDF document, the TouchUp Text tool also lets you add new text as well. Simply Ctrl+click (Option+click on Mac) the area in a PDF document where you want to enter new text to open the New Text Font dialog box. Here you choose a font in the Font drop-down list, choose the text display direction by selecting Horizontal or Vertical in the Mode drop-down list, then click OK to close the New Text Font dialog box and begin typing your new text.

Editing text from the context menu

When text is selected, you can also edit it using the options available on its context menu. To open selected text’s context menu, right-click (Control+click on the Mac) the text with the TouchUp Text tool. The context menu includes the following options:
  • Cut: Removes selected text from the PDF document and adds it to the Clipboard.
  • Copy: Copies selected text to the Clipboard.
  • Paste: Inserts text stored in the Clipboard into selected text or onto the current document page if no text is selected.
  • Delete: Removes selected text.
  • Select All: Selects all text within a bounding box on the current document page.
  • Select None: Deselects all text within a bounding box on the current document page.
  • Create/Delete Artifact: Designates or deletes text or an object in a PDF as either a Page (such as printing crop marks), Pagination (such as page numbers), or Layout (such as dividing lines between columns of text or footnotes) Artifact that may or may not be included in the document when it is repurposed in another format. For example, you may want printer’s marks on a PDF that will be printed, but not on the same PDF repurposed as a Web page.
  • Insert: Inserts various formatting elements into your text selection that improve the flow of text when you right-click and choose the desired element on the Insert submenu. Options available are: Line Break, Soft Hyphen (that is, one that disappears when the word doesn’t break across two lines), Non-Breaking Space (a space that keeps hyphenated words together on the same line at all times), and Em Dash (a longerthan-usual dash usually equal to the width of the letter M in the selected text that does permit line breaks across words).
When you finish editing text, click the Hand tool to ensure that you don’t inadvertently select other lines of text and do unintentional editing to them. Just be aware that you can’t use your good ol’ H keystroke shortcut to select the Hand tool because this only succeeds in typing the letter h in the line! Remember that some PDF files use the restrictions in the Changes Allowed security option to prevent anyone from making further editing changes. When this option is in effect in your document, you can’t get the TouchUp Text tool to select any text in the PDF document no matter how hard you click.

Using the TouchUp Text tool to edit text


You use the TouchUp Text tool much like the mouse cursor in a word processing program. You can either select the text containing the characters you want to edit or simply insert the cursor into the text and edit text on either side of the cursor. Thanks to Acrobat 6 support of document structure tags, you can now make much larger text selections than previously possible. The Acrobat 6 TouchUp Text tool lets you make text selections based on a heading or paragraph style tag present in the original document you converted to PDF — hopefully, a document created in an RTF (Rich Text Format) word processing program like Microsoft Word that adds these structure tags automatically. The end result is that clicking on text in a PDF document with the TouchUp Text tool displays a bounding box (also referred to as a container) around the text, based on its underlying document structure.

You can then select any or all text within the bounding box. For example, if the text you click has tags that define it as Normal paragraph style, a bounding box appears around the whole paragraph, indicating that you can select any part or the entire paragraph for editing. This is great progress for a program that until recently only allowed you to select one line of text at a time for editing. When you select the TouchUp Text tool on the Advanced Editing toolbar, the mouse pointer changes to an I-beam. Click the I-beam on a line or block of text where you need to make your first edit. When you click, Acrobat encloses the text in a bounding box defined by the underlying document structure tag. You can select any or all the text within the bounding box by dragging the I-beam through the desired text. To make editing changes to the surrounding characters when you insert the I-beam into text, use one of the following techniques:
  • To insert new characters at the insertion point, just type the characters.
  • To delete characters to the immediate right of the insertion point, press the Delete key.
  • To delete characters to the immediate left of the insertion point, press the Backspace key.
  • To restore characters deleted in error or remove ones incorrectly inserted, press Ctrl+Z (Ô+Z on the Mac), your good ol’ trusty Undo key.
Note that Acrobat 6 now supports multiple levels of undo. To make editing changes to text you’ve selected by dragging the I-beam cursor, use one of the following techniques:
  • To replace the text you’ve selected with new text, just begin typing.
  • To delete selected text, press the Delete key or right-click the text selection and choose Delete on the context menu.

Touching Up the Text and Graphics


You use the TouchUp tools on the Editing toolbar to make last-minute changes to the text and graphics in your PDF document. Acrobat includes two TouchUp tools that share a single button: the TouchUp Text tool (T) that you can use to do text corrections in individual lines of text in a PDF file, and the TouchUp Object tool (Shift+T) that you can use to reposition graphics. The single-key accelerator feature that allows keyboard shortcuts, such as pressing T to select the TouchUp Text tool, is not turned on by default in Acrobat 6. To enable single-key accelerators, choose Edit➪Preferences or press Ctrk+K (Ô+K on Mac) to open the Preferences dialog box, click General in the list box on the left to display the general options, and then select the Use Single-Key Accelerators to Access Tools check box. Finally, click OK to enable your settings. After turning on this feature, when you point to an editing tool button on the Acrobat 6 toolbars, a screen tip displays the name of the tool, as well as the key that can be pressed to quickly select the tool.

Removing all comments


After you’ve made all the required editing changes, you can remove all the comments and various markings from the original PDF document by opening the Comments palette, selecting all the comments listed, and then clicking the Delete the Selected Comment button on the Comments palette button bar. To select all comments, make sure all comments are collapsed by clicking their Collapse buttons (minus sign in Windows, triangle pointing down on the Mac), click the top comment group in the Comments pane, and then Shift+click the remaining comment groups. Note that Acrobat does not display an alert dialog box asking for your confirmation before removing all the comments in the current PDF document. You can, however, restore them by choosing Edit➪Undo Multiple Deletes or by pressing Ctrl+Z (Ô+Z on the Mac). Before you make your edits and remove all the comments, use the File➪Save As command and rename the file to make a copy of the PDF document with all its comments. That way, you always have a copy of the original file with all the reviewers’ feedback.

Friday, November 28, 2008

Searching for comments


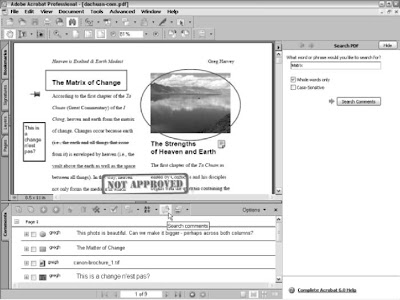
You can have Acrobat search comments for particular words or phrases by clicking the Search Comments button on the Comments palette button bar to open the Search PDF pane with only Search Comments options displayed.
Follow these steps in using the Find Comment dialog box:
  1. In the What Word or Phrase Would You Like to Search For? text box, enter the word or phrase in the comment(s) you want to locate as the search text.
  2. To prevent Acrobat from finding the search text inside of other words (as in her in the word there), select the Whole Words Only check box.
  3. To match the capitalization of the search text, select the Case-Sensitive check box.
  4. Click the Search button to begin your search. After Acrobat scans the PDF document, it displays the search result in the Search PDF pane, letting you know that it’s finished searching for your term, displaying the number of total instances found and the actual result(s) in the Results list box. Clicking an item in this list selects not only the icon or markup associated with the search result comment text in the PDF document, but also the associated comment in the Comments palette.
  5. If no results appear after a search, click the New Search button to start the process over.
  6. When you finish searching the comments in the PDF document, click the Done button or the Hide button in the Search PDF pane.
Note that you can enter the name of an author (as it appears on the title bar of the comment boxes) in the What Word or Phrase Would You Like to Search For? text box to use the Search Comments feature to locate and select comments made by a single reviewer.
Don’t confuse searching for comments in a PDF document with searching for text in the document. You use the regular Edit➪Search command to search for words or phrases in the general text of the document. You use the Search Comments button in the Comments palette to search for words or phrases only within the comments that you’ve added or imported into the PDF document.

Locating comments in the Comments palette

To use the Comments palette to locate and select a particular comment in the document, follow these steps:
  1. Click the Comments tab on the Navigation pane or choose View>Navigations tabs>Comments to display the Comments palette.
  2. To choose a different sort order for the comments, select one of the options on the Sort By pop-up menu: Type, Author, Date Last Modified, Color, Checkmark Status, or Status by Person. By default, Acrobat sorts the comments in the Comments palette by page.
  3. Click the Expand button (a plus sign on Windows and triangle pointing right on the Mac) for the page, comment type, author, or date modified (depending upon how the list in the Comments palette is sorted) that you think contains the comment or comments you want to find.
  4. Click the icon for the comment you want selected in the expanded list of comments on that page.

When you click a comment in the Comments palette, Acrobat displays the page and the comment markup in the Document pane. Because the comment you selected in the Comments palette is also selected in the PDF document, if you want to change its setting, you can then open its Properties dialog box by rightclicking the markup and choosing Properties on the context menu. To open its comment box, however, you still have to double-click the selected text or icon. Note that you can also edit a comment directly in the Comments palette without opening the comment box attached to the markup in the PDF document.

Finding comments


Acrobat provides a couple of methods for locating the comments that you’ve added and imported into a PDF document: You can use the Comments palette in the Navigation pane to identify all the comments made on particular pages of the PDF document, or you can use the Search Comments button in the Comments palette button bar to search comments for particular words or phrases. The Search PDF pane is displayed by clicking the Search Comments button shown in the figure. Note that the Comments palette, because of its expanded button bar and greater content, is the only Navigation pane that displays horizontally rather than vertically. Unlike the other Navigation panes (Bookmarks, Pages, and so on), if the Navigation pane is open when you select the Comments palette, you can close the Navigation pane by clicking its Close button while leaving the Comments palette open, thus giving your document more horizontal viewing space. If the Navigation pane is closed when you select the Comments palette, it remains closed.

Showing and hiding comments

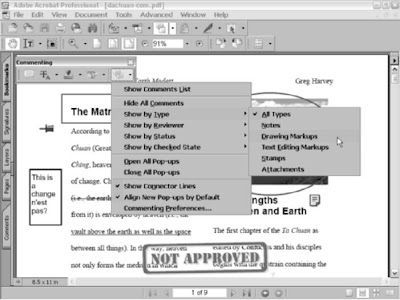
The Show menu button, located at the end of the Commenting toolbar, contains a large variety of options for displaying and hiding (also known as filtering) review comments attached to a PDF document, as shown in Figure. Filtering makes it easier to review annotations by allowing you to temporarily hide certain types of comments and only view those that you want to work with. For example, you can use the Show by Reviewer command to display only those comments made by a specific review participant. Note that the first time you use any of the Show menu commands in Acrobat 6, you may get a largely esoteric Hiding Comments with Replies alert dialog box telling you that Filtering does not apply to individual replies and that when you have a comment with replies that is hidden, all of its replies are hidden as well, regardless of whether they match the criteria for being hidden or not.

The gist is that you’ll have to use the Search Comments feature to find these comments and replies if you hide them. Select the Don’t Show This Message Again check box (unless you like this sort of abuse) and then click OK to close the alert dialog box.
To begin filtering a PDF review document, simply click the Show menu button on the Commenting toolbar and select a command on its menu or submenus. In Figure, I’m choosing Show>Show by Type>Drawing Markups. This command displays only those comments in the PDF document that were made with either the Pencil tool or the Rectangle tool. As the figure shows, in addition to displaying only Drawing Markups, you can also choose to display All Types of comments, only Notes, only Text Editing Markups, only Stamps, or only Attachments on the Show by Type submenu. Other filtering criteria on the menu include Show by Reviewer, where you can choose all participants or a specific participant, Show by Status, which gives you the option of displaying comments that have been Accepted, Rejected, Cancelled, or Completed (you can also choose All Status or None), and Show by Checked State, which displays only those comments that you’ve marked Checked or Unchecked.

These markups are for the use of the review initiator only and don’t appear to other review participants.
The following list describes other commands that appear on the Show menu that you can use to filter comments in a PDF document:
  • Show Comments List: Used to open the Comments palette in the Navigation pane.
  • Hide All Comments: This is a no-brainer. When you temporarily hide all comments, this menu command changes to Show All Comments so that you can redisplay all those you’ve hidden.
  • Open/Close All Pop-ups: Used to open or close all pop-up comments attached to markups for display, whether they are hidden or not.
  • Show Connector Lines: Used to add connector lines between markups and their associated comments. This is especially useful for comments placed outside the margins of a PDF document.
  • Align New Pop-ups by Default: Used to line up new pop-up comments along the right side of the screen, regardless of the location of its markup in the PDF document.
  • Commenting Preferences: Used to open the Commenting window in the Preferences dialog box in Acrobat 6.

Using summarize feature


After you’ve received reviewers’ comments in a PDF document, whether e-mail or browser-based, you can use the Summarize feature to create a summary report that lists all the different types of comments attached to a PDF document. This convenient feature lets you sort comments and specify a page layout in order to generate a printable comment synopsis. The summary is a separate PDF document that can be printed directly in Acrobat or saved and distributed to others for viewing and printing.
To generate a summary report, follow these steps:
  1. Choose Document➪Summarize Comments. The Summarize Options dialog box appears, as shown in Figure.
  2. Click one of the radio buttons in the Choose a Layout section of the Summarize Options dialog box to specify how the summary will appear onscreen or when printed. As you can see in Figure, in addition to having a lengthy description of the page layout attached to each radio button, you also get a graphic depiction of the selected page layout in the area above when you click a radio button.
  3. Choose a comment sort order for the summary by clicking the Sort Comments By drop-down list and choosing either Author, Date, Page, or Type.
  4. Select one of the Include radio buttons, either All Comments, which displays all comments whether they are hidden or not in summary, or Only the Comments Currently Showing, which keeps hidden comments hidden in the summary.
  5. Choose a Font Size radio button, either Small, Medium, or Large, to specify the size of displayed text in the summary.
  6. Click OK to close the Summarize Options dialog box and generate the summary report.
  7. Acrobat generates the summary report in a separate PDF document that it displays in the Document window using the Fit Width view. You can then save and print this summary file.

Wednesday, November 12, 2008

Spelling it out


Acrobat includes a spell check feature that you can use to catch typos you make in the comments that you add to a PDF document. You can use this feature to catch and eliminate all those embarrassing spelling errors before you send your comments out to someone else on the review team. To spell-check the text in all comments in the document (along with all text in any form fields you’ve added), go to the first page of the document, choose Edit>Check Spelling>In Comments and Form Fields, or press F7 to open the Check Spelling dialog box, and then click the Start button.
Acrobat will then flag the first unknown word it encounters in either the form fields or the comments in the document, and you can then take one of the following steps:
  • To replace the flagged word with one of the suggested corrections listed in the Suggestions list box, click the correction and then click the Change button.
  • To replace the flagged term with the selected correction in all instances in the other form fields and comments in the document, click the Change All button.
  • To ignore the flagged word, click the Ignore button.
  • To ignore the flagged word in all the other form fields and comments in the document, click the Ignore All button.
  • To add the word to the dictionary, click the Add button.

When Acrobat finishes checking the spelling in the last form field or comment on the last page of the document, it automatically returns to the first page and displays the message Spell Check Complete in the Check Spelling dialog box. You can then click the Done button to close the Check Spelling dialog box. If you want to have Acrobat spell-check a passage in the document text, use the Highlight tool to highlight the text to be spell-checked, which is then automatically added to a hidden comment box. Run the spell check feature and use it to correct all the misspellings in the text’s comment box.

You can then use the corrected text stored in the comment box when making the corrections during the final editing phase. Note that in order for the process described previously to work in Acrobat 6, you need to make sure that the Copy Selected Text into Highlight, Cross-Out, and Underline Comment Pop-ups check box is selected in the Commenting section of the Preferences dialog box. To check if this feature is selected, choose Edit➪Preferences or press Ctrl+K (Ô+K on Mac) and click Commenting in the list box on the left side of the Preferences dialog box.

Mark it well

The graphic markup tools (Pencil and Rectangle) found on the Advanced Commenting toolbar enable you to mark up elements that need changing in the PDF document you’re reviewing. When you use these graphic markup tools to call attention to particular passages of text and graphics, you can add hidden notes (like you can do when using the Stamp and Note tools) that explain the type of changes you’d like to see made to the elements you’ve marked. All the graphic tools work in a similar manner and share the same Appearance, General, and Review History properties as associated with Commenting toolbar markup tools. The Pencil tool comes with its own Pencil Eraser tool (just like a real pencil!), and the Rectangle tool is actually one of seven shape tools found on its pop-up menu. Which of these tools you select varies according to the kind of document elements you want to mark up:
  • Pencil tool: Draws freehand shapes around text and graphics.
  • Rectangle tool: Draws rectangular and square boxes around text and graphics. Hold down the Shift key to constrain the shape to a square as you draw with this tool.
  • Oval tool: Draws a circle or oval around text and graphics. Hold down the Shift key to constrain the shape to a perfect circle as you draw with this tool.
  • Arrow tool: Draws arrows that point to a specific document element.
  • Line tool: Adds a line to text or graphics (often referred to as adding a rule). Hold down the Shift key to constrain the shape to a straight line and drag left and right for a horizontal rule, up and down for a vertical rule, and diagonally for a rule on the bias at 45 degrees.
  • Cloud tool: Draws a nice puffy cloud around text or graphic elements you want to call attention to. Using this tool greatly enhances the cuteness quotient of your reviewing contribution.
  • Polygon tool: Draws a closed multisegment polygon shape around a document element.
  • Polygon Line tool: Draws an open multisegment polygon shape around a document element.
To use one of these tools to mark up a PDF document, follow these general steps:
  1. To use the Pencil tool, click its button on the Advanced Commenting toolbar or press N. To use one of the other markup tools, press Shift+D until its icon (rectangle for the Rectangle tool, oval for the Oval tool, diagonal line for the Line tool, and so on) is selected.
  2. Position the cross-hair mouse pointer near the text or graphic that you want to mark up, and then drag to draw the line or shape made by the tool to call attention to it. When using the Pencil tool, you can draw a freehand line or enclosing shape. When using the Square, Circle, or Line tool, remember that you can constrain the shape or line by holding down the Shift key. When using the Cloud or Polygon tools, click the point where you want to start drawing and drag to draw a line. When you want to change direction, click again to start a new line in the same manner. Continue clicking and dragging until you’ve either enclosed the desired document element with a final click at your starting point, or in the case of the Polygon Line tool, make a final click to end your drawing. Note that you can cancel or complete a drawing at any time during the process by right-clicking and selecting either Cancel or Complete on the context menu.
  3. Release the mouse button when you finish drawing the desired line or shape with the selected tool.
When you release the mouse button, Acrobat lays the graphic down on the page. To select the markup graphic to resize it, move it, or change its graphic settings, select the Hand tool by pressing H, and then click the line or shape with the arrowhead pointer. If the graphic is a shape made with any tool other than the Line tool, Acrobat encloses it in a bounding box with sizing handles at the corners. If the graphic is a rule made with the Line tool, the program selects the line with sizing handles at either end.

To move a markup graphic, drag its outline with the arrowhead pointer and then drop it in its new position. To resize it, drag one of its sizing buttons. Remember that you can have Acrobat automatically open a comment box each time you add a markup graphic by selecting the Automatically Open Comment Pop-ups for Comments Other Than Notes check box in the Pop-up Behavior area of the Commenting Preferences dialog box. You can also have Acrobat automatically display a hidden comment when you position the mouse on the markup graphic by selecting the Automatically Open Pop-ups on Mouse Rollover check box as well.

Using the File Attachment tool

You can use the File Attachment tool to attach or append another file (not necessarily saved as a PDF) to the PDF document you’re reviewing. You can use this feature to attach new copy and graphics that you’d like to see replace particular text passages and images in the PDF file. You can also use this tool to attach a memo or some other text document that outlines the review steps or special instructions to the design or review team. Don’t use this feature to attach files saved in other file formats besides PDF unless you’re sure that each reviewer has the software necessary to open it installed on his or her computer. Of course, the way to be sure that each and everyone concerned will be able to open and evaluate all the files you attach to a PDF document under review is to save them as PDF files before you attach them.
To attach a file to the PDF file you’re reviewing, follow these steps:
  1. Click the Attach File tool on the Advanced Commenting toolbar or press Shift+J until its icon (the one with the pushpin) is selected.
  2. Click the Pushpin pointer at the place in the PDF document’s text or graphics where you want the File Attachment icon (a paper clip by default) to appear, indicating to other reviewers that a file has been attached. Acrobat responds by opening the Select File to Attach dialog box.
  3. Open the folder and select the icon for the file that you want to attach to the current PDF document, and then click the Select button. The File Attachment Properties dialog box opens.
  4. Change the properties of the file attachment as follows:
    • To select a new icon besides the default paper clip, click the Appearance tab and choose an item in the Icon list box.
    • To change the color of the File Attachment icon, click the Color button and then click the new color in the palette.
    • To increase or decrease the opacity of the file attachment icon, type in a new percentage number in the Opacity text box or use the slider button.
    • To modify the ToolTip description that appears when the user positions the mouse over the File Attachment icon, click the General tab and replace the filename in the Description text box. Acrobat automatically displays the filename as the ToolTip if you don’t modify this text box.
    • To change the author or subject associated with this file attachment, click the Author or Subject text box and edit the default text that appears there.
  5. Click the Close button to close the File Attachment Properties dialog box. As soon as you close the File Attachment Properties dialog box, you see the File Attachment icon (a paper clip unless you changed it) at the place you clicked in the document. To move this icon, drag it with the arrowhead pointer. To display the ToolTip with the name of the attached file (or some other description if you modified the Description text box), position the arrowhead mouse pointer over the File Attachment icon. To open the attached file, double-click its File Attachment icon, or right-click (Control+click on the Mac) the icon and then click Open File on the context menu. Acrobat responds by displaying an Open Attachment alert dialog box, warning you about possible dangers in opening the file. When you click the Open button in the alert dialog box, Acrobat then goes ahead and opens the file.
If the attached file is a PDF document, Acrobat opens it and makes it the current document (you can then return to the original PDF document by selecting its name at the bottom of the Windows menu). If the attached file is saved in some other file format, your computer’s operating system launches the program that created the file (provided that it can be identified and that the program is installed on the computer), opening it in a new window. You can then return to the original PDF document by clicking its program icon on the Windows taskbar or clicking the Application icon on the OS X Dock. To remove an attached file from the PDF document, right-click the File Attachment icon (Control+click on the Mac) and then click Delete on its context menu. To save the attached file on your hard drive before you delete it, click Save Embedded File to Disk on its context menu, select the folder in which you want it saved, and click the Save button.

Using the Attach Sound tool


You use the Attach Sound tool to record a sound note or select an audio file that is played back when the user double-clicks the Sound Note icon. Note that your computer must have a microphone in order to record your own sound notes and add them to your PDF document.
To record a sound note for playback in your PDF document, follow these steps:
  1. Click the Attach Sound tool on the Advanced Commenting toolbar pop-up menu.
  2. Click the Speaker mouse pointer at the place on the page in the PDF document where you want the Sound Note icon to appear. When you click this pointer, Acrobat opens a Sound Recorder dialog box.
  3. To record the sound note, click the Record button and speak into your computer’s microphone. When you finish recording, click the Stop button. To play the note before adding it to your document, click the Play button (which replaces the Stop button).
  4. Click OK in the Sound Recorder dialog box. The Sound Recorder dialog box closes, and the Sound Attachment Properties dialog box opens.
  5. Click the Appearance tab and select an icon for the sound attachment —either Ear, Microphone, or Sound (speaker) in the Icon list box. Click the Color button and select a new color for the sound attachment icon on the color palette that appears. Increase or decrease the opacity of the sound attachment icon by typing in a new percentage number in the Opacity text box or using the slider button.
  6. Click the General tab and edit the default text in the Author, Subject, and Description text boxes. Text entered in the Description text box identifies the sound file when you position the mouse pointer over its attached sound icon.
  7. Click the Review History tab to view any recent changes to the status of the attached sound during a review cycle. When you’re finished changing Sound Attachment properties, click Close to exit the dialog box.
You can also select a prerecorded sound file to play back when the Sound Attachment is played. To select a prerecorded sound file, click the Browse button in the Sound Recorder dialog box to open the Select Sound File dialog box. Click the folder that contains the desired sound file, click the sound file icon, and then click the Select button.
To play a sound note that you’ve added to a PDF document, double-click its Sound Note icon with the Hand tool or right-click (Control+click on Mac) its icon and then click Play File on the context menu.

Using the Text Box tool


You use the Text Box tool to create comments in the PDF document that are always visible. Because free-text comments are always displayed, you need to position them in margin areas or places where they won’t obscure document text or graphics text underneath.
To create a comment with the Text Box tool, follow these steps:
  1. Click the Text Box tool on the Advanced Commenting toolbar or press X if the single-key accelerator feature is turned on.
  2. Click the I-beam mouse pointer or draw a marquee at the place on the page in the PDF document where you want the text of the comment to appear. When you click or draw a marquee with this pointer, Acrobat opens a yellow bounding box (which appears dotted on some monitors) in which you type the note.
  3. Type the text of the free-text note in the note’s bounding box. As you type a note in a bounding box you created by drawing a marquee with the I-beam pointer, Acrobat automatically breaks the lines of text to fit within the width of the bounding box and expands its height.
  4. When you finish typing the text of the free-text note, click the Hand tool and then click outside of the note’s bounding box. Acrobat displays your free-text note in a box.

If you create a bounding box by simply clicking an area in your document with the I-beam pointer, you must make the first line break in your text note by pressing Enter (Return on the Mac) in order for Acrobat to make subsequent automatic line breaks. Otherwise, you end up typing a never-ending line of text that expands the width of the bounding box right off the page! To resize the Text Box note to make all of its text visible or to eliminate excess white space around the note text, position the Hand tool somewhere on the note and then click the arrowhead pointer to display the sizing handles at the four corners of the free-text note box. Next, position the pointer on one of the sizing handles and drag the double-headed pointer diagonally until the outline of the note box is the shape and size you need. Click outside the note box to deselect the sizing handles.

To move a free-text note, click within its note box to display the sizing handles and then, with the arrowhead mouse pointer inside the box, drag the outline to a new position on the page before releasing the mouse button. To delete a free-text note from the PDF document, right-click (Control+click on the Mac) the note text or its bounding box, and then click Delete on its context menu. As with comments added with the Note tool, you can change the default settings for the free-text notes you create with the Text Box tool. Right-click the text box and select Properties on its context menu to open the Text Box Properties dialog box. As you can see, the setting options in this dialog box enable you to change the Appearance, General settings, and display Review History by clicking the appropriate tab. On the Appearance tab, select a border style in the Style drop-down list. Your choices are Solid or six different dashed-line styles. To make the border of the text box thicker, increase the value in the Thickness text box. To remove the border entirely from text box, set this value down to 0.

To change the color of the box border, click the Border Color button and then click a new color on the palette. To decrease or increase the opacity of the text box so that you can see more or less of the document background, enter a percentage number in the Opacity text box or move the slider button to the left to decrease the opacity or to the right to increase the opacity of the text box. To add a background color to the text box, click the Fill Color button and click the background color from its color palette (but for heaven’s sake, don’t select a background color on this palette that’s so dark that you can’t read the note text). The options on the General and Review History tabs are exactly the same as those for the other markup tools (Note, Stamp, and Indicate Text). Change the author or subject of a comment attached to a Text Box on the General tab or display changes of status to the Text Box comment on the Review History tab. When you finish making changes in the Text Box Properties dialog box, click Close to see the effects of your changes on the currently selected text box.

Monday, October 27, 2008

Inserting Document Comments with the Advanced Commenting Toolbar

Options that appear on the Advanced Commenting toolbar give you a lot of flexibility when annotating a PDF document by providing markup tools that go way beyond the standard note, text edit, stamps, and highlighting features found on the Commenting toolbar. You can use the Rectangle tool and its many built-in variations to create drawn shapes used to highlight text or graphics that you want to call attention to with an attached comment. The Text Box tool creates static annotations that always appear in a document rather than hidden comments made with the Note tool. The Pencil tool draws free-hand shapes around document elements you want to call attention to with an attached comment. You can even attach sound files or other document files using the Attach Sound tool and Attach File tool. The following sections give the particulars on these useful markup tools.

Hitting the highlights


Acrobat includes three text-only markup tools: Highlighter tool, Cross-Out Text tool, and Underline Text tool:
  • Highlighter tool: Highlights text in a color (yellow by default) just like the highlighting pens you used to mark key words and phrases to remember in your text books.
  • Cross-Out Text tool: Indicates words and phrases that should be deleted from the text. (Acrobat puts a line through the text just like they do in voter pamphlets to show what provisions of a referendum will be removed from a statute.)
  • Underline Text tool: Underscores the importance of text.
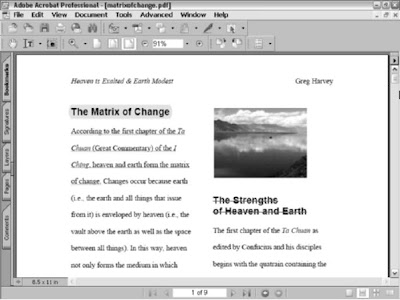
Figure shows you examples of three types of text markup: highlighting in the title, underlining in the first-paragraph text at the top of the first column, and crossing-out in the title at the top of the second column. As with the graphics markup tools, when you mark up text with the text-only tools, Acrobat automatically adds hidden comment boxes to the markups.
To have the comment boxes contain a copy of all the text that you’ve marked with the text-only markup tool, open the Acrobat Preferences dialog box by choosing Edit➪Preferences or pressing Ctrl+K (Ô+K on Mac), click Commenting in the list box, and then select the Copy Selected Text into Highlight, Cross-Out, and Underline Comment Pop-Ups check box in the Making Comment section before clicking OK to close the Preferences dialog box. You can then annotate this comment text or replace it with the corrections you’d like to see made. The text-only tools all work the same way: After you click the desired textonly markup tool, you drag the I-beam mouse pointer through all the text you want to highlight, cross-out, or underscore. Each text-only markup tool has the same Properties dialog box as the graphics markup tools (Note and Stamp) where you can edit the Color, Opacity, Author, Subject, and Review History of created markups. To access these options, right-click the markedup text and choose Properties on the context menu to open the associated Properties dialog box.
To delete the highlighting, strikeout, or underlining made to words or phrases in the PDF document, right-click (Control+click on the Mac) the marked-up text and then click Delete on its context menu. To open the comments box attached to the words or phrases you’ve marked up with one of the text-only markup tools, double-click the marked-up text to open its comment box. You can also hide an open comment box in this manner rather than clicking its Close button.
Remember that you can have Acrobat automatically open a comment box each time you mark up text with one of the text-only markup tools by selecting the Automatically Open Comment Pop-Ups for Comments Other Than Notes check box in the Commenting Preferences dialog box. You can also have Acrobat automatically display a hidden comment when you position the mouse on the marked-up text by selecting the Automatically Open Pop-Ups on Mouse Rollover check box as well.

Adding custom marks to your own stamp category


You can create your own marks in graphics programs, such as Adobe Illustrator or Adobe Photoshop, and then use them as stamps in Acrobat 6. To do this, convert the graphic image you want to use as a stamp to either a JPEG, GIF, or bitmap file. You can also convert Illustrator and Photoshop files saved in their native format (AI or PSD).
After you have the mark saved, follow these steps to make it available as a stamp in Acrobat 6:
  1. Choose Tools>Commenting>Stamp Tool>Create Custom Stamp or simply click Create Custom Stamp on the Stamp tool pop-up menu. The Create Stamp dialog box opens.
  2. Click the Select button to open the Select dialog box.
  3. Click the Browse button, and in the Open dialog box that appears, locate the desired graphic and click the Select button to return to the Select dialog box.
  4. Click OK to close the Select dialog box and return to the Create Stamp dialog box.
  5. Enter the name you want to give the stamp (something with the company name or a description of the mark) in the Name text box, enter a name in the Category drop-down list box or select a previously created custom category, and then click the OK button.

After you add a custom graphic as a new stamp, its category, name, and thumbnail appear on the Stamp tool pop-up menu as well as the Acrobat menu bar, and you can start using it in the PDF documents you’re reviewing as you would any of the other built-in stamps. After clicking the Stamp tool, select your new custom imprint on the Stamp tool submenus and then click the Stamp tool mouse pointer at the location in the current PDF document where you want the stamp to appear. If you want to delete a custom stamp you’ve created, choose Manage Stamps on the Stamp tool pop-up menu, and in the Manage Stamps dialog box that appears, select the custom stamp for deletion by choosing its category and name in the drop-down lists before clicking the Delete button. When you’re finished deleting custom stamps, click the OK button to close the Manage Stamps dialog box. Note that you can also invoke the Create Stamps dialog box by clicking the Create button in the Manage Stamps dialog box.

Getting your hidden comments added and seen


When using stamps to annotate a PDF document, you may want to make a couple of changes to the Comments Preferences — one that will help you remember to add hidden comments and the other to let you and your reviewers know that hidden comments are attached to particular stamp imprints. To have Acrobat automatically open a blank comment box whenever you add a new stamp imprint, open the Commenting section of the Preferences dialog box (by pressing Ctrl+K on Windows or Ô+K on the Mac, and then clicking Commenting in the list box on the left), and then select the Automatically Open Comment Pop-ups for Comments Other Than Notes check box in the Pop-up Open Behavior section. To have the program automatically display the comment boxes you add to stamp imprints whenever you position the mouse over them, select the Automatically Open Pop-Ups on Mouse Over check box in the Viewing Comments section (note that selecting this check box option affects hidden comments added with the Notes tool, as well as those added with the Stamps tool).

Adding a hidden comment to a stamp imprint


If you want to add a hidden text comment to the imprint of a stamp, you can do so by following these steps:
  1. Double-click the imprint of the stamp to which you want to add the comment. Acrobat responds by opening a comment box, just like the ones used to add comments with the Note tool.
  2. Type the text of your comment in the open comment box.
  3. To resize the comment box so it better fits the text you entered, drag the sizing box in the lower-right corner diagonally until it’s the right shape and size.
  4. To move the comment box so that its title bar doesn’t obscure the stamp’s imprint, drag the comment box by its title bar.
  5. When you finish making changes to the comment box, click its Close button to make the box and its note disappear. You can also doubleclick a stamp imprint to toggle between hiding and displaying its attached comment.

Options of Stamp Properties dialog box

As mentioned earlier, you can attach hidden comments to stamps (see the following section to find out how) and also specify properties for those comments. To change properties for comments made with the Stamp tool, rightclick a stamp imprint in the current document and choose Properties on the context menu to open the Stamp Properties dialog box. The following is a rundown of the options you find there:
  • Appearance tab: To change the color used in the title bar of any comment box that you attach to a stamp, click the Pop-up Color button and then click the new color in the palette. To decrease or increase the opacity of the stamp imprint so that you can see more or less of the document background, enter a percentage number in the Opacity text box or move the slider button to the left to decrease the opacity or to the right to increase the opacity of the stamp imprint.
  • General tab: To change the author associated with the stamp, click the Author text box and then edit the name. To change the subject of the stamp, click the Subject text box and edit the default text. Note that Acrobat 6 uses your Windows Identity or Log-in name as the default entry in the Author text box for stamps. To use your Acrobat Identity instead for all subsequent notes you create with the Stamp tool, see the instructions at the end of the previous section, “Using the Note tool.”
  • Review History tab: Contains a list box that displays any changes in status for the selected comment. When you finish making changes to the settings in the Stamp Properties dialog box, click the Close button to return to the current document. Note that when you close the Stamp Properties dialog box, the imprint is still selected in the current document so that you can resize it and move it to a new place on the page if you need to.
To resize the imprint, position the mouse pointer on one of the sizing handles and then drag diagonally with the double-headed pointer. To move the imprint to a new place on the page (perhaps to the side or above related text or graphic images), position the arrowhead pointer somewhere within its bounding box and then drag its outline and drop it in place. To delete a stamp from the PDF document, right-click (Control+click on the Mac) the Stamp’s imprint and click Delete on its context menu.

Wednesday, October 15, 2008

Using the PDF Stamp tool


You can use the Stamp tool to imprint the document with a predefined graphic mark that mimics real-world rubber ink stamps used to indicate the status of the document, such as Draft, As Is, Confidential, or Final. When you use one of these marks, you can also add a hidden comment to it, just like you do when creating a comment with the Note tool. Acrobat comes with a wide variety of ready-made stamps that you can use (which are organized into different categories). You can also add your own marks to these collections. Don’t confuse adding a stamp to the PDF document you’re reviewing with digitally signing a PDF document.
When you stamp a document, you’re simply adding another, more graphic form of notation to the document. When you digitally sign a document, however, you’re actually using a secure method for identifying yourself as the signatory. Use stamps when you want to call attention to the current state of the PDF document or add a very visible review comment, such as red-flagging a change with, of all things, a red flag. Digitally sign the PDF document when you’re ready to freeze it and prevent all further changes to it.
To add a stamp to a PDF document, take these steps:
  1. Click the Stamp tool on the Commenting toolbar.
  2. Click the Stamp tool mouse pointer at the place on the page in the PDF document where you want the stamp’s imprint to appear. When you click the Stamp tool mouse pointer, Acrobat inserts the lastused stamp at the place you click (this is the Approved mark when you first begin using this feature in Acrobat).
  3. If you want to use a different stamp, click the mark that you just added to the document to select it (you can tell it’s selected because a bounding box with sizing handles at the corners appears), and then click the Stamp tool pop-up menu to select another stamp.
The Stamp tool pop-up menu and submenus contain all the built-in stamps available in Acrobat 6. These are divided into three categories: Dynamic, Sign Here, and Standard Business. Dynamic stamps like the Approved stamp, automatically display author, time, and date information, as opposed to Standard Business like the For Public Release stamp shown selected on Stamp tool pop-up menu in the figure, which has no additional dynamic information. The Sign Here category provides a number of stamps used to highlight digital signature areas, much like the Sign Here Post-It notes you may have seen attached to paper documents from your accountant or lawyer.

How to change the color and icons used when you add your comments with the Note tool

You can also change the color and icons used when you add your comments with the Note tool. This is a good feature to use when many people will be adding comments to the same PDF. By having the reviewers select individual colors and icons, you can tell at a glance which notes belong to which reviewers.
To select a new color and/or icon for your notes, follow these steps:
  1. Add your first note (by following the preceding steps).
  2. Right-click the Note icon (Control+click on the Mac), and then choose Properties on the context menu. The Note Properties dialog box appears.
  3. To select a new Note icon, select it in the Icon list box.
  4. To select a new color for the Note icon, click the Color button and then click a new color in the palette. Note that you can also increase or decrease the opacity of the Note icon by entering either a percentage number in the Opacity text box or moving the slider button right for less opacity or left for more opacity.
  5. To change the author or subject for the note, click the General tab and enter a new name in the Author text box or a new subject in the Subject text box.
  6. Click Close to put your changes into effect.
When you close the Note Properties dialog box, Acrobat changes the current comment to suit the new icon and/or color settings. All notes that you subsequently create will use the new note settings. Be aware, however, that the icons for notes previously added are unaffected by your changes to these settings (you would have to delete and then re-create them to have all your notes reflect the new color and icon settings). Also keep in mind that changes you make in the Author or Subject text boxes of the Note Properties dialog box affect only the particular note selected at that time. Acrobat 6 uses your Windows Identity or Log-in name as the default entry in the Author text box for Notes. If your Windows Log-in name differs from your Acrobat Identity (entered in the Identity Preferences dialog box), you can choose your Acrobat Identity for all subsequent notes you create with the Note tool. To do so, open the Preferences dialog box (Ctrl+K on Windows, Ô+K on the Mac), click Commenting in the list box, and then deselect the Always Use Log-in Name for Author name check box in the Making Comments Preferences area.
You can also change the font and font size for text used in the comments you create with the Note tool, as well as the opacity of the comment box (by decreasing it, you can see more of the text and graphics underneath) in the Viewing Comments area of the Commenting Preferences dialog box. Note that changes you make in the Font and Font Size drop-down lists affect only new comments created with the Note tool. The same holds true for any new setting you select with the Opacity text box or slider.

Using the Note tool


The notes that you can add when reviewing a PDF file run the gamut of hidden comments (identified by a note icon), simple text displayed at all times in the document, audio comments that you listen to, and predefined stamps indicating approval, confidentiality, and the like. You can even add notes that attach files to the PDF document (useful when you want to include alternative text or graphics that should be considered as possible replacements or additions).
To add a hidden comment with the Note tool, follow these steps:
  1. Click the Note tool on the Commenting toolbar or type S if the singlekey accelerators feature is turned on in the Acrobat General >Preferences.
  2. Click the Note mouse pointer at the place on the page in the PDF document where you want the Note icon to appear. When you click this pointer, Acrobat opens a comment box that shows your name and the current date on the colored (yellow by default) title bar.
  3. Type the text of the note in the comment box.
  4. If the text of your note is short, you can resize the comment box to better suit the mount of text by positioning the mouse pointer in the sizing box in the lower-right corner and dragging the outline of the box with the arrowhead pointer until it’s the shape and size you want.
  5. After you finish typing the text of the note, click the Close button in the upper-left corner of the comment dialog box to close it. You can also double-click the Note icon to close its comment box.
After you click the Close button in the comment box, only the Note icon appears on the page. To open the note’s comment box to read its text, select the Hand tool by pressing H and double-click the Note icon, or right-click the icon (Control+click on the Mac), and then select Open Pop-up Note on its context menu. You can leave a comment box open next to its Note icon on the page by clicking outside of the box rather than clicking its Close button.
You can move notes by dragging their Note icons or their comment boxes (if they’re open) with either the Hand tool or the Note tool. Simply drag the arrowhead pointer to the desired position on the page (usually off the text that you’re commenting on) and then release the mouse button. To move a note back to its original position, right-click (Control+click on the Mac) its Note icon and click Reset Pop-up Note Location on its context menu. To delete a hidden comment, choose Delete on the context menu.

Wednesday, September 17, 2008

Inserting Document Comments with the Commenting Toolbar

In its original state, the Commenting toolbar displays the buttons for four tools — Note, Indicate Text Edits, Stamp tool, and Highlight Text — that you can use to annotate your PDF document, as well as the Show button that is used to display or hide (also known as filtering) comments in your PDF document. Three of the tool buttons, Indicate Text Edits, Stamp tool, and Highlight Text, contain pop-up menus that you can click to display additional features for the selected tool.
When you click the pop-up menu button on the Indicate Text Edits tool, it displays options for marking up edited text selections. You normally use this group of commands in conjunction with the Indicate Text Edits tool to perform various markups on selected text in PDF document you’re reviewing for the benefit of other review participants. These self-explanatory options include Insert Text at Cursor, Replace Selected Text, Highlight Selected Text, Add Note to Selected Text, Cross Out Text for Deletion, and Highlight Selected Text, among others. When you click the pop-up menu button on the Stamp tool, it displays all the options for using the electronic rubber stamp feature in Acrobat 6.
When you click the pop-up menu button on the Highlight tool, it displays different highlighting tools — Cross-Out Text tool and the Underline Text tool, in addition to the standard Highlighter tool. You usually use this group of tools to draw attention to text in the PDF document you’re reviewing that needs some type of editing (normally deletion, when you use the Cross-Out Text tool) or emphasizing (when you use the Underline Text tool). See the “Hitting the highlights” section, later in this chapter, for details. Note that Acrobat saves all notations that you add with Commenting and Advanced Commenting tools on a distinct and invisible top layer of the PDF document, keeping them separate from the PDF document text and graphics underneath. This makes it possible for you to import comments from other reviewers and add them to the PDF document, as well as to summarize all comments made in the document and export them as a separate file.

Renaming and deleting bookmarks

If you aren’t happy with a name of a particular bookmark, you can rename it in a snap:
  1. Right-click (Control+click on the Mac) the name of the bookmark whose name needs changing in the Bookmarks palette and click Rename on the context menu.
  2. Replace the existing name by typing the new name and then pressing Enter (Return on the Mac) or by clicking the mouse pointer somewhere outside of the bookmark name.
To delete a bookmark, right-click (Control+click on the Mac) the bookmark in
the Navigation pane and then click Delete on its context menu

Changing the page destination for a bookmark

If you find that you’ve linked a bookmark that goes to the wrong page, you can easily edit just its destination by taking these few steps:
  1. Using the buttons on the Navigation toolbar or navigation buttons on the Document window status bar, go to the correct destination page in the document for the bookmark.
  2. Right-click (Control+click on the Mac) the name of the bookmark whose destination needs editing in the Bookmarks palette and click Set Destination on the context menu.
  3. Click Yes in the alert dialog box that asks you if you’re certain that you want to make this change.
To test the edited destination, click the buttons on the Navigation toolbar or on the Document window status bar to move to a new page, and then click the bookmark to make sure that it now takes you to the right page.

Saturday, September 6, 2008

Making bookmarks to go to pages in the document


When you create a new bookmark to another page in the same PDF document, Acrobat records not only the page but also the page view and the magnification setting in effect as part of the bookmark’s destination. This means that the most productive way to create manual bookmarks is to first navigate to the destination page and make any desired change to the page view and/or magnification settings before you begin creating the bookmark. Although you can designate the destination page as part of the process of creating the new bookmark, going to the page and setting things up beforehand just makes the process all the easier and more efficient.

With this tip in mind, the steps for manually creating a bookmark to a new page in the same document are as follows:

1. Launch Acrobat and then open the PDF document to which you want to add bookmarks.

2. If necessary, open the Navigation pane by pressing F6 and click the Bookmarks tab to display its palette on top.

3. Using the buttons on the Navigation toolbar or navigation buttons on the Document window status bar, go to the destination page in the document for the first bookmark.

4. If you want the destination page to be displayed in a different page view or magnification, select the appropriate options from the View menu or click the appropriate buttons on Zoom toolbar and the Document status bar.

5. Choose the New Bookmark command on the Options menu at the top of the Bookmarks palette or right-click the Document window to open its context menu, and then click New Bookmark (you can also press Ctrl+B on Windows or Ô+B on the Mac). A new bookmark icon named Untitled is added.

6. Type a descriptive name for your new bookmark and then press the Enter key (Return on the Mac) or click the mouse pointer somewhere outside of the bookmark name to add it to the list in the Bookmarks palette.

How to generate automated bookmarks?


When you use the PDFMaker plug-in to convert documents created with Microsoft Word for Windows to PDF, you can specify that the document heading and other styles, cross-references, and footnotes automatically be converted into bookmarks in the final PDF file. Also, when capturing Web pages, Acrobat can automatically generate bookmarks for each page that you capture. When the Add Bookmarks to Adobe PDF option is selected during conversion, the bookmarks automatically generated from Word documents with the PDFMaker 6.0 and from Web pages in Acrobat 6 are saved as a special type called tagged bookmarks. Tagged bookmarks keep track of the underlying structure of the document (such as heading levels and paragraph styles in Word documents and HTML tags in Web pages) by tagging these elements. You can use the elements stored in any tagged PDF document or captured Web page to automatically generate bookmarks for any particular element in the document. To generate automatic bookmarks for a tagged file, click the Options pop-up menu on the Bookmarks palette and then click New Bookmarks from Structure on the menu to open the Structure Elements dialog box. Note that the New Bookmarks from Structure menu item is grayed out if the PDF document you’re working with isn’t tagged


To have Acrobat generate bookmarks for particular elements in the PDF document, you then select the names of the elements for which you want the bookmarks generated (Ctrl+click on Windows or Control+click on the Mac to select multiple elements) in the Structure Elements dialog box before you click OK. Acrobat then goes through the document, identifying the tags for the selected elements and generating bookmarks for each of them. Figure illustrates how this works. In this figure, you see a group of four automatically generated bookmarks created from the Figure tag in the original tagged PDF document. As you can see, when Acrobat generates these tags, it gives them the name of the tagged element used to create them (which in this case just happened to be Figure). These four Figure tags are automatically nested under a generic bookmark named Untitled. All that remains to do is to rename these bookmarks to something a little bit more descriptive, such as Table of Figures for the Untitled bookmark, Cover for the first Figure bookmark, Title Page for the second, Half Title Page for the third, and Copyright for the fourth and last bookmark.

The Ins and Outs of Bookmarks

Bookmarks are the links that appear on the Bookmarks palette in the Navigation pane in a PDF document. They are most often used to take you directly to different sections within the document. Bookmarks can take you to different pages in the document or even different views of a page. Bookmarks can also link you to different documents (PDF and non-PDF) on your computer, as well as to Web pages on the Internet. All of these functions make bookmarks perfect for providing review participants with a quick means of navigating to annotations and markups you make in a PDF document review cycle.

As if this weren’t enough, bookmarks can also perform certain actions in the PDF document, such as submitting a form’s data, playing a sound or movie, or selecting a particular menu item. To use a bookmark to jump to a particular page or page view, to open a new document or Web page, or to execute a command or perform a specified action, all you have to do is click the name or icon of the bookmark in the Bookmarks palette in the Navigation pane. If you want, you can have Acrobat automatically close the Navigation pane whenever you click a bookmark by selecting the Hide After Use setting on the Options pop-up menu at the top of the Navigation pane. This option is particularly useful for bookmarks that open pages in the document that are displayed in the Fit Width or Fit Visible page views and require maximum screen area for legibility.

Saturday, August 23, 2008

How to manage reviews with the Review Tracker?


The Review Tracker is a handy new feature that helps the review initiator organize participant comments, communicate with participants, and keep track of ongoing or completed review cycles, whether they are e-mail-based or browser-based reviews. To open the Review Tracker, choose Track Reviews on the Review and Comment Tasks button pop-up menu, or choose Open Review Tracker on the Options pop-up menu at the top of the Comments palette in the Navigation pane. As you can see in Figure above, the Review Tracker has two pop-up menus, Show and Manage, as well as two list boxes, one on top of the other.

The Show pop-up menu lets you specify which reviews are displayed in the top list box. Choose either All, Active, Completed, Sent, or Received. Note that displayed reviews are categorized as either e-mail-based or browser-based. Attached Expand (+) and Collapse (–) buttons on these categories, when clicked, display or hide individual review document names. Clicking a review document name in the review list displays that review’s status information in the list box directly below. Clicking the Open button displays the review document in either Acrobat, if it’s an e-mail-based review, or in your Web browser, if it’s a browser-based review. Clicking the Remove button deletes the review from the Review Tracker. The Manage pop-up menu enables you to communicate with participants associated with the selected review and contains the following options:
  • E-mail All Reviewers: Used to send an e-mail message to all reviewers associated with the selected review.
  • Send Review Reminder: Used to send a gentle (or otherwise) reminder to those participants who might be lagging in their rate of review contribution.
  • Invite More Reviewers: Used to liven up the party, especially if you find yourself using the Send Review Reminder command a little too often.
  • Go Back Online: Activates when you select a browser-based review in the Review Tracker list. This command, surprisingly enough, enables you to go back online and refresh the selected browser-based review for those who might be online at the very moment you decide to change the review status.
The Review Tracker also has the standard How To window navigation buttons at the top of the pane — How To, Home, Back, Forward, and Hide. Just don’t click the Home button and expect to be able to click the Back button to redisplay the Review Tracker. In order to reopen the Review Tracker, you have to use the Review and Comment Tasks button or the Options command on the Comments palette in the Navigation pane.


When participants open the FDF setup file attached to their invitation e-mail, a copy of the PDF review document is opened in their browser. In addition to the basic Adobe Reader tool set displayed in the browser window, you also get the Review and Comment Tasks button, that allows you to annotate the PDF in your browser. The following list gives you some pointers on making a review cycle run smoothly, whether you’re the initiator or a participant in a browser-based review:

  • You must use Acrobat 6 Professional or Standard versions to participate in a browser-based review.
  • You must open the FDF file attached to your invitation e-mail in order to participate in a browser-based review.
  • To annotate a PDF file, use the tools and commands on the Review and Comment Tasks button because the menu commands in this case are browser-specific. The Review and Comment Tasks button also contains commands for displaying the Commenting and Advanced Commenting toolbars. Like all tool bars in Acrobat, these can be displayed as either floating or docked.
  • In order to be able to see other participant’s comments, your Reviewing preferences must match those of the review initiator. If you can’t see other people’s comments, request the correct server settings from the review initiator and make sure you have access to that location.
  • To view updated annotations from other participants or to enable others to view your recent contributions, choose Send and Receive Comments on the Review and Comment Tasks pop-up menu.
  • When you’re finished adding annotations to a PDF review document, you can change the status of your review to completed to communicate that fact to the review initiator and other participants. You complete a review by choosing Review and Comment➪Set Review Status➪Completed from the Review and Comment Tasks button pop-up menu.
  • If you’d like to perform your review in Acrobat rather than your Web browser, click the Save and Work Offline button on the Commenting toolbar.
  • If at anytime you’ve stopped adding annotations to a PDF review document and want to continue the process, either reopen the FDF attachment in your original e-mail invitation or, if you’ve saved the document to work offline, open it in Acrobat and choose File➪Go Back Online. This command reopens the PDF document in your browser and uploads your comments.
  • Use the Review Tracker to manage the annotations you collect in a review cycle, whether it is an e-mail-based review or a browser-based review. See the next section for details.


How to initiate a browser-based review?


After setting up your Reviewing preferences, you’re ready to upload the PDF review file and specify review participants. Keep in mind that though the PDF review file and the FDF setup file do not have to be in the same location, participants must have access to both files on a network in order to review the PDF document. Also note that you should wait until you’ve uploaded a PDF for review to make any initial comments. If you don’t, any comments you make to a PDF file prior to uploading will be embedded in the PDF document and you won’t be able to further edit them. To upload your PDF document and initiate a browser-based review, follow these steps:
  1. Open the PDF review document in Acrobat and choose File➪Upload for Browser-Based Review.
  2. In the Upload for Review dialog box that appears, click My Network and locate the folder in which you want to store the PDF review file. Make sure that all participants have access to this network location.
  3. Click the Upload button to copy the PDF review document. When your PDF file finishes uploading, the Start Browser-Based Review dialog box appears,
  4. In the Start Browser-Based Review dialog box, enter participant addresses in the To, Cc, or Bcc text boxes.
  5. Edit the default text in the Subject and Message to Reviewers text boxes and click the Send button. If your default e-mail client displays an alert dialog box asking you to verify sending the e-mail, click the Send button again to send an e-mail message to participants that specifies the location of the PDF review file.

If the PDF file you want to have reviewed already exists on a server, you can initiate a browser-based review as well as invite new participants to the review cycle by first navigating to the file and opening it in your browser. The Review and Comment Tasks button appears in your browser window; from its pop-up menu, choose Invite Others to Review This Document to open the Start Browser-Based Review dialog box, where you enter participant addresses before clicking the Send button. You can also use this same command in Acrobat 6 during an e-mail-based review to invite more participants to review your PDF document.