Showing posts with label a40. Viewing Comments in a PDF Document. Show all posts

Thursday, December 11, 2008

Removing all comments


After you’ve made all the required editing changes, you can remove all the comments and various markings from the original PDF document by opening the Comments palette, selecting all the comments listed, and then clicking the Delete the Selected Comment button on the Comments palette button bar. To select all comments, make sure all comments are collapsed by clicking their Collapse buttons (minus sign in Windows, triangle pointing down on the Mac), click the top comment group in the Comments pane, and then Shift+click the remaining comment groups. Note that Acrobat does not display an alert dialog box asking for your confirmation before removing all the comments in the current PDF document. You can, however, restore them by choosing Edit➪Undo Multiple Deletes or by pressing Ctrl+Z (Ô+Z on the Mac). Before you make your edits and remove all the comments, use the File➪Save As command and rename the file to make a copy of the PDF document with all its comments. That way, you always have a copy of the original file with all the reviewers’ feedback.

Friday, November 28, 2008

Searching for comments


You can have Acrobat search comments for particular words or phrases by clicking the Search Comments button on the Comments palette button bar to open the Search PDF pane with only Search Comments options displayed.
Follow these steps in using the Find Comment dialog box:
  1. In the What Word or Phrase Would You Like to Search For? text box, enter the word or phrase in the comment(s) you want to locate as the search text.
  2. To prevent Acrobat from finding the search text inside of other words (as in her in the word there), select the Whole Words Only check box.
  3. To match the capitalization of the search text, select the Case-Sensitive check box.
  4. Click the Search button to begin your search. After Acrobat scans the PDF document, it displays the search result in the Search PDF pane, letting you know that it’s finished searching for your term, displaying the number of total instances found and the actual result(s) in the Results list box. Clicking an item in this list selects not only the icon or markup associated with the search result comment text in the PDF document, but also the associated comment in the Comments palette.
  5. If no results appear after a search, click the New Search button to start the process over.
  6. When you finish searching the comments in the PDF document, click the Done button or the Hide button in the Search PDF pane.
Note that you can enter the name of an author (as it appears on the title bar of the comment boxes) in the What Word or Phrase Would You Like to Search For? text box to use the Search Comments feature to locate and select comments made by a single reviewer.
Don’t confuse searching for comments in a PDF document with searching for text in the document. You use the regular Edit➪Search command to search for words or phrases in the general text of the document. You use the Search Comments button in the Comments palette to search for words or phrases only within the comments that you’ve added or imported into the PDF document.

Locating comments in the Comments palette

To use the Comments palette to locate and select a particular comment in the document, follow these steps:
  1. Click the Comments tab on the Navigation pane or choose View>Navigations tabs>Comments to display the Comments palette.
  2. To choose a different sort order for the comments, select one of the options on the Sort By pop-up menu: Type, Author, Date Last Modified, Color, Checkmark Status, or Status by Person. By default, Acrobat sorts the comments in the Comments palette by page.
  3. Click the Expand button (a plus sign on Windows and triangle pointing right on the Mac) for the page, comment type, author, or date modified (depending upon how the list in the Comments palette is sorted) that you think contains the comment or comments you want to find.
  4. Click the icon for the comment you want selected in the expanded list of comments on that page.

When you click a comment in the Comments palette, Acrobat displays the page and the comment markup in the Document pane. Because the comment you selected in the Comments palette is also selected in the PDF document, if you want to change its setting, you can then open its Properties dialog box by rightclicking the markup and choosing Properties on the context menu. To open its comment box, however, you still have to double-click the selected text or icon. Note that you can also edit a comment directly in the Comments palette without opening the comment box attached to the markup in the PDF document.

Finding comments


Acrobat provides a couple of methods for locating the comments that you’ve added and imported into a PDF document: You can use the Comments palette in the Navigation pane to identify all the comments made on particular pages of the PDF document, or you can use the Search Comments button in the Comments palette button bar to search comments for particular words or phrases. The Search PDF pane is displayed by clicking the Search Comments button shown in the figure. Note that the Comments palette, because of its expanded button bar and greater content, is the only Navigation pane that displays horizontally rather than vertically. Unlike the other Navigation panes (Bookmarks, Pages, and so on), if the Navigation pane is open when you select the Comments palette, you can close the Navigation pane by clicking its Close button while leaving the Comments palette open, thus giving your document more horizontal viewing space. If the Navigation pane is closed when you select the Comments palette, it remains closed.

Showing and hiding comments

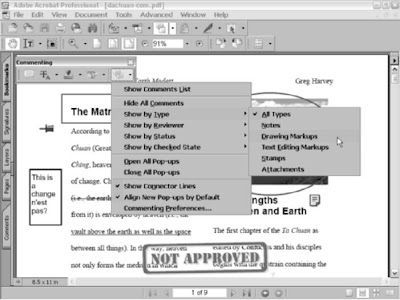
The Show menu button, located at the end of the Commenting toolbar, contains a large variety of options for displaying and hiding (also known as filtering) review comments attached to a PDF document, as shown in Figure. Filtering makes it easier to review annotations by allowing you to temporarily hide certain types of comments and only view those that you want to work with. For example, you can use the Show by Reviewer command to display only those comments made by a specific review participant. Note that the first time you use any of the Show menu commands in Acrobat 6, you may get a largely esoteric Hiding Comments with Replies alert dialog box telling you that Filtering does not apply to individual replies and that when you have a comment with replies that is hidden, all of its replies are hidden as well, regardless of whether they match the criteria for being hidden or not.
The gist is that you’ll have to use the Search Comments feature to find these comments and replies if you hide them. Select the Don’t Show This Message Again check box (unless you like this sort of abuse) and then click OK to close the alert dialog box.
To begin filtering a PDF review document, simply click the Show menu button on the Commenting toolbar and select a command on its menu or submenus. In Figure, I’m choosing Show>Show by Type>Drawing Markups. This command displays only those comments in the PDF document that were made with either the Pencil tool or the Rectangle tool. As the figure shows, in addition to displaying only Drawing Markups, you can also choose to display All Types of comments, only Notes, only Text Editing Markups, only Stamps, or only Attachments on the Show by Type submenu. Other filtering criteria on the menu include Show by Reviewer, where you can choose all participants or a specific participant, Show by Status, which gives you the option of displaying comments that have been Accepted, Rejected, Cancelled, or Completed (you can also choose All Status or None), and Show by Checked State, which displays only those comments that you’ve marked Checked or Unchecked.

These markups are for the use of the review initiator only and don’t appear to other review participants.
The following list describes other commands that appear on the Show menu that you can use to filter comments in a PDF document:
  • Show Comments List: Used to open the Comments palette in the Navigation pane.
  • Hide All Comments: This is a no-brainer. When you temporarily hide all comments, this menu command changes to Show All Comments so that you can redisplay all those you’ve hidden.
  • Open/Close All Pop-ups: Used to open or close all pop-up comments attached to markups for display, whether they are hidden or not.
  • Show Connector Lines: Used to add connector lines between markups and their associated comments. This is especially useful for comments placed outside the margins of a PDF document.
  • Align New Pop-ups by Default: Used to line up new pop-up comments along the right side of the screen, regardless of the location of its markup in the PDF document.
  • Commenting Preferences: Used to open the Commenting window in the Preferences dialog box in Acrobat 6.

Using summarize feature


After you’ve received reviewers’ comments in a PDF document, whether e-mail or browser-based, you can use the Summarize feature to create a summary report that lists all the different types of comments attached to a PDF document. This convenient feature lets you sort comments and specify a page layout in order to generate a printable comment synopsis. The summary is a separate PDF document that can be printed directly in Acrobat or saved and distributed to others for viewing and printing.
To generate a summary report, follow these steps:
  1. Choose Document➪Summarize Comments. The Summarize Options dialog box appears, as shown in Figure.
  2. Click one of the radio buttons in the Choose a Layout section of the Summarize Options dialog box to specify how the summary will appear onscreen or when printed. As you can see in Figure, in addition to having a lengthy description of the page layout attached to each radio button, you also get a graphic depiction of the selected page layout in the area above when you click a radio button.
  3. Choose a comment sort order for the summary by clicking the Sort Comments By drop-down list and choosing either Author, Date, Page, or Type.
  4. Select one of the Include radio buttons, either All Comments, which displays all comments whether they are hidden or not in summary, or Only the Comments Currently Showing, which keeps hidden comments hidden in the summary.
  5. Choose a Font Size radio button, either Small, Medium, or Large, to specify the size of displayed text in the summary.
  6. Click OK to close the Summarize Options dialog box and generate the summary report.
  7. Acrobat generates the summary report in a separate PDF document that it displays in the Document window using the Fit Width view. You can then save and print this summary file.